How to Take an Order in TechSuite POS
The Take Order page lets staff create orders, add items, assign customers, and complete payment from a single screen. It works for dine-in, takeaway, and delivery.
To Get Started
Open the TechSuite POS app and sign in. From the home screen, open the Take Order page for your terminal.
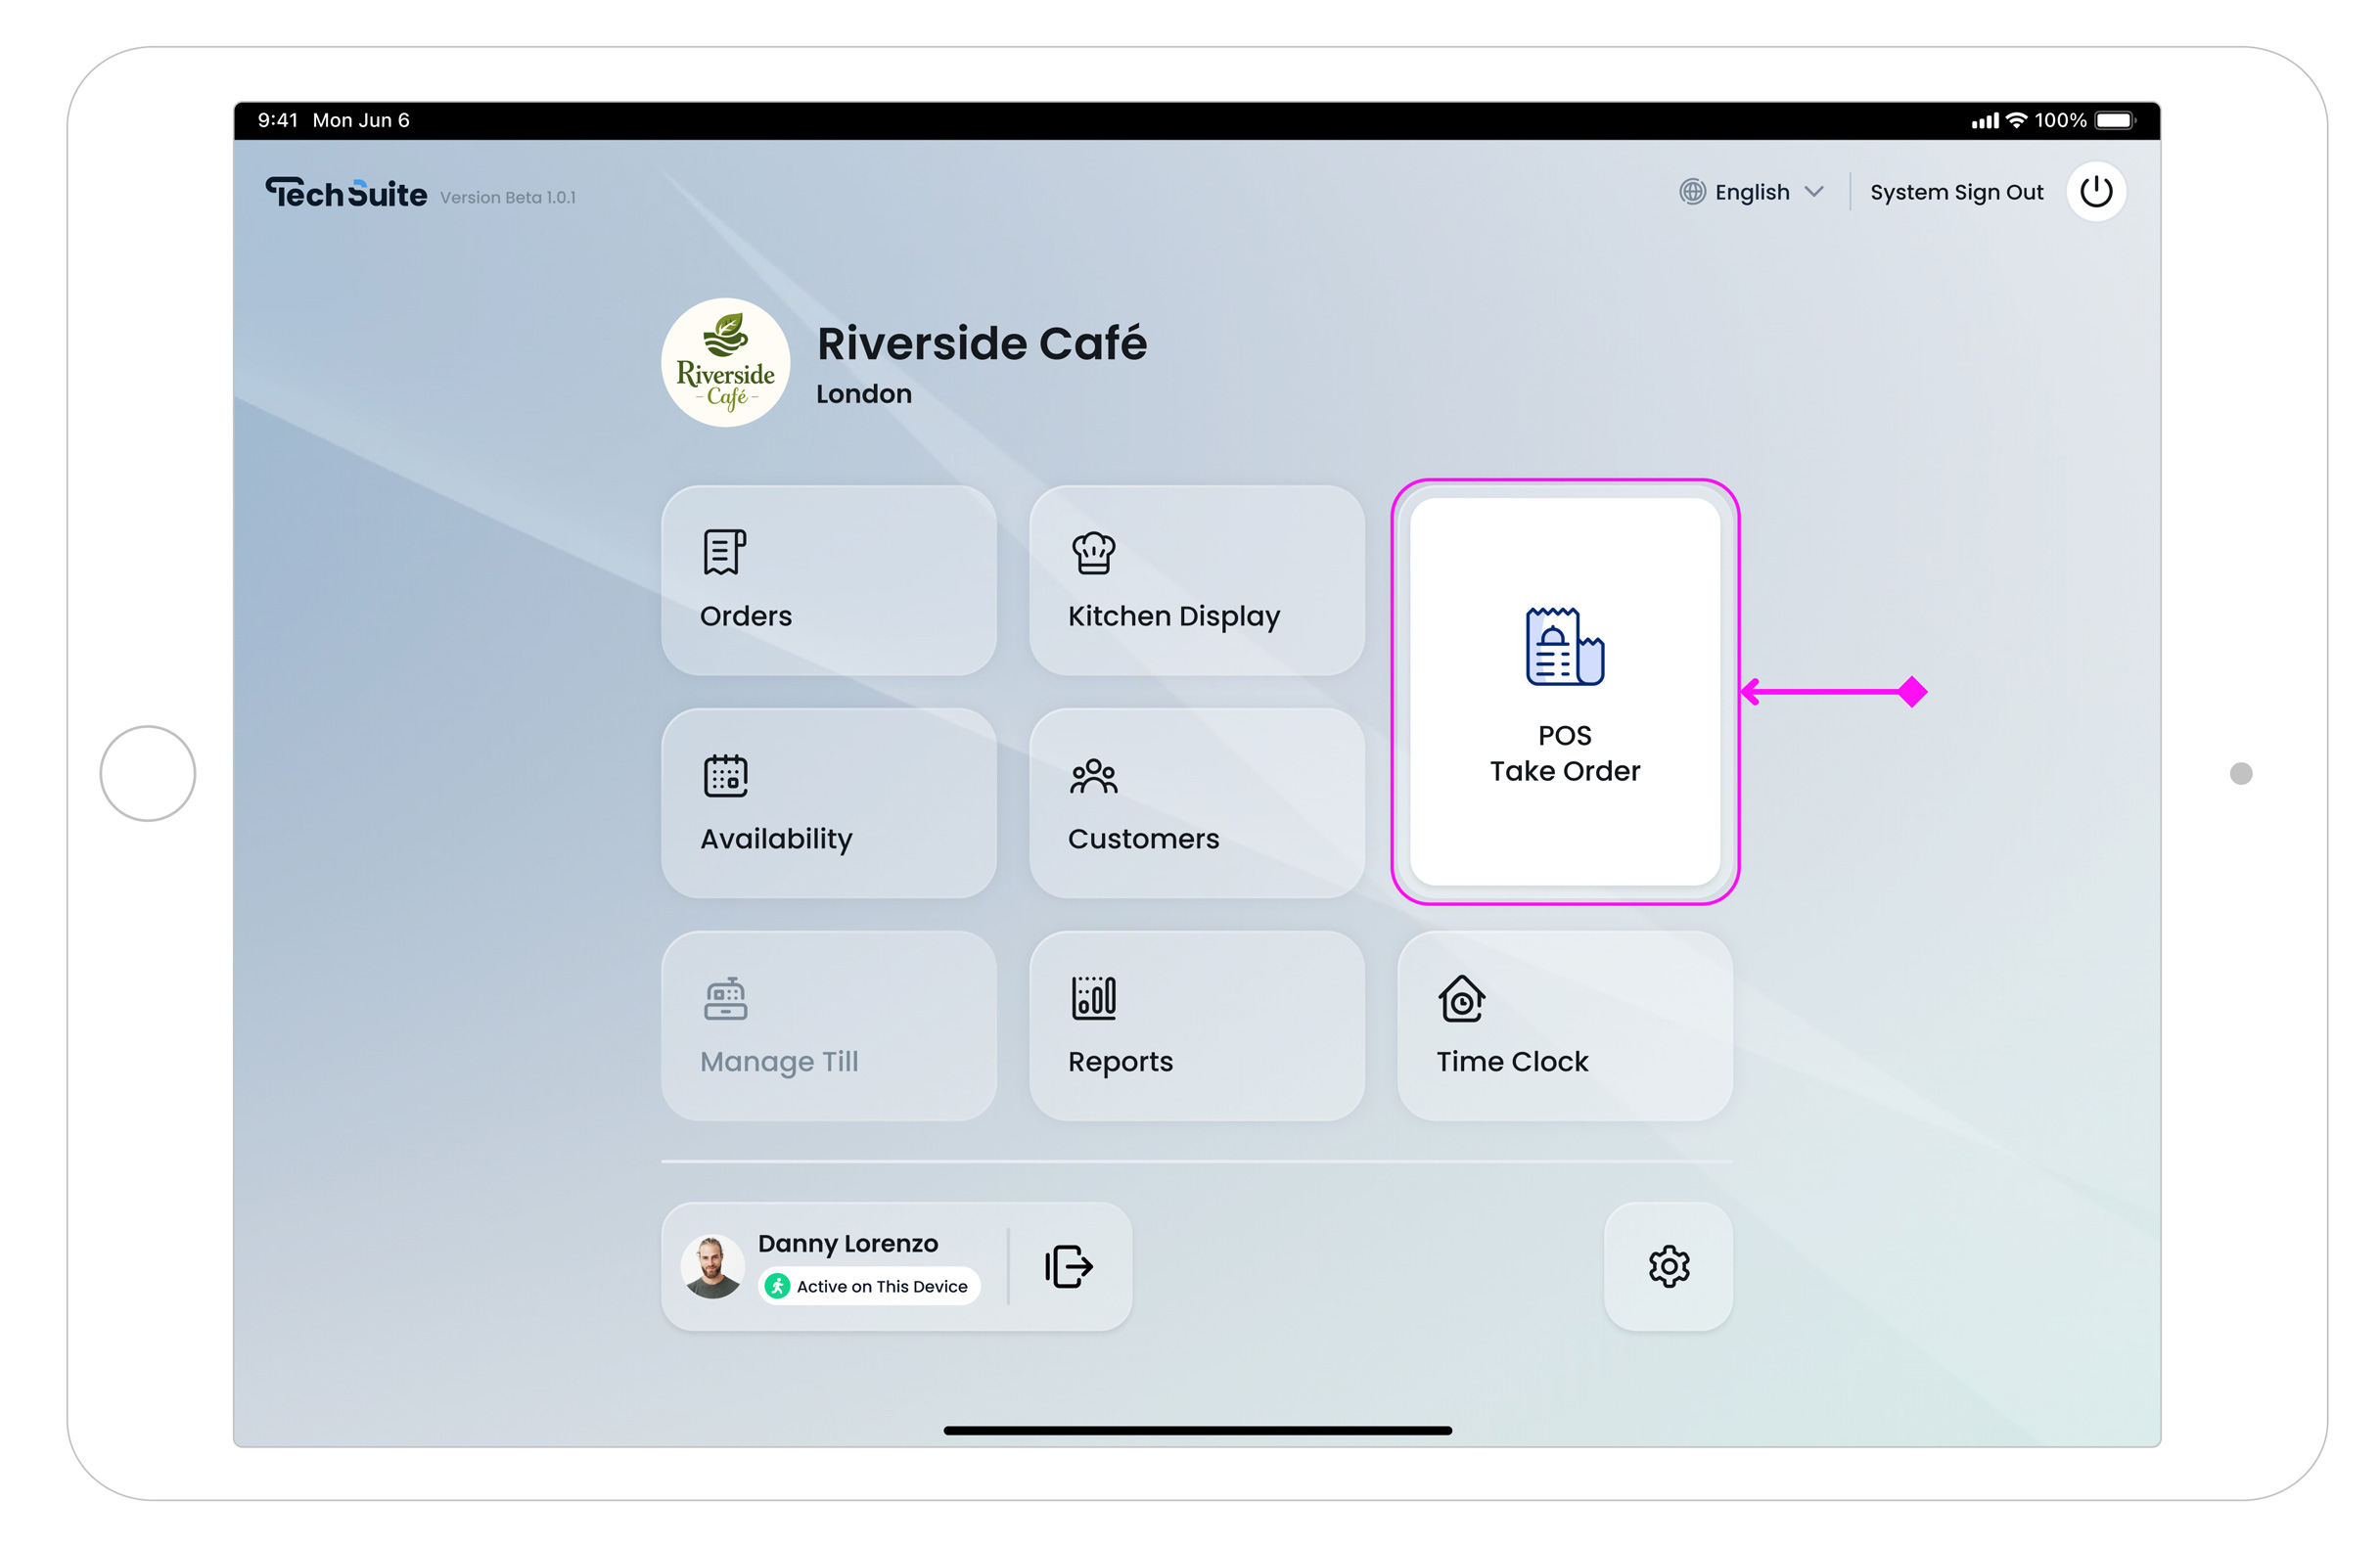
Step 1: Choose the Order Type
Tap the current order type shown in the top-left (for example, Dine-in, Delivery, Takeaway).
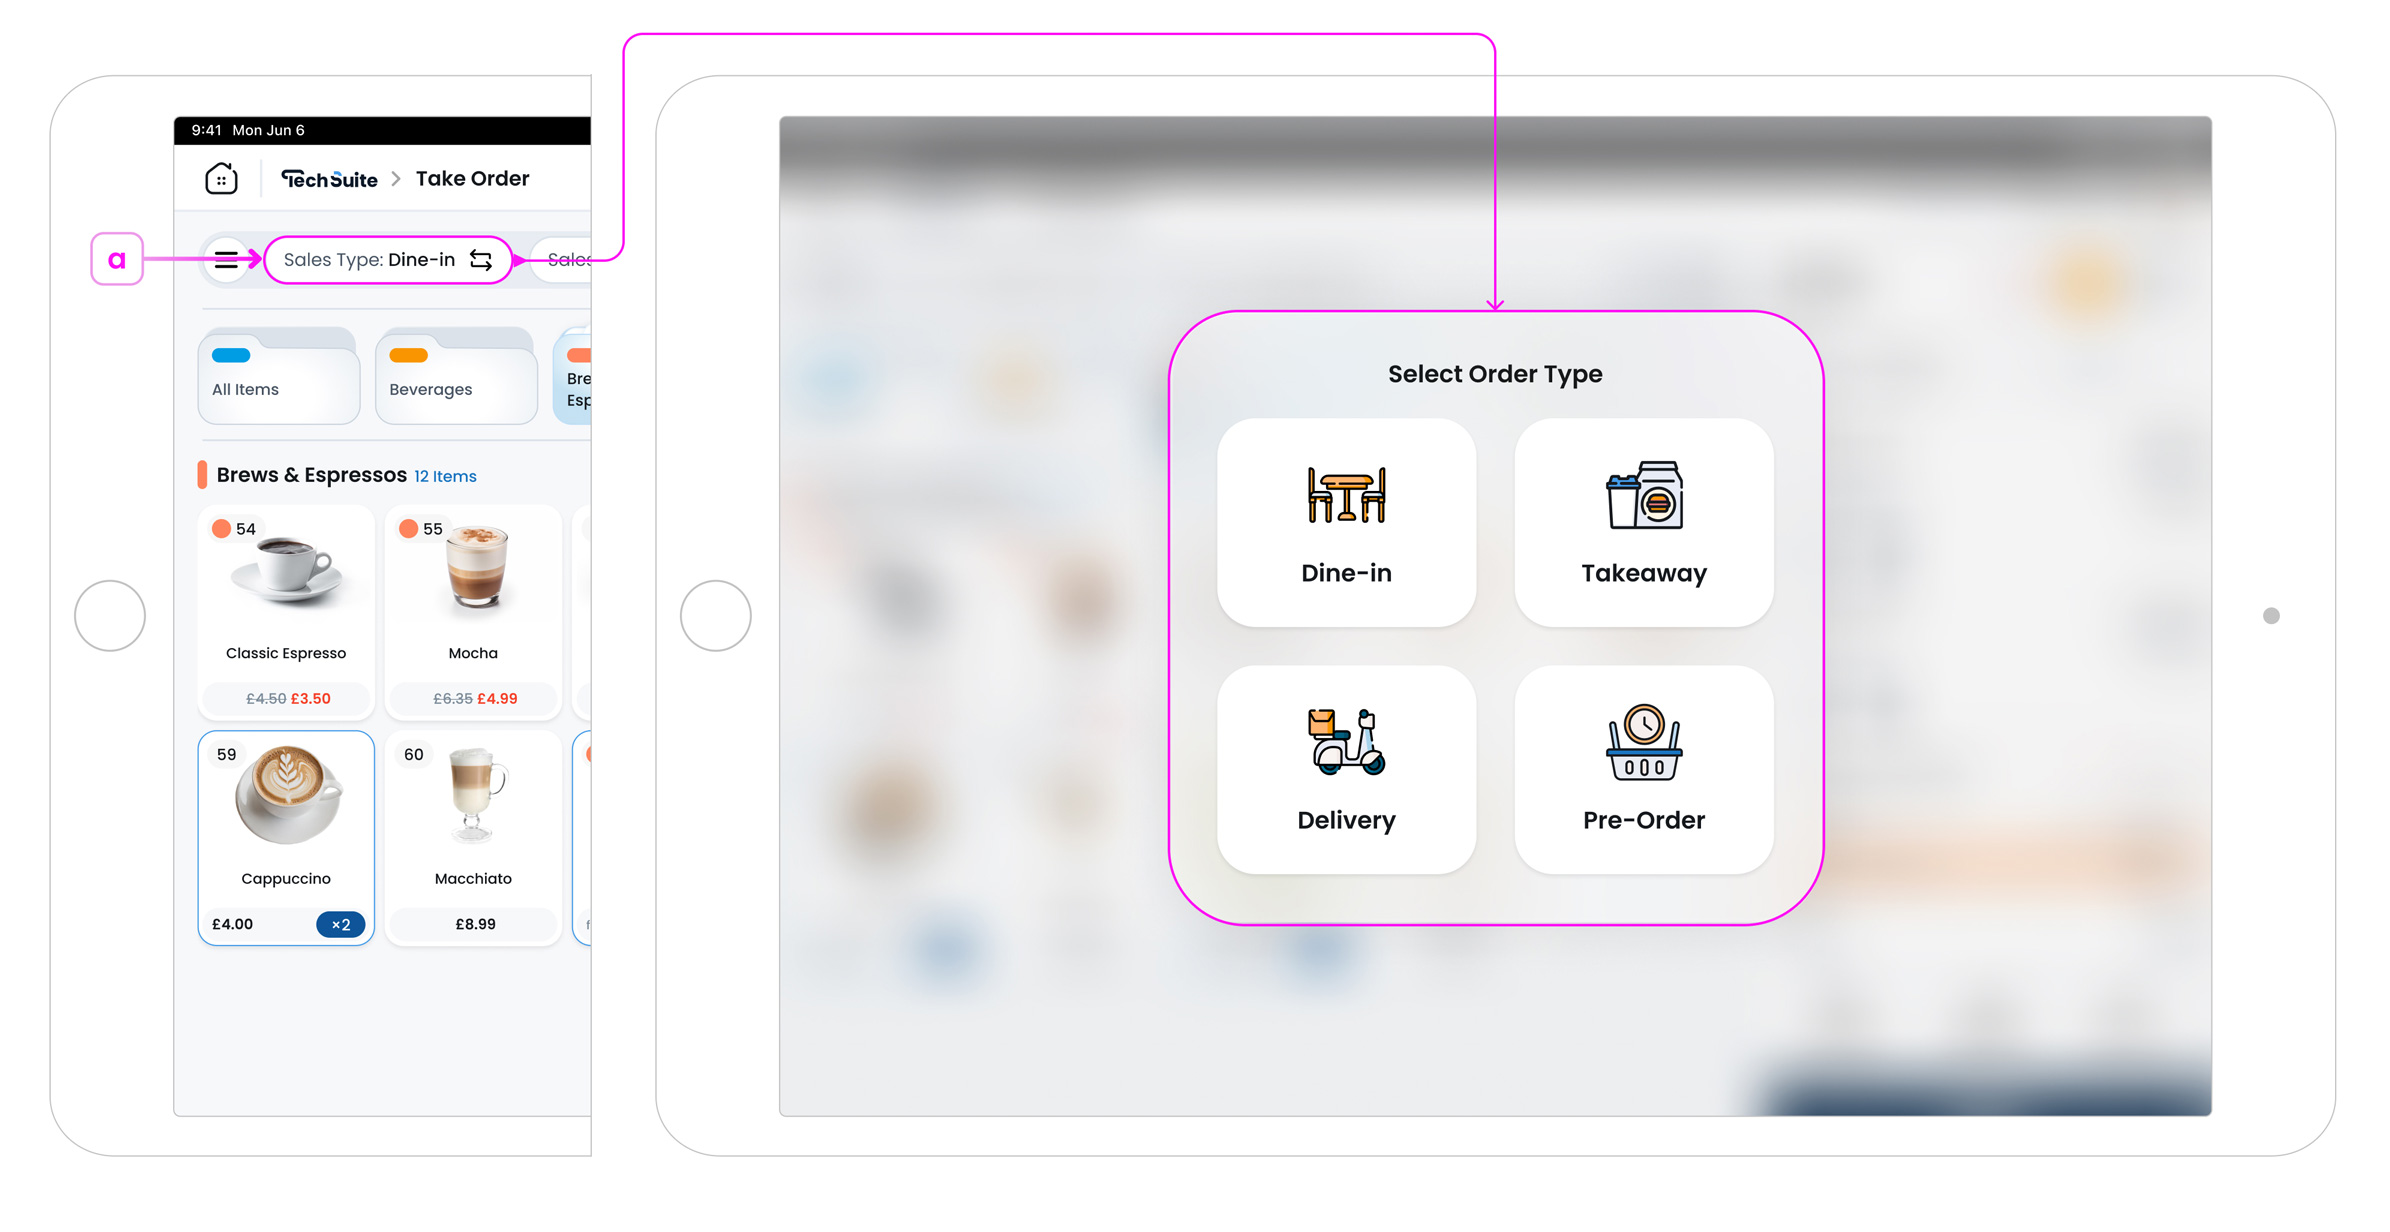
Popup behaviour
If the “Require order type before starting” popup is enabled in your POS Profile, a sales type popup appears before you begin every order and staff must ask the customer and confirm it. If it is disabled, you must set a default sales type in the POS Profile. The popup will not appear at the start, but staff can change the sales type at any time from the toolbar.
Step 2: Browse or Search for Items
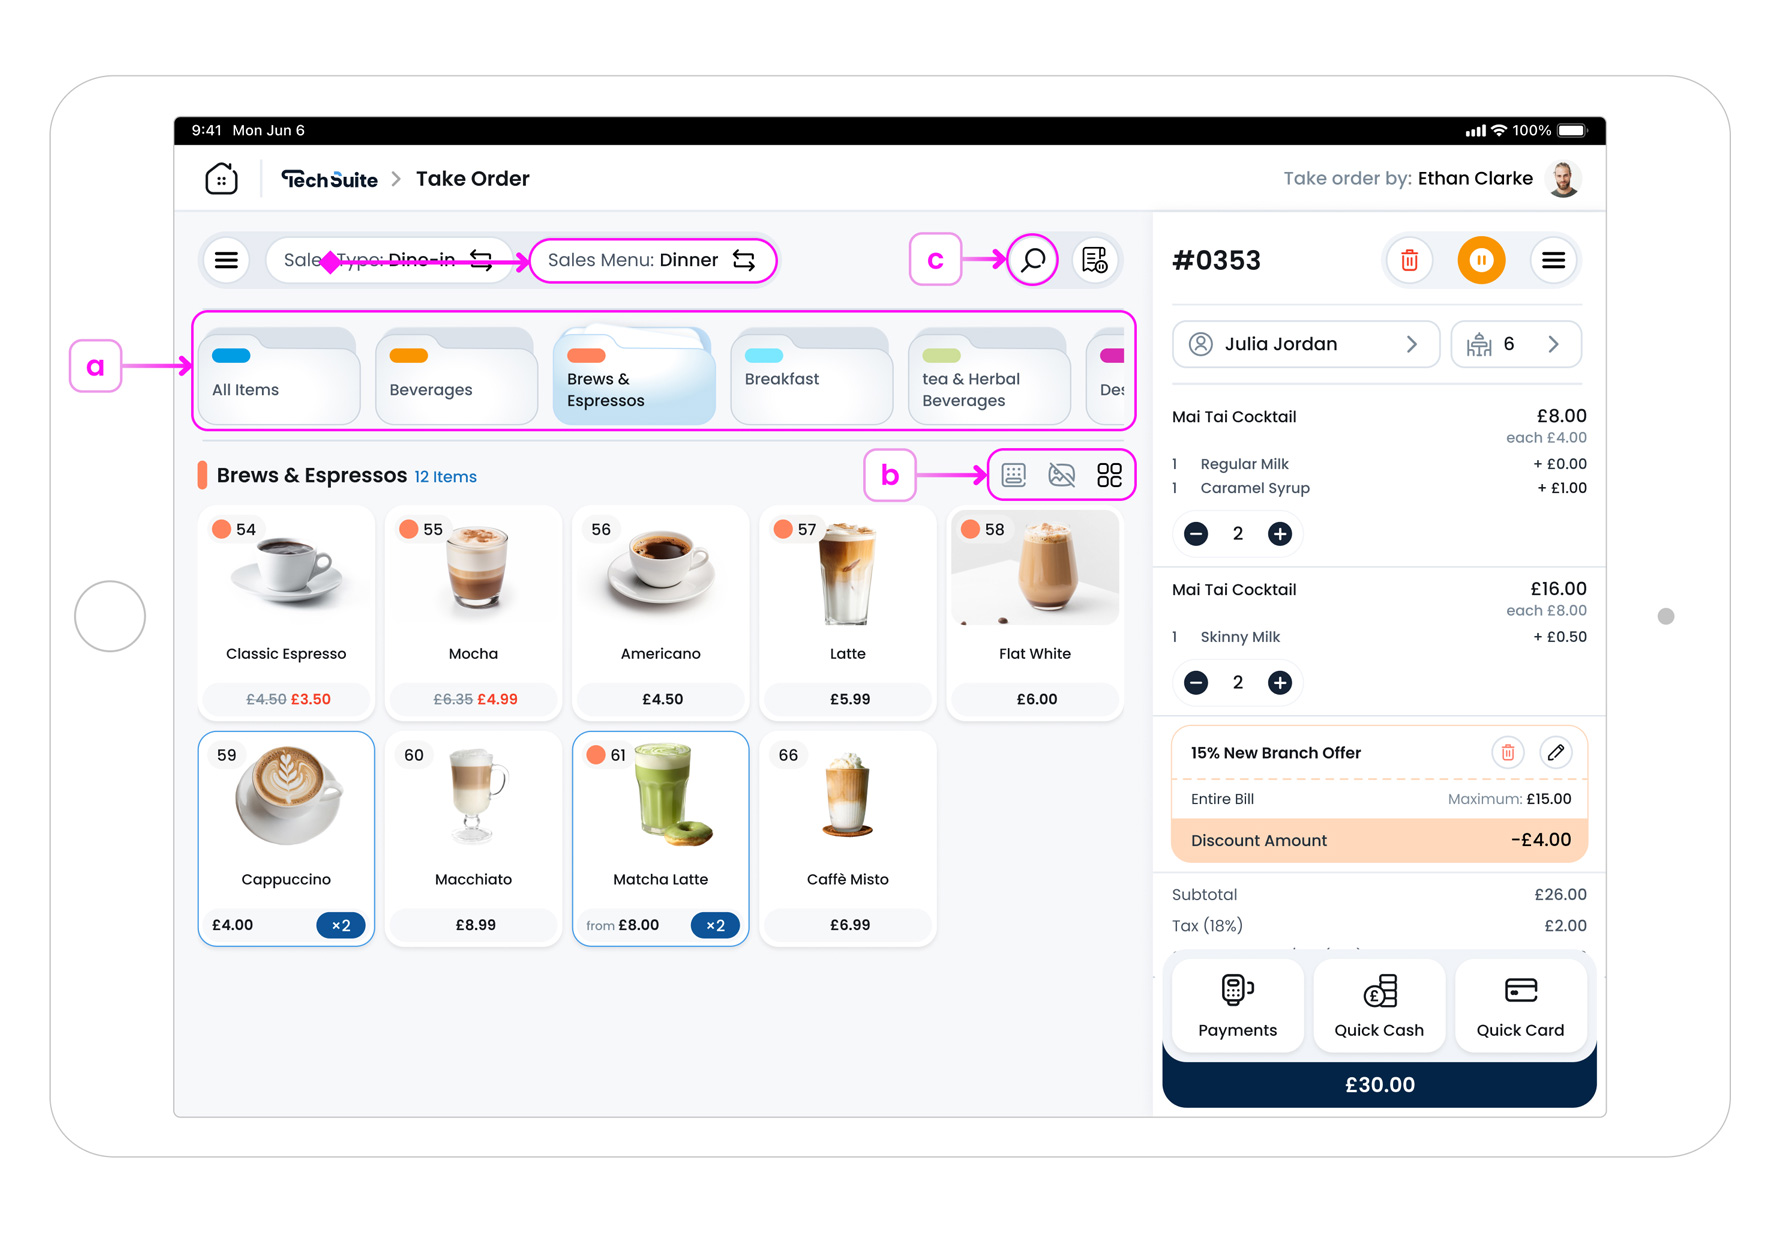
a. Categories
These come from the menu selected in the toolbar. If “All Items” is selected, POS shows all categories and all items in one place.
b. View Mode
Switch between Image Grid (shows item images), No Image Grid, and Code View to match your workflow.
-
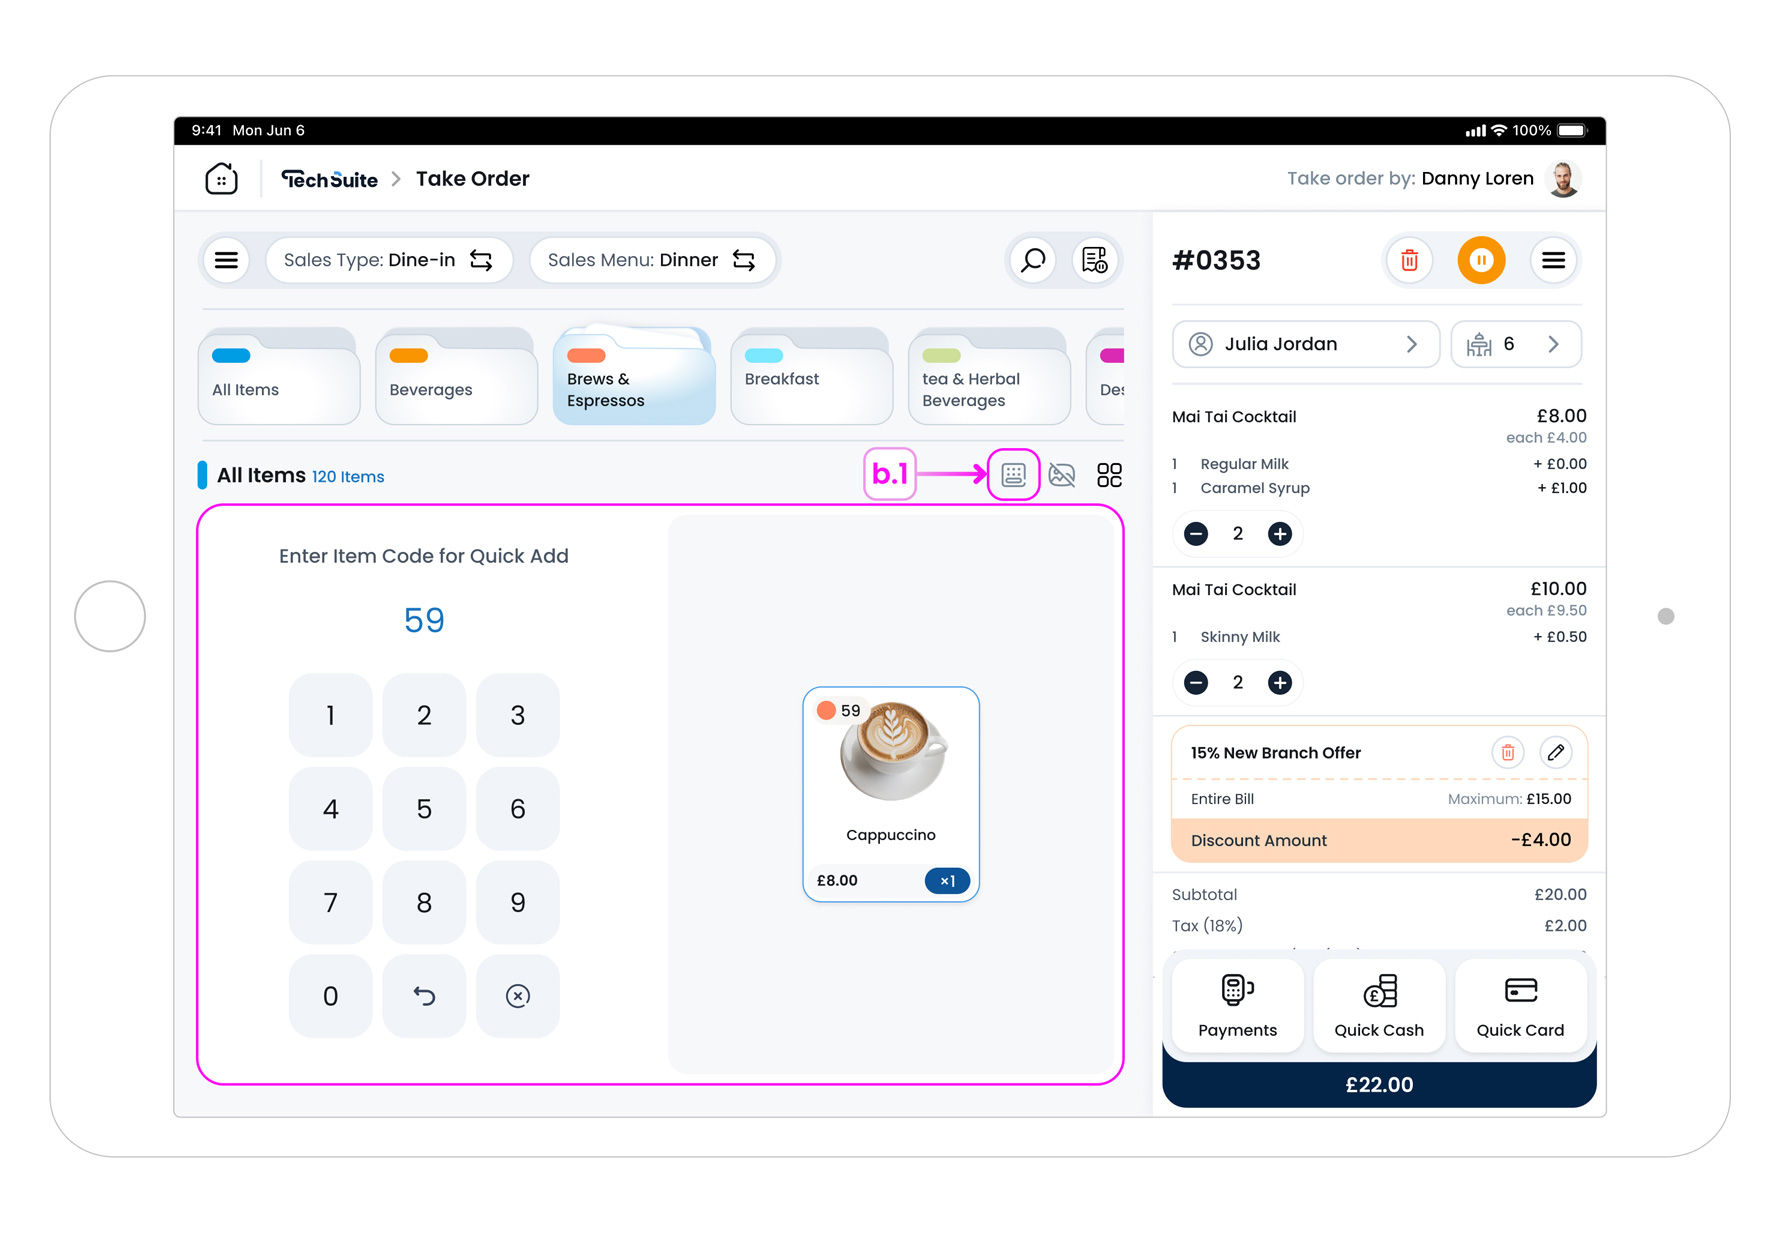
b.1. What is Quick Add by Code
Enter an item code using the keypad to add it fast. Great for high-volume counters, coffee bars, or teams that memorise popular codes.
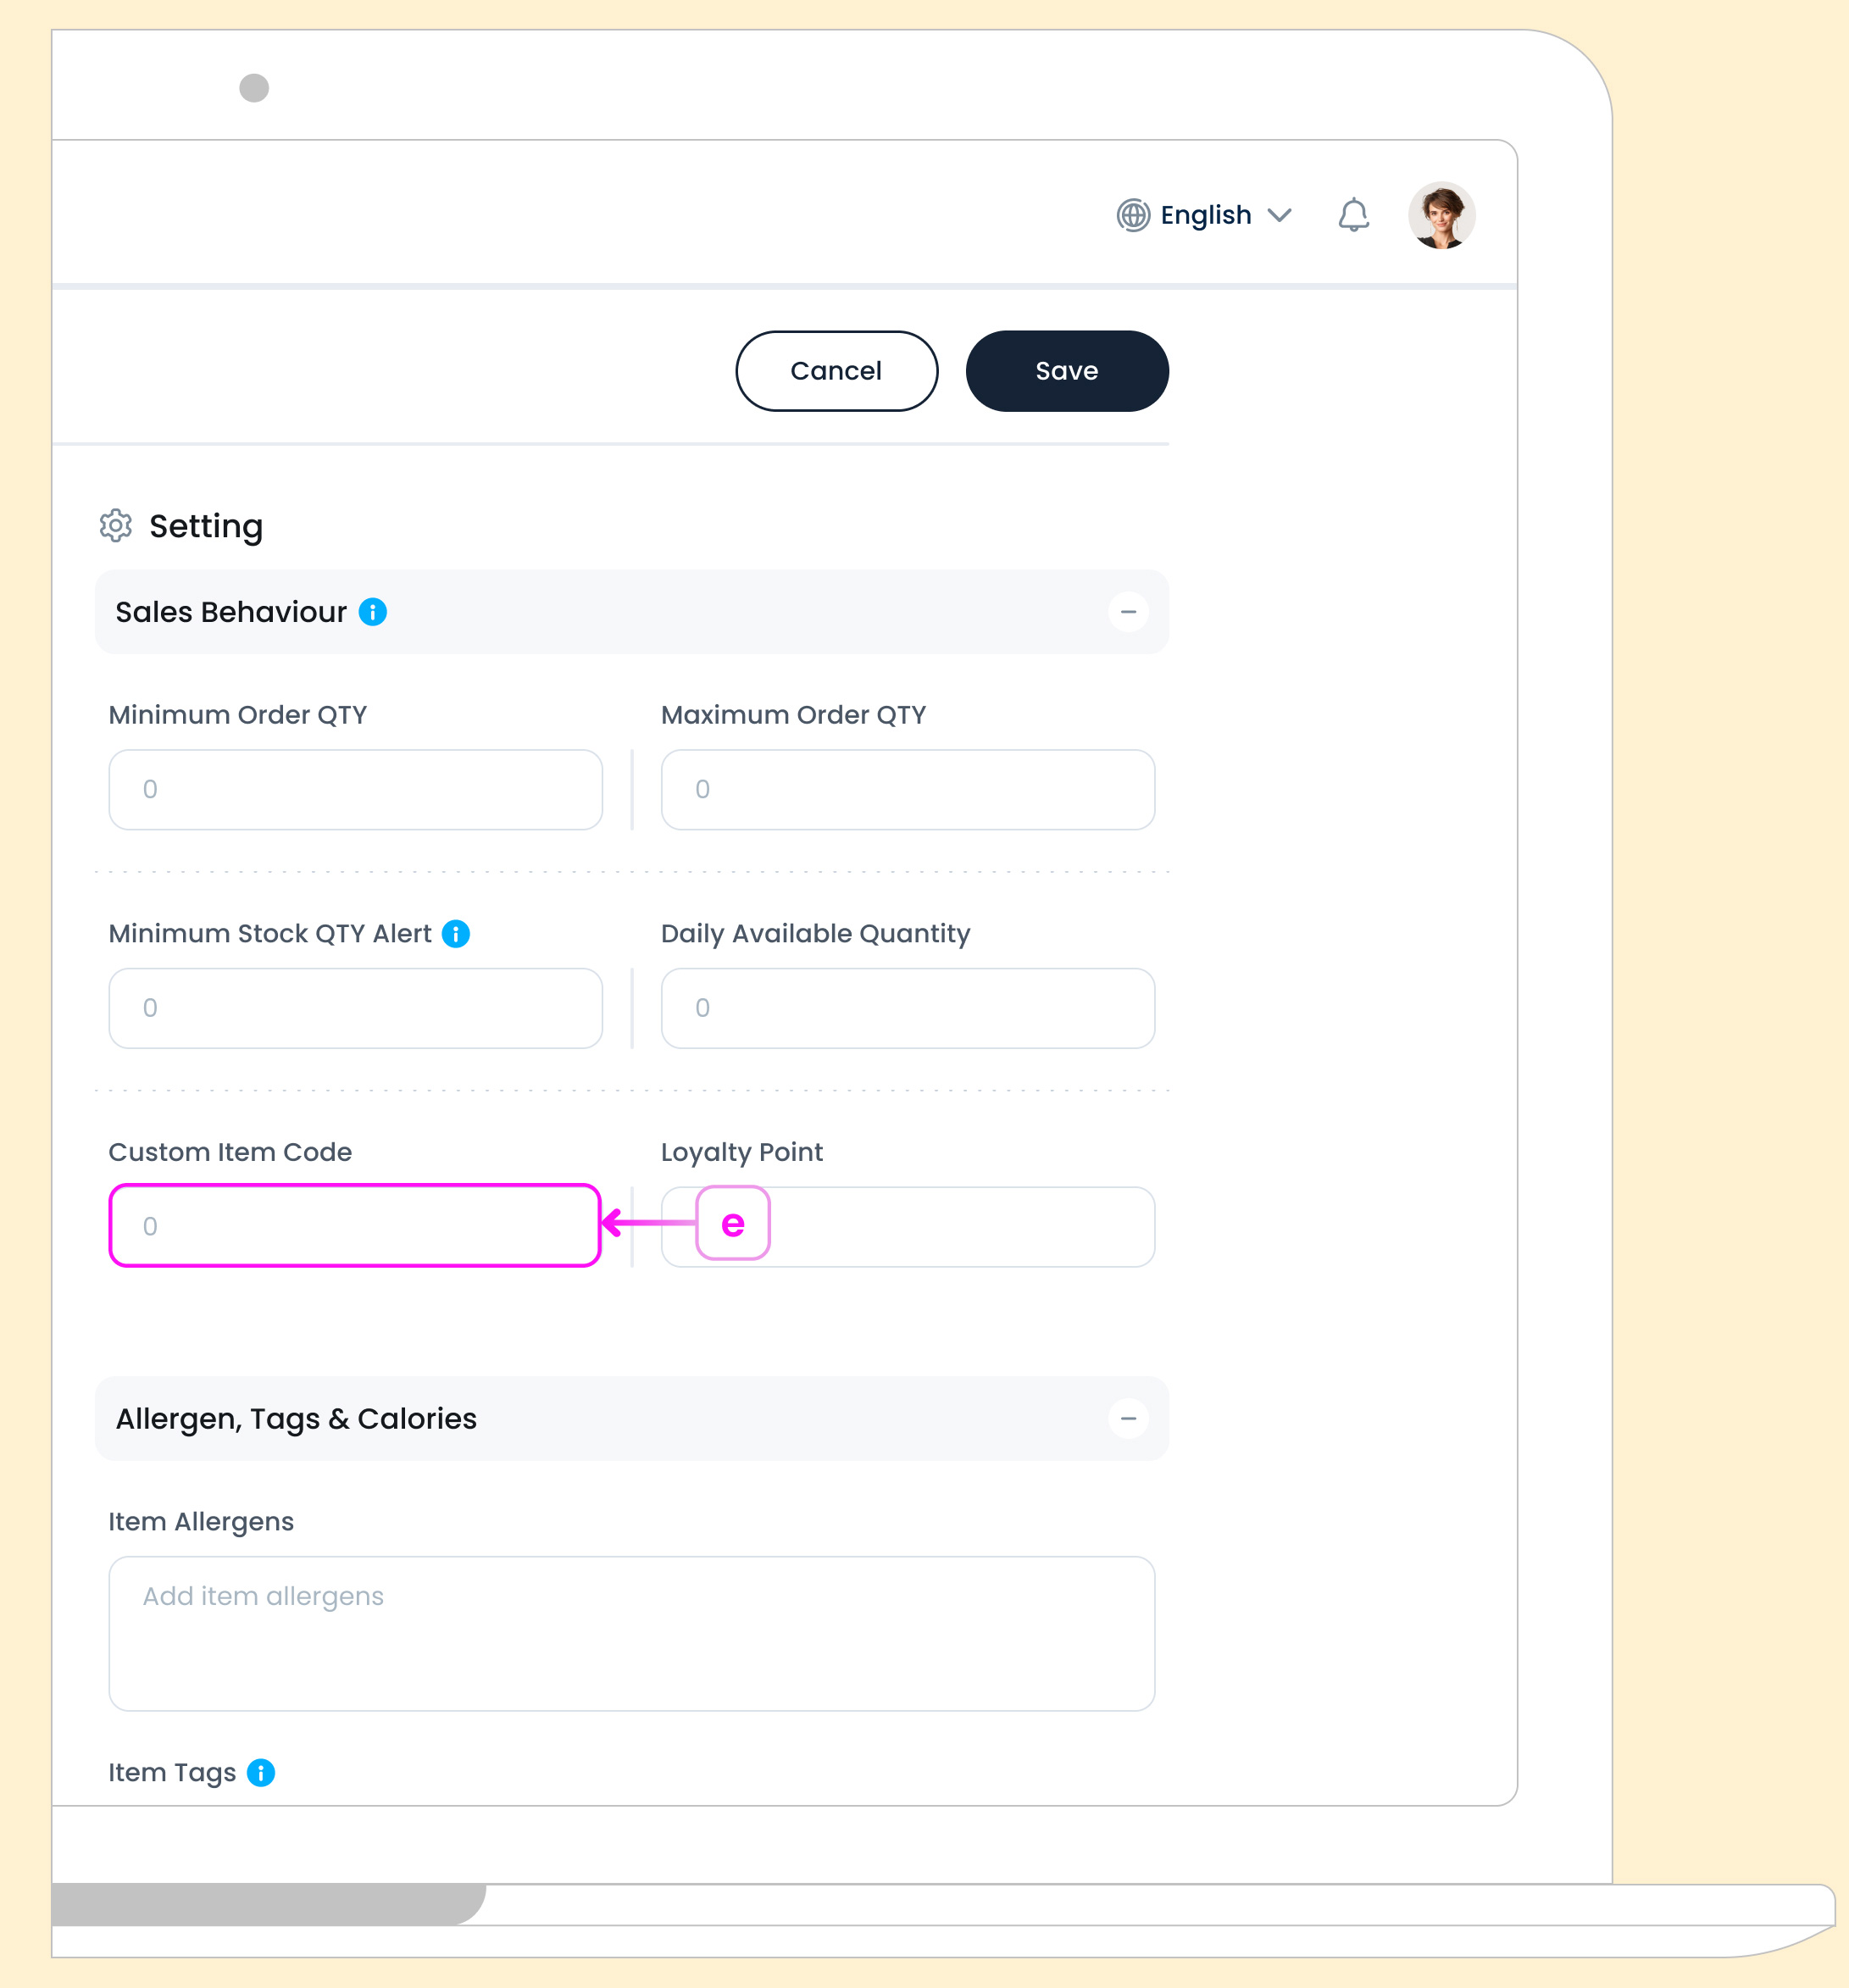
Tip
To use Quick Add by Code, set a code on each item in the item form. When creating a new item or editing an existing one, go to Sales Behaviour > Custom Item Code and enter the code. The POS keypad will recognise these codes immediately.
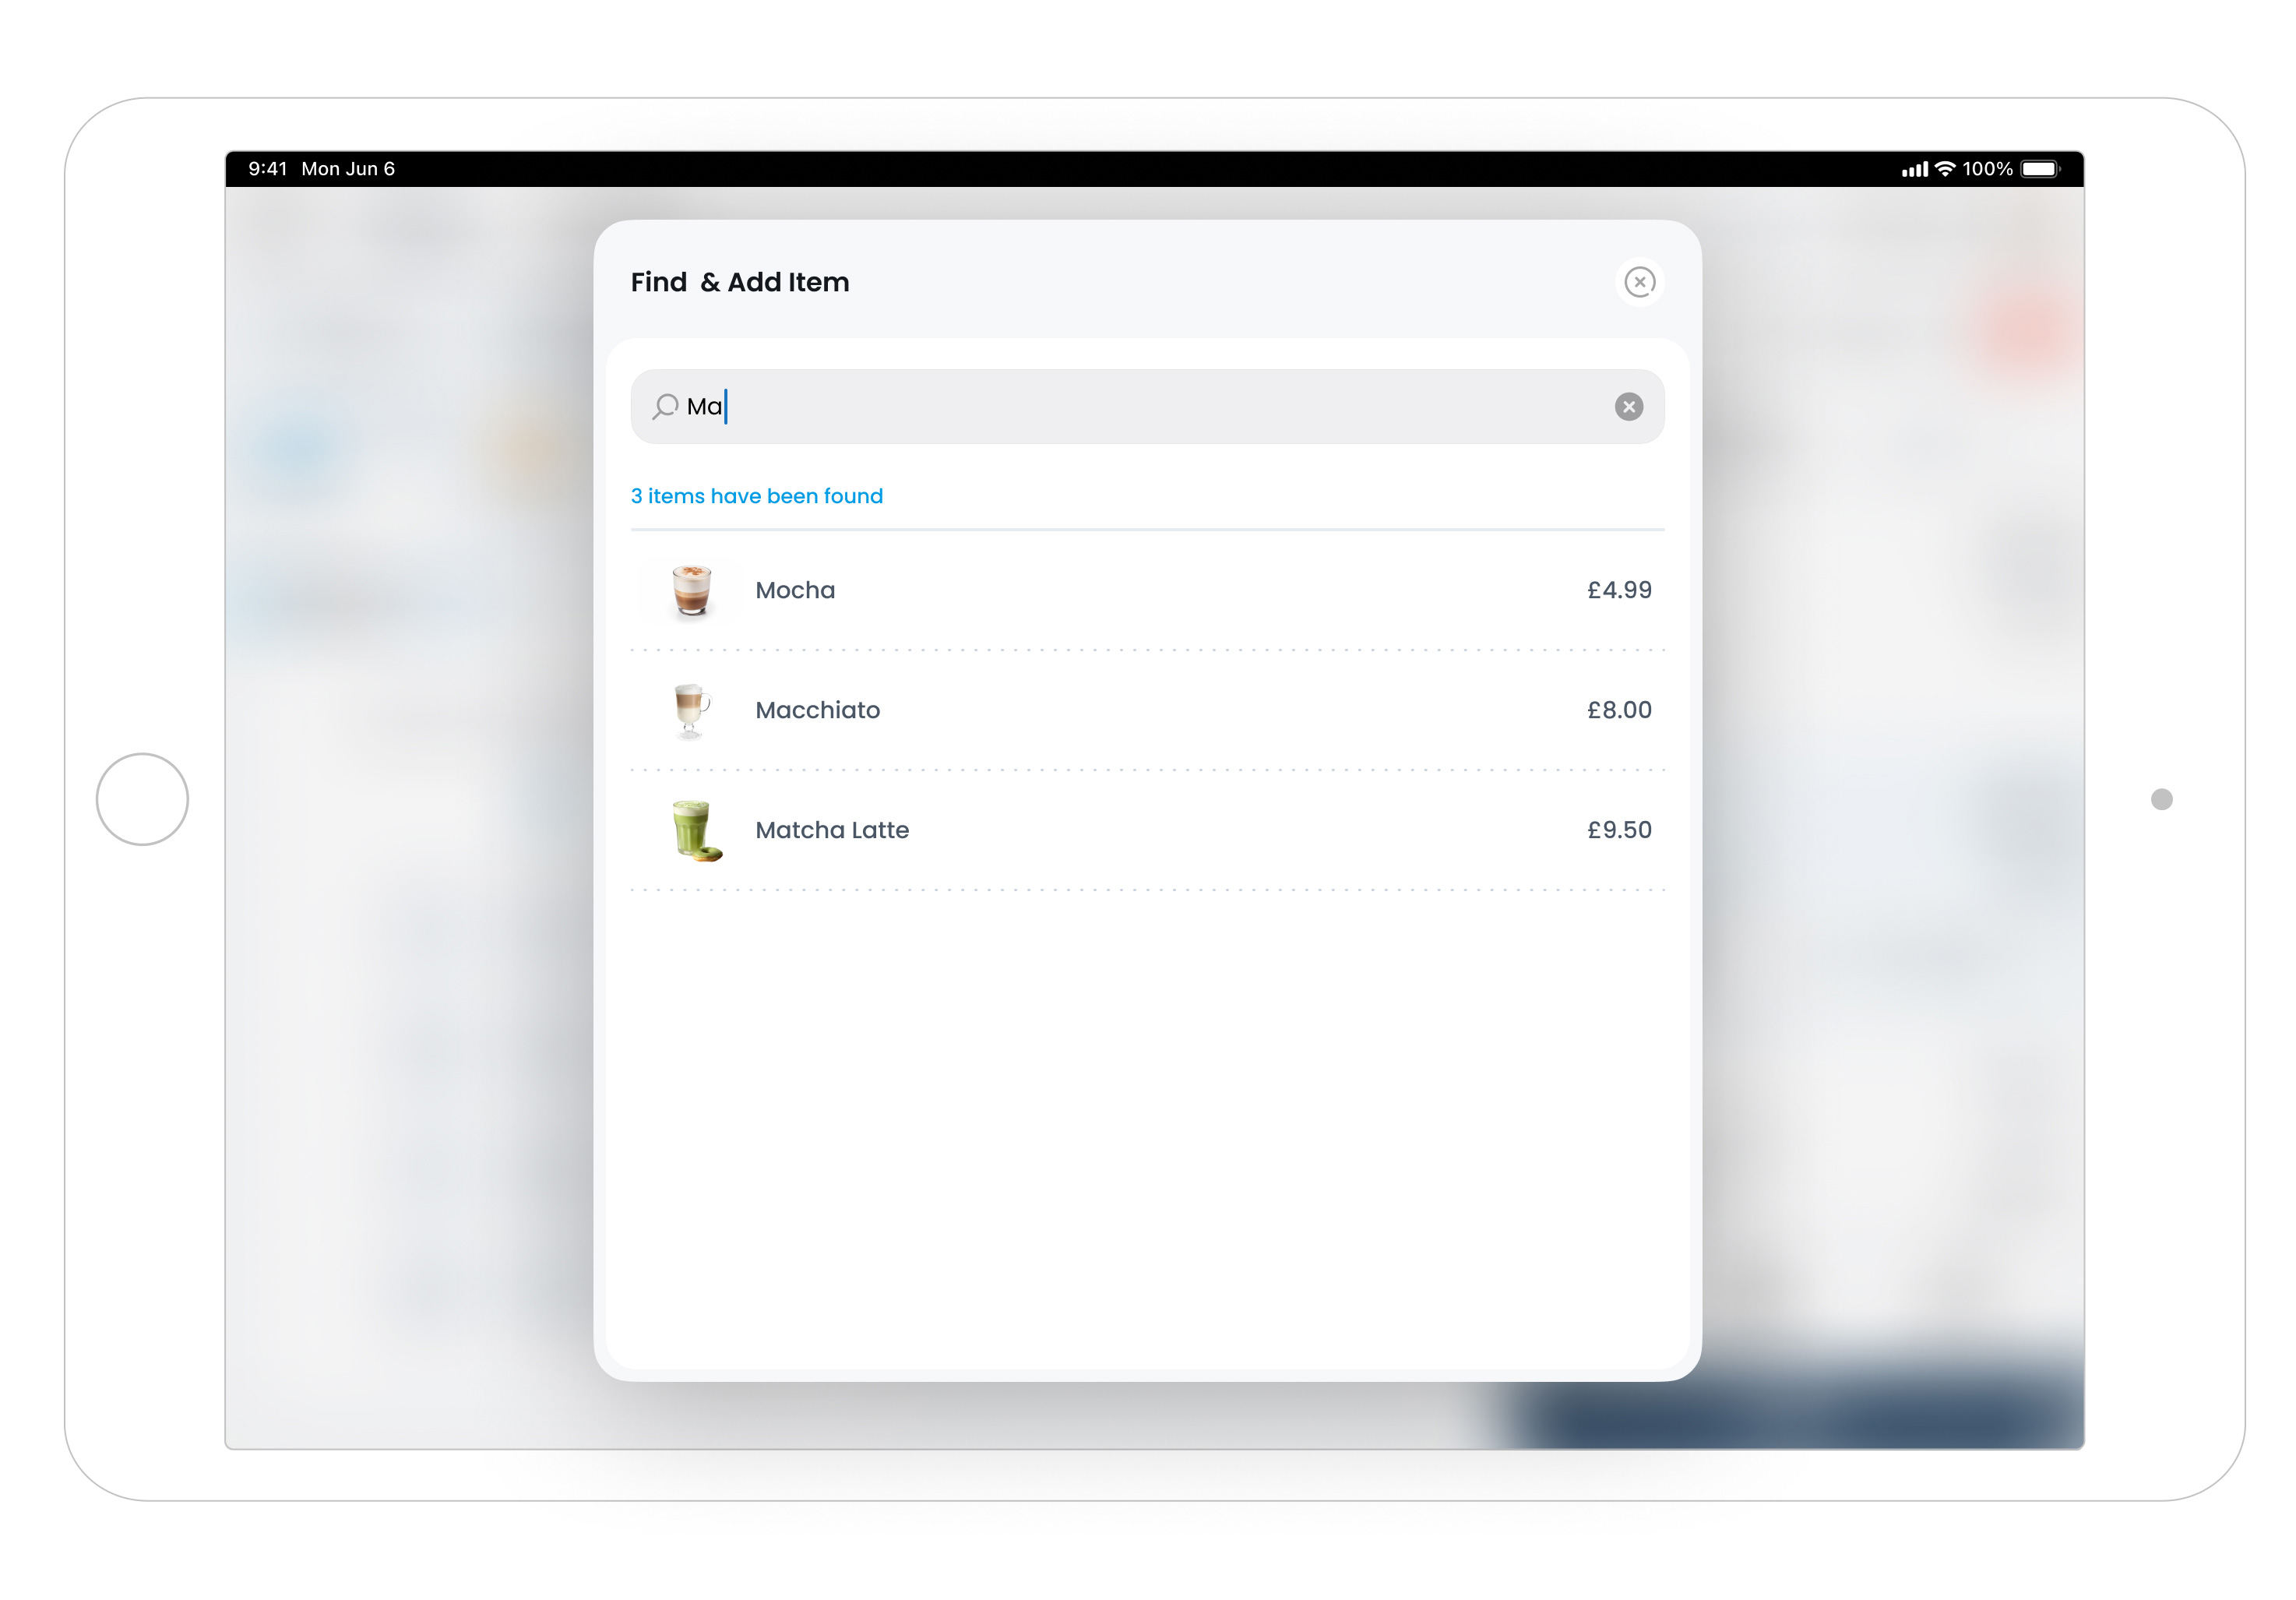
c. Search
Tap the magnifying glass to find items by name. Type a full or partial name to filter quickly.
Tip
Items follow availability rules from the Portal. Unavailable items are hidden automatically based on menu, time, and sales type.
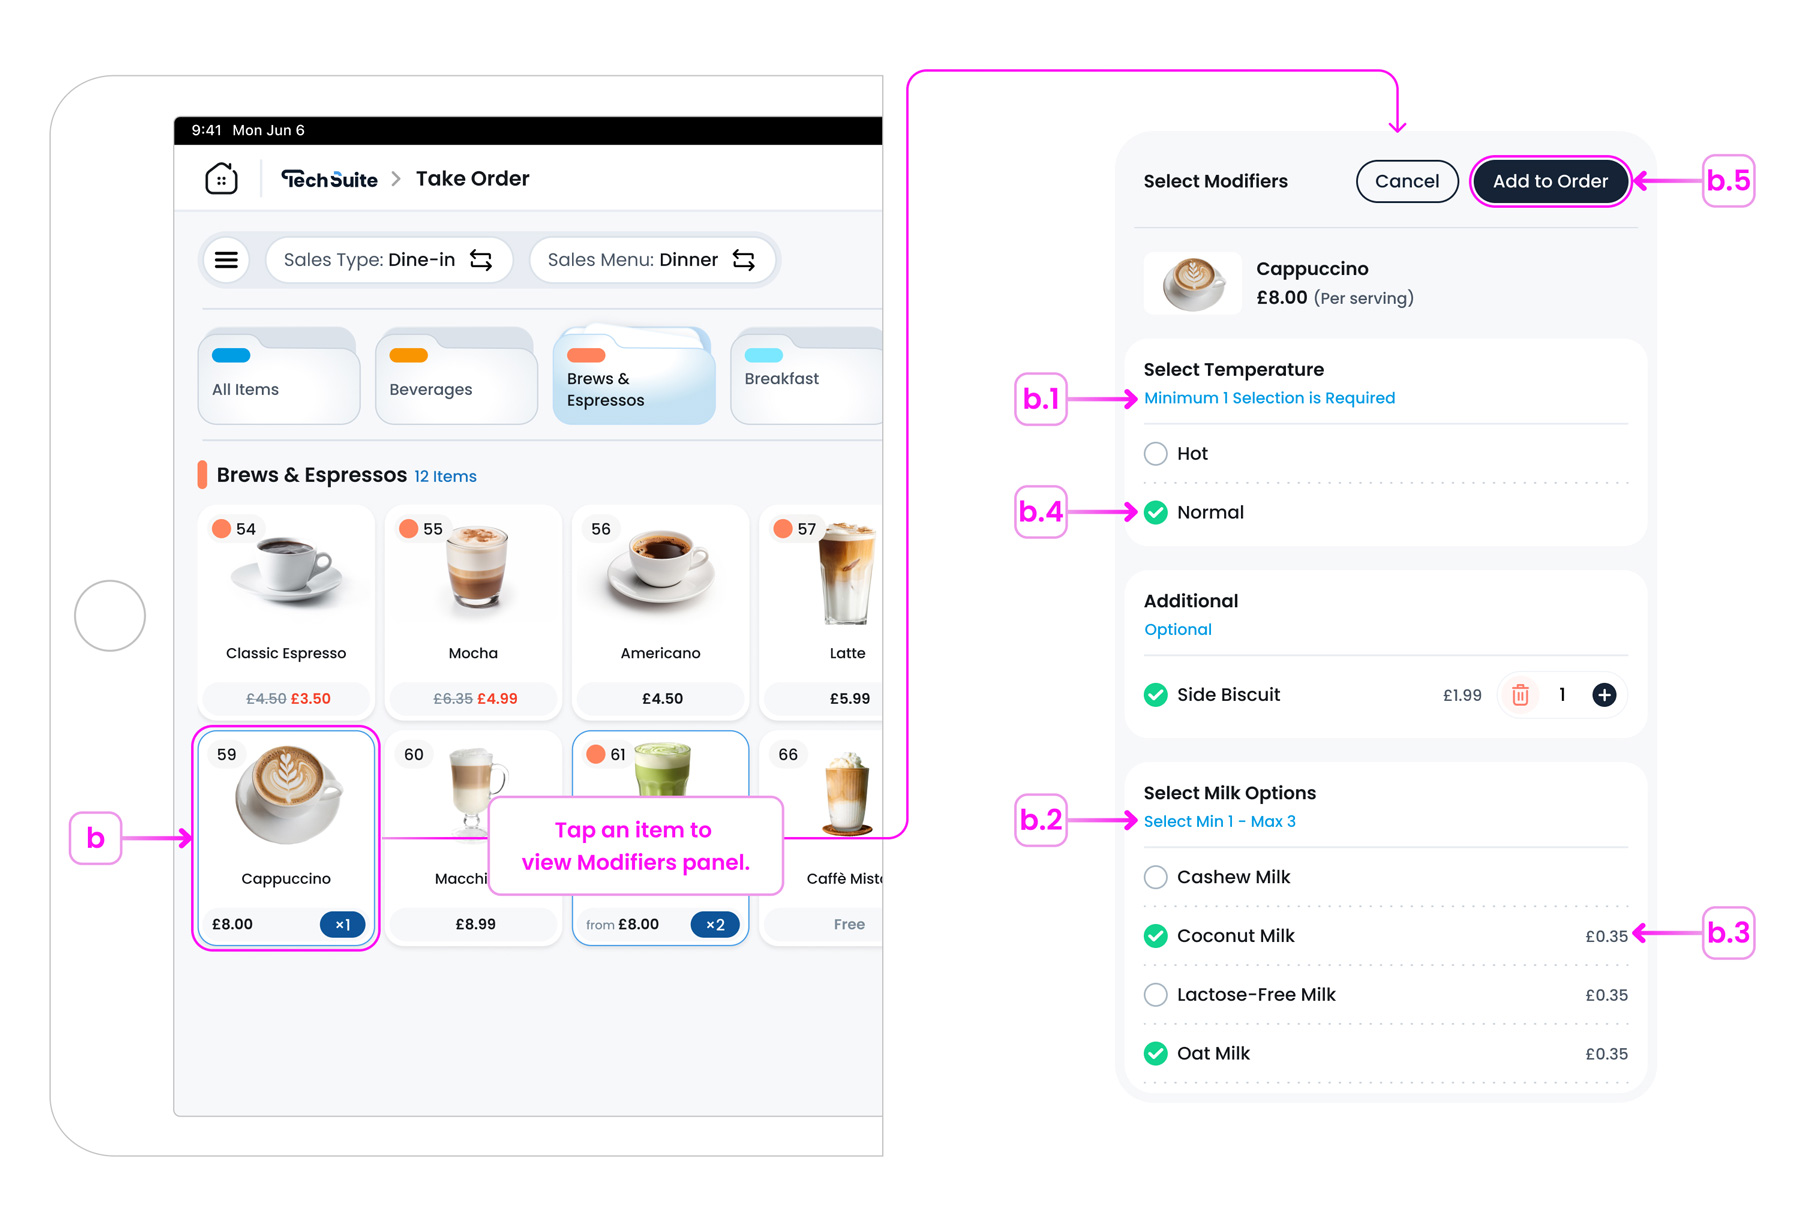
Step 3: Add Items to the Order
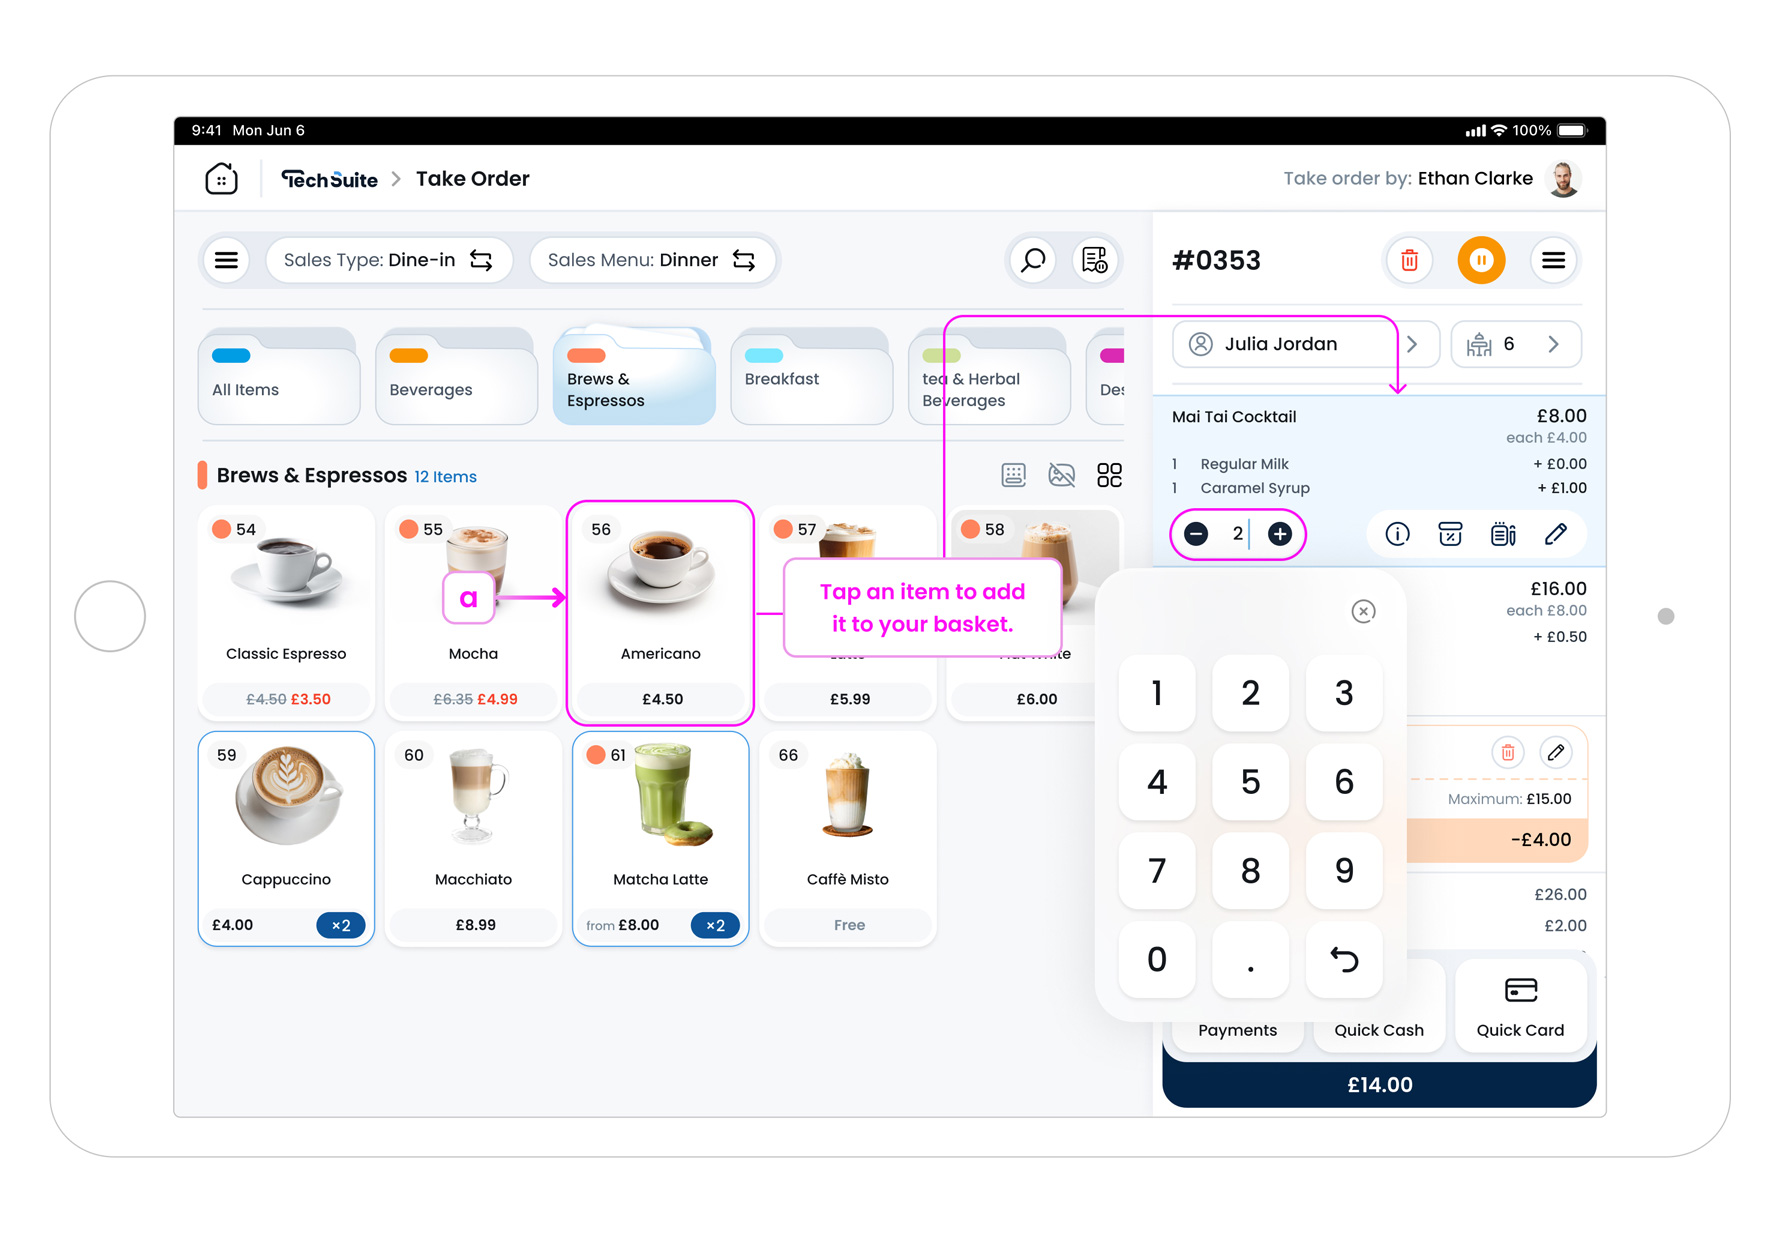
a. Add an item
Tap an item to add it to the basket. Tap the same item again to increase its quantity. You can also increase or decrease the quantity using the counter controls in the basket on the right-hand side of the page, or tap the quantity number in the counter to type a larger value directly.
b. Modifiers (if the item has modifiers)
-
b.1. Required vs Optional
If the minimum required is 0, you can skip the popup. If the minimum is greater than 0, you must select the required options before continuing.
-
b.2. Min/Max & Select Type
Modifier groups can enforce a minimum or maximum number of choices and may allow single-select or multi-select.
-
b.3. Pricing
Some modifiers are free, others add a charge. Prices show next to the option when applicable.
-
b.4. Defaults
A modifier may be preselected by default. You can change it before adding the item.
-
b.5. Click the Add to Order Button
Your final choices are listed beneath the item in the basket for easy review and printing/KDS visibility.

For a deeper dive into rules and examples, see the Modifiers guide in the Help Centre.
Step 4: Proceed to Payment
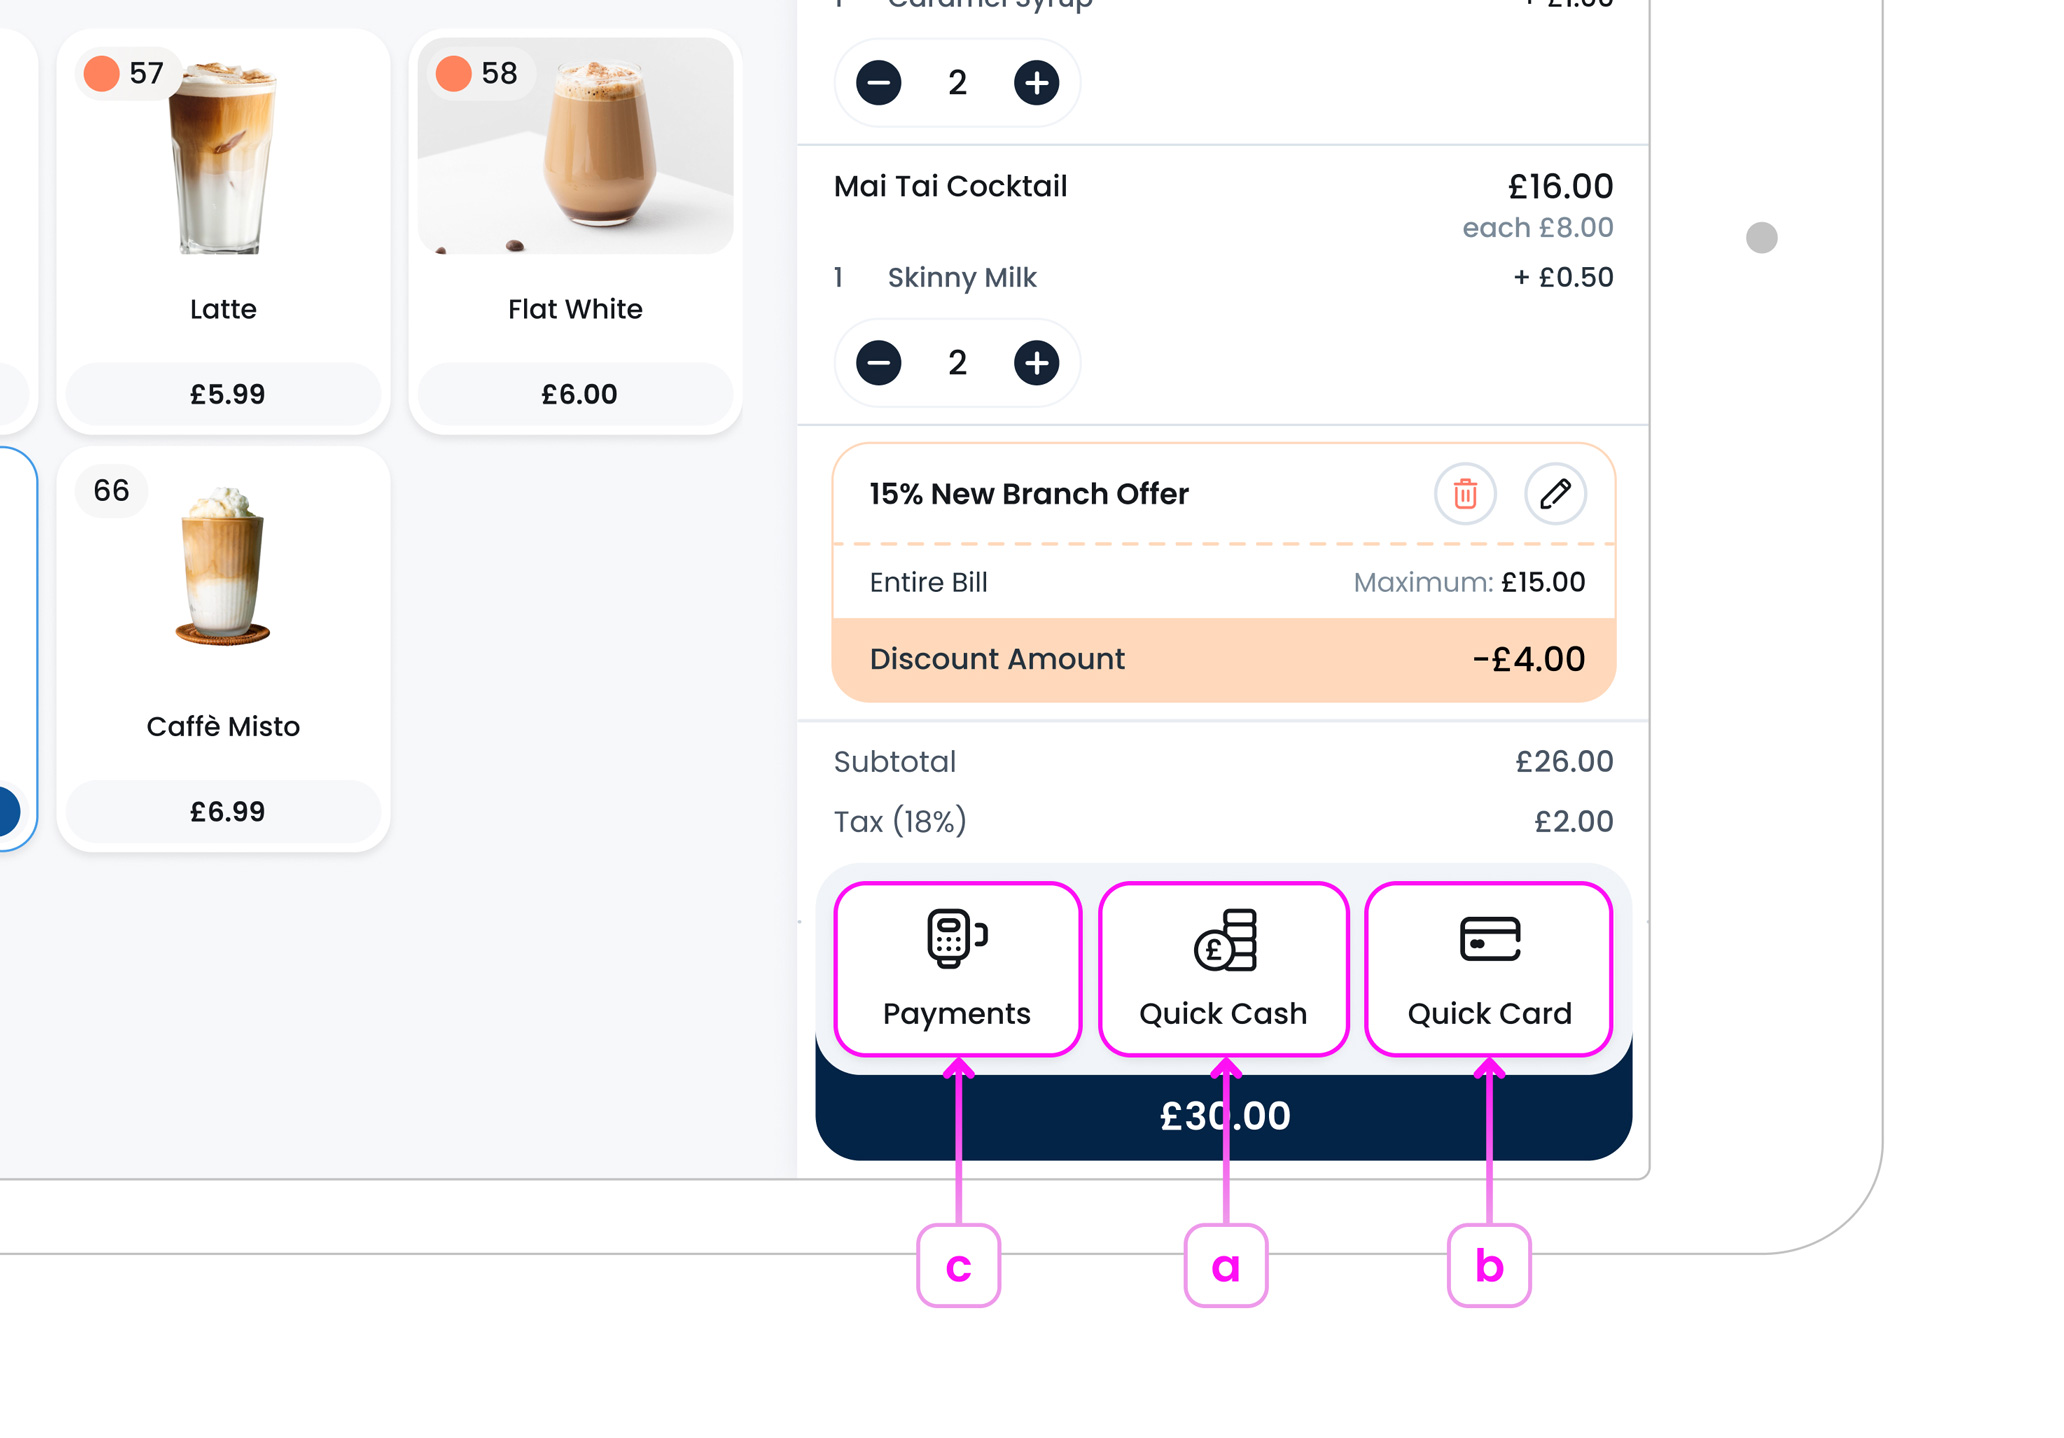
a. Quick Cash (one-tap cash checkout)
Records the full amount due as paid by cash with no popup, then goes straight to Receipt Options. Use this when exact cash is given. If you need to enter cash received and show calculated change, use Pay > Cash instead.
b. Quick Card (one-tap card checkout)
Sends the full amount to the paired payment terminal immediately. On approval, the order completes and Receipt Options appear. If the terminal isn’t connected or the transaction fails, POS opens the Payment popup so you can retry or choose another method.
Show/Hide Quick Cash & Quick Card (POS Profile)
You can control whether the Quick Cash and Quick Card buttons appear on the Take Order page from the Portal: Settings > Devices & Profiles > POS Profiles > Edit POS Profile.
- Display the Quick Cash" button on the take order page
- Display the Quick Card button on take order page
Choose any combination that suits your flow: enable both, Quick Card + Pay only, Quick Cash + Pay only, or turn both off to use just Pay.
For setup steps, see Create a New POS Profile.
c. Payments (opens full payment screen)
Opens the Payment popup for split payments, card, cash with change entry, gift card, vouchers, custom amounts, and other methods.
Step 5: Payment Popup
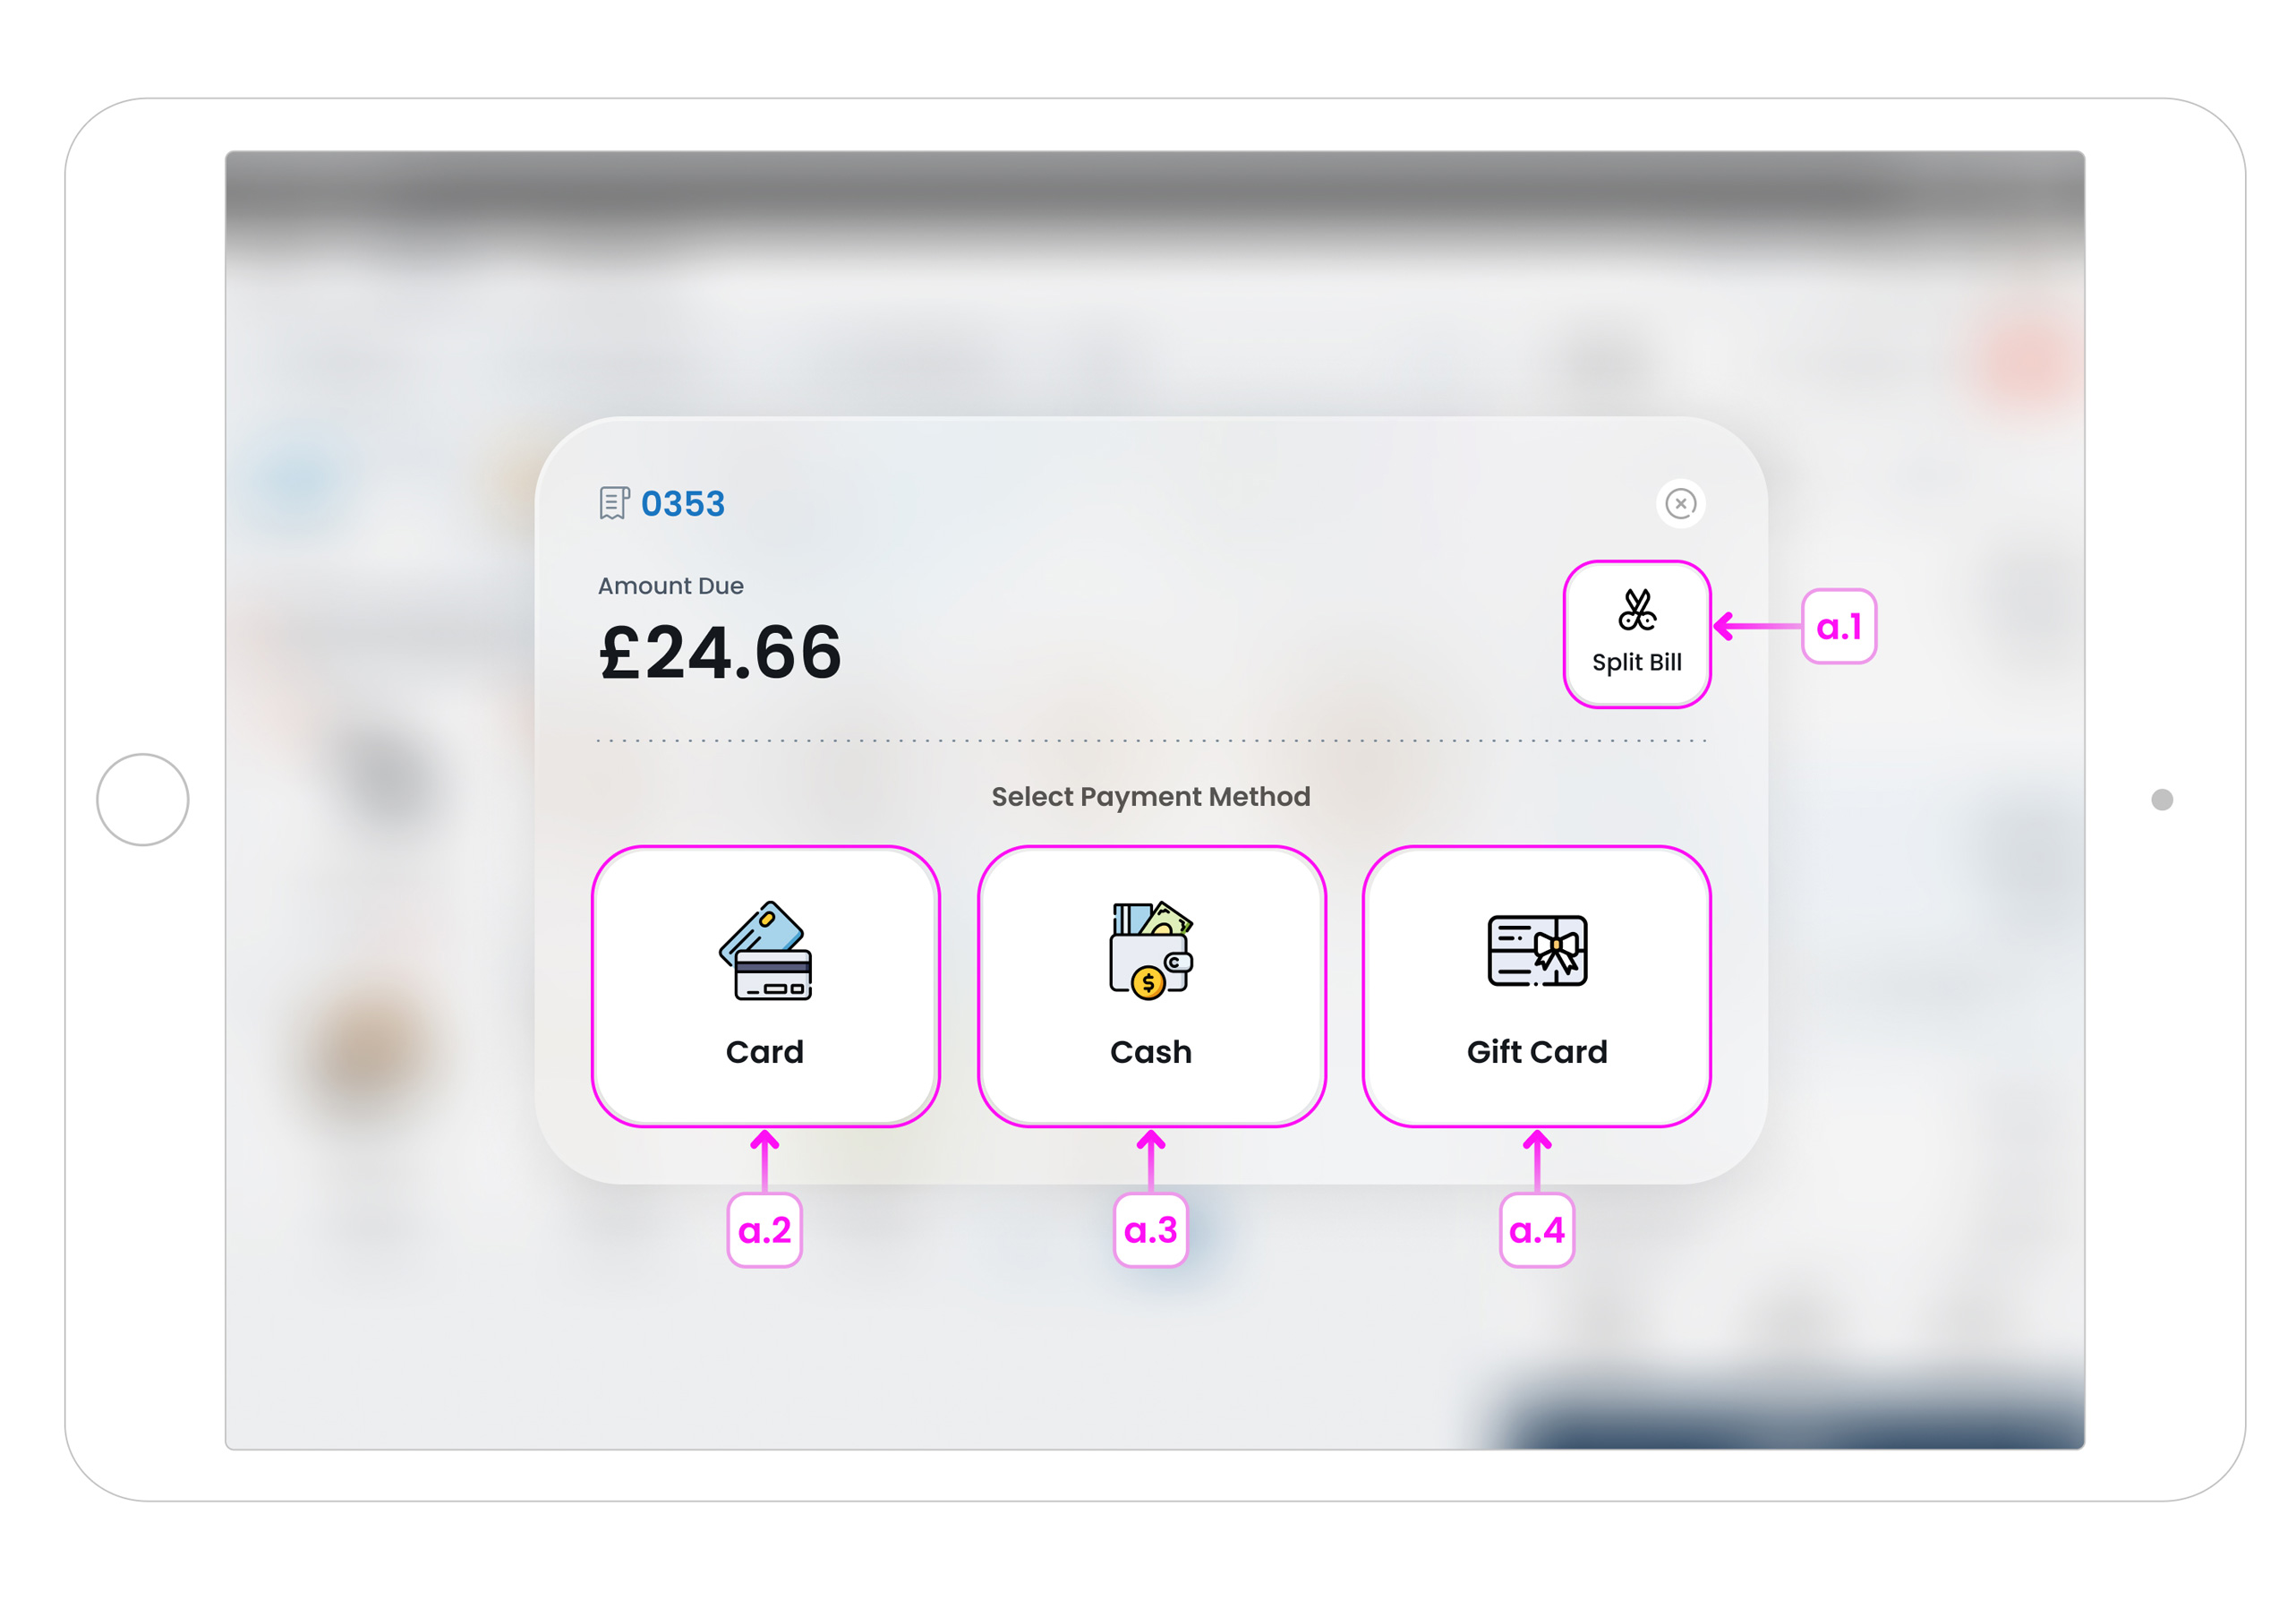
a. Payment methods at a glance
-
a.1. Split Bill
Split the total into equal parts, then take payment per part.
-
a.2. Card
Send the amount to your payment terminal and confirm.
-
a.3. Cash
Enter cash received change is calculated automatically.
-
a.4. Gift Card
Scan or type the gift card pay using the card balance.
b. Pay by Card
Use this for standard card transactions via your connected terminal.
-
Step 1: Open Card
Tap Card and verify the Amount Due on screen.
-
Step 2: Register Payment
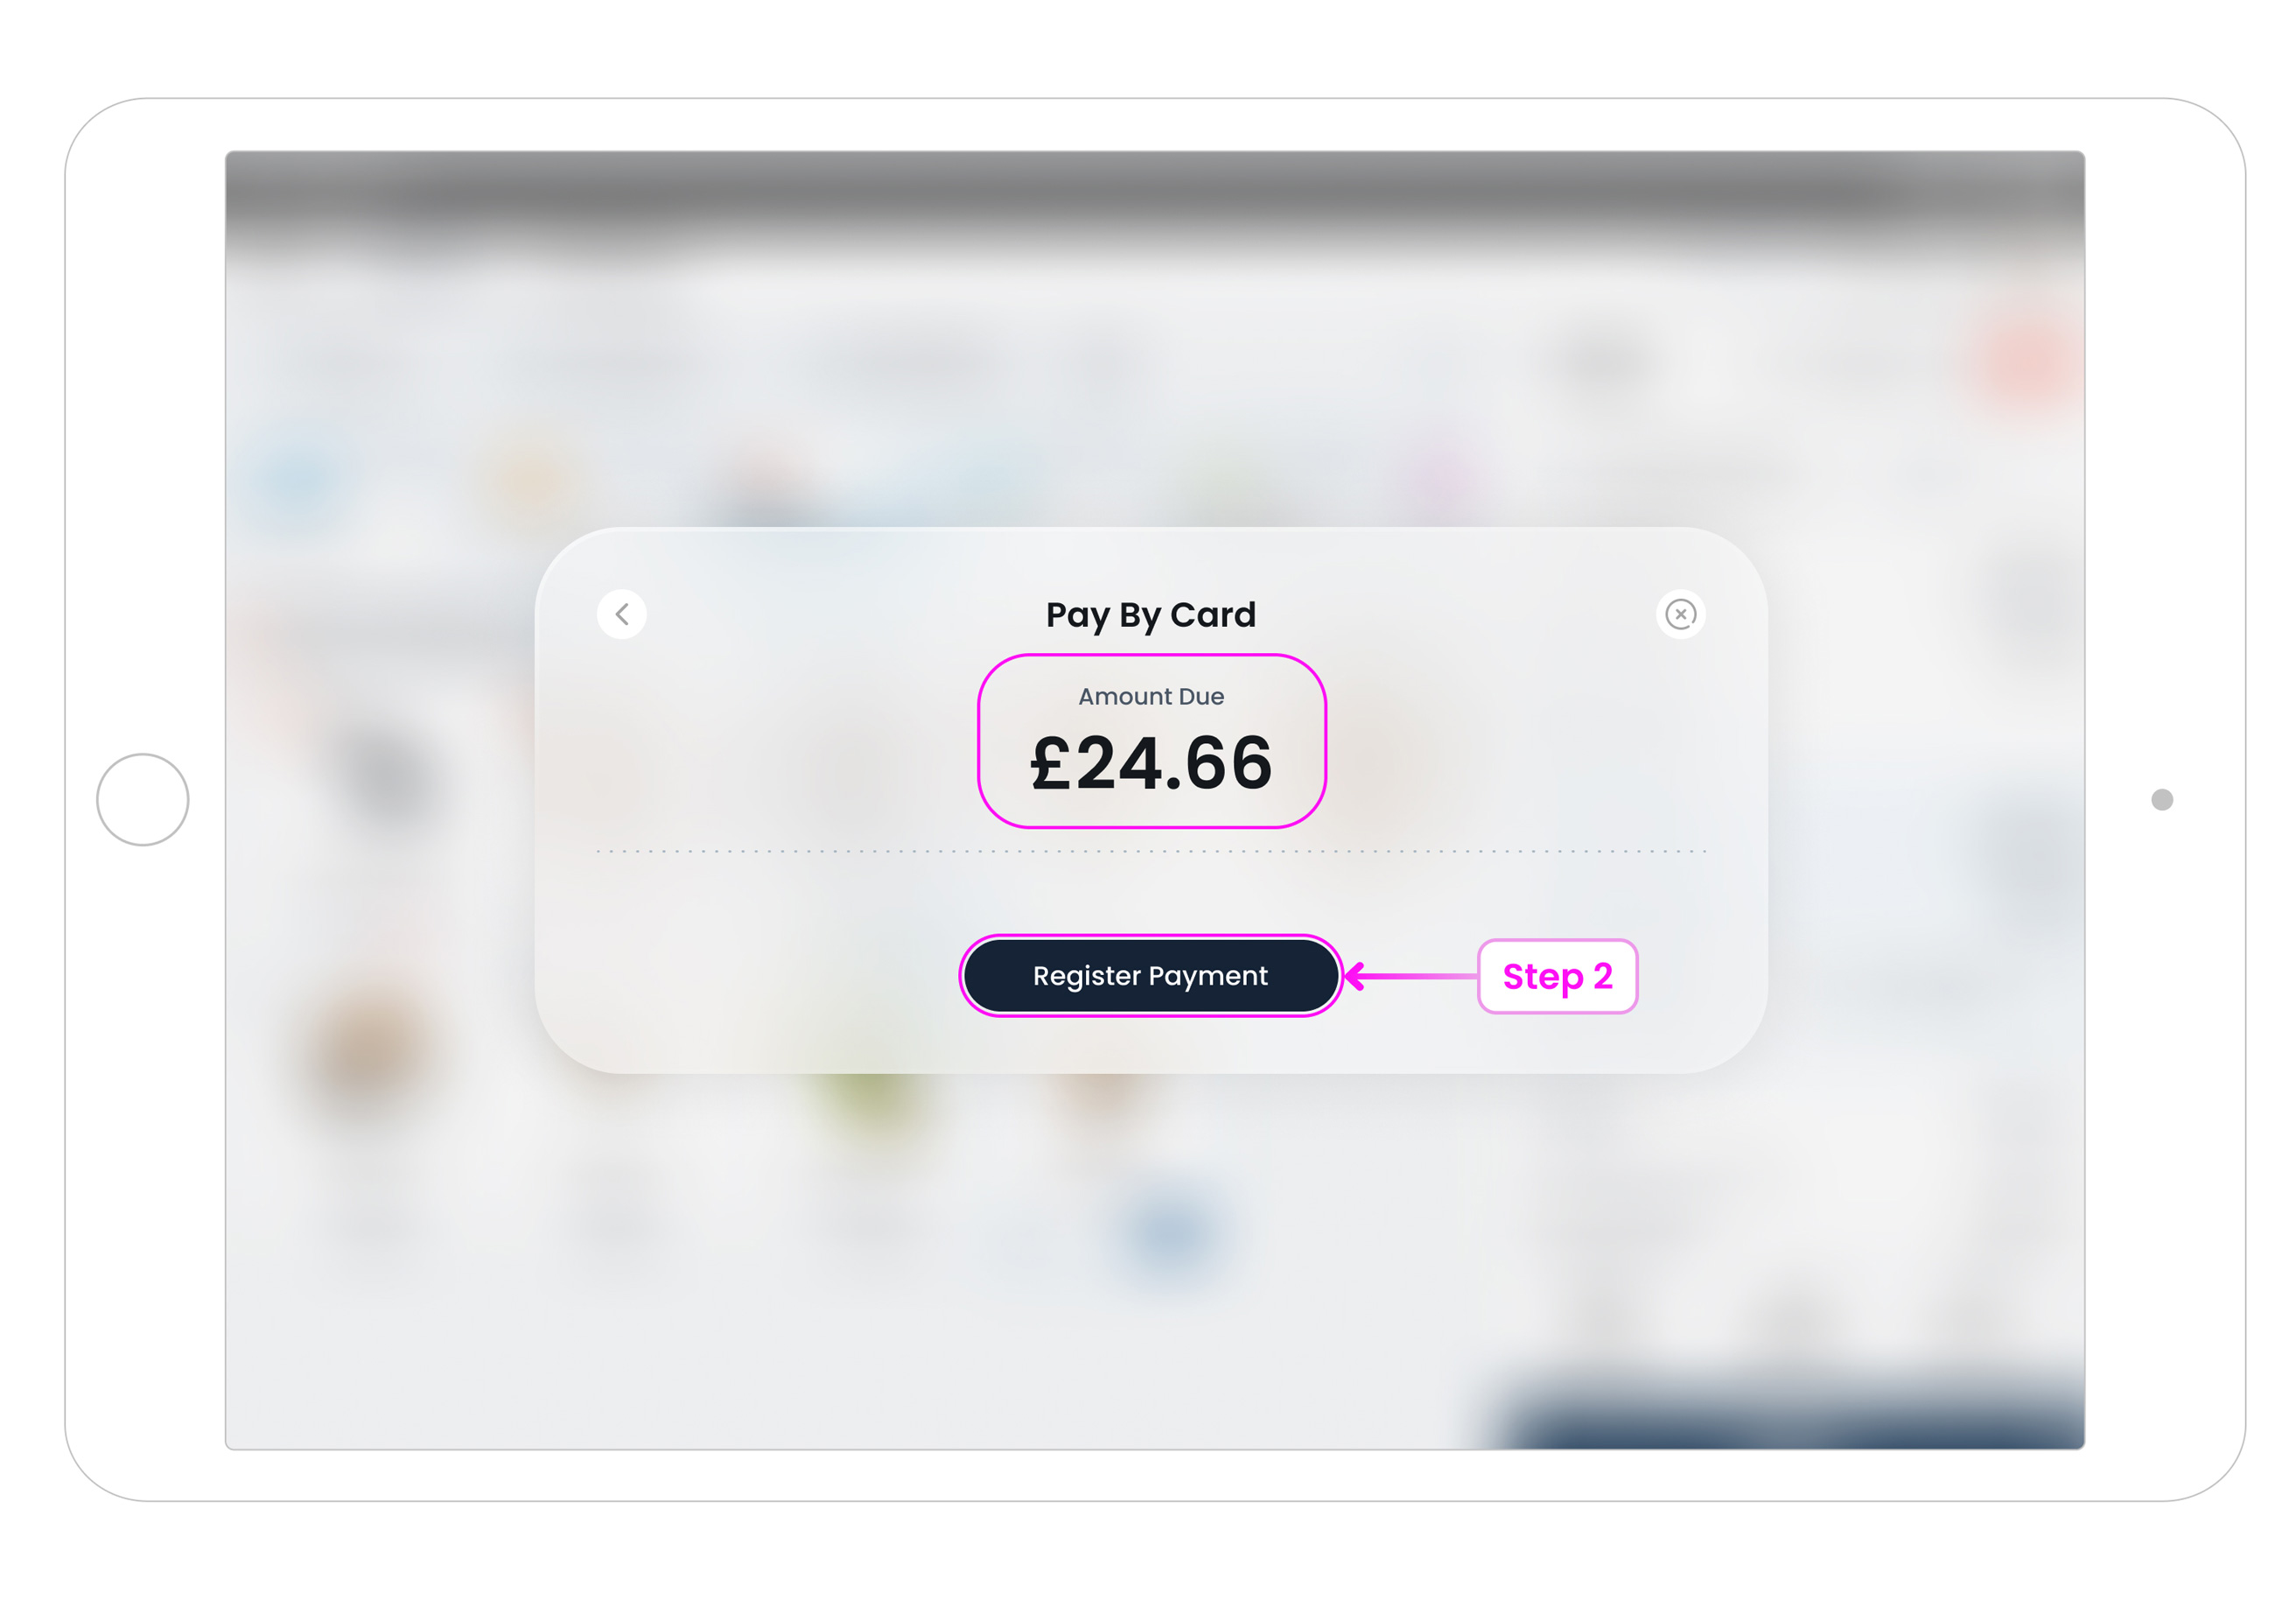
Press Register Payment (or the confirm button) to send the charge to the terminal.
-
Step 3: Customer Action
Ask the customer to tap/insert/swipe their card on the terminal. Wait for approval.
-
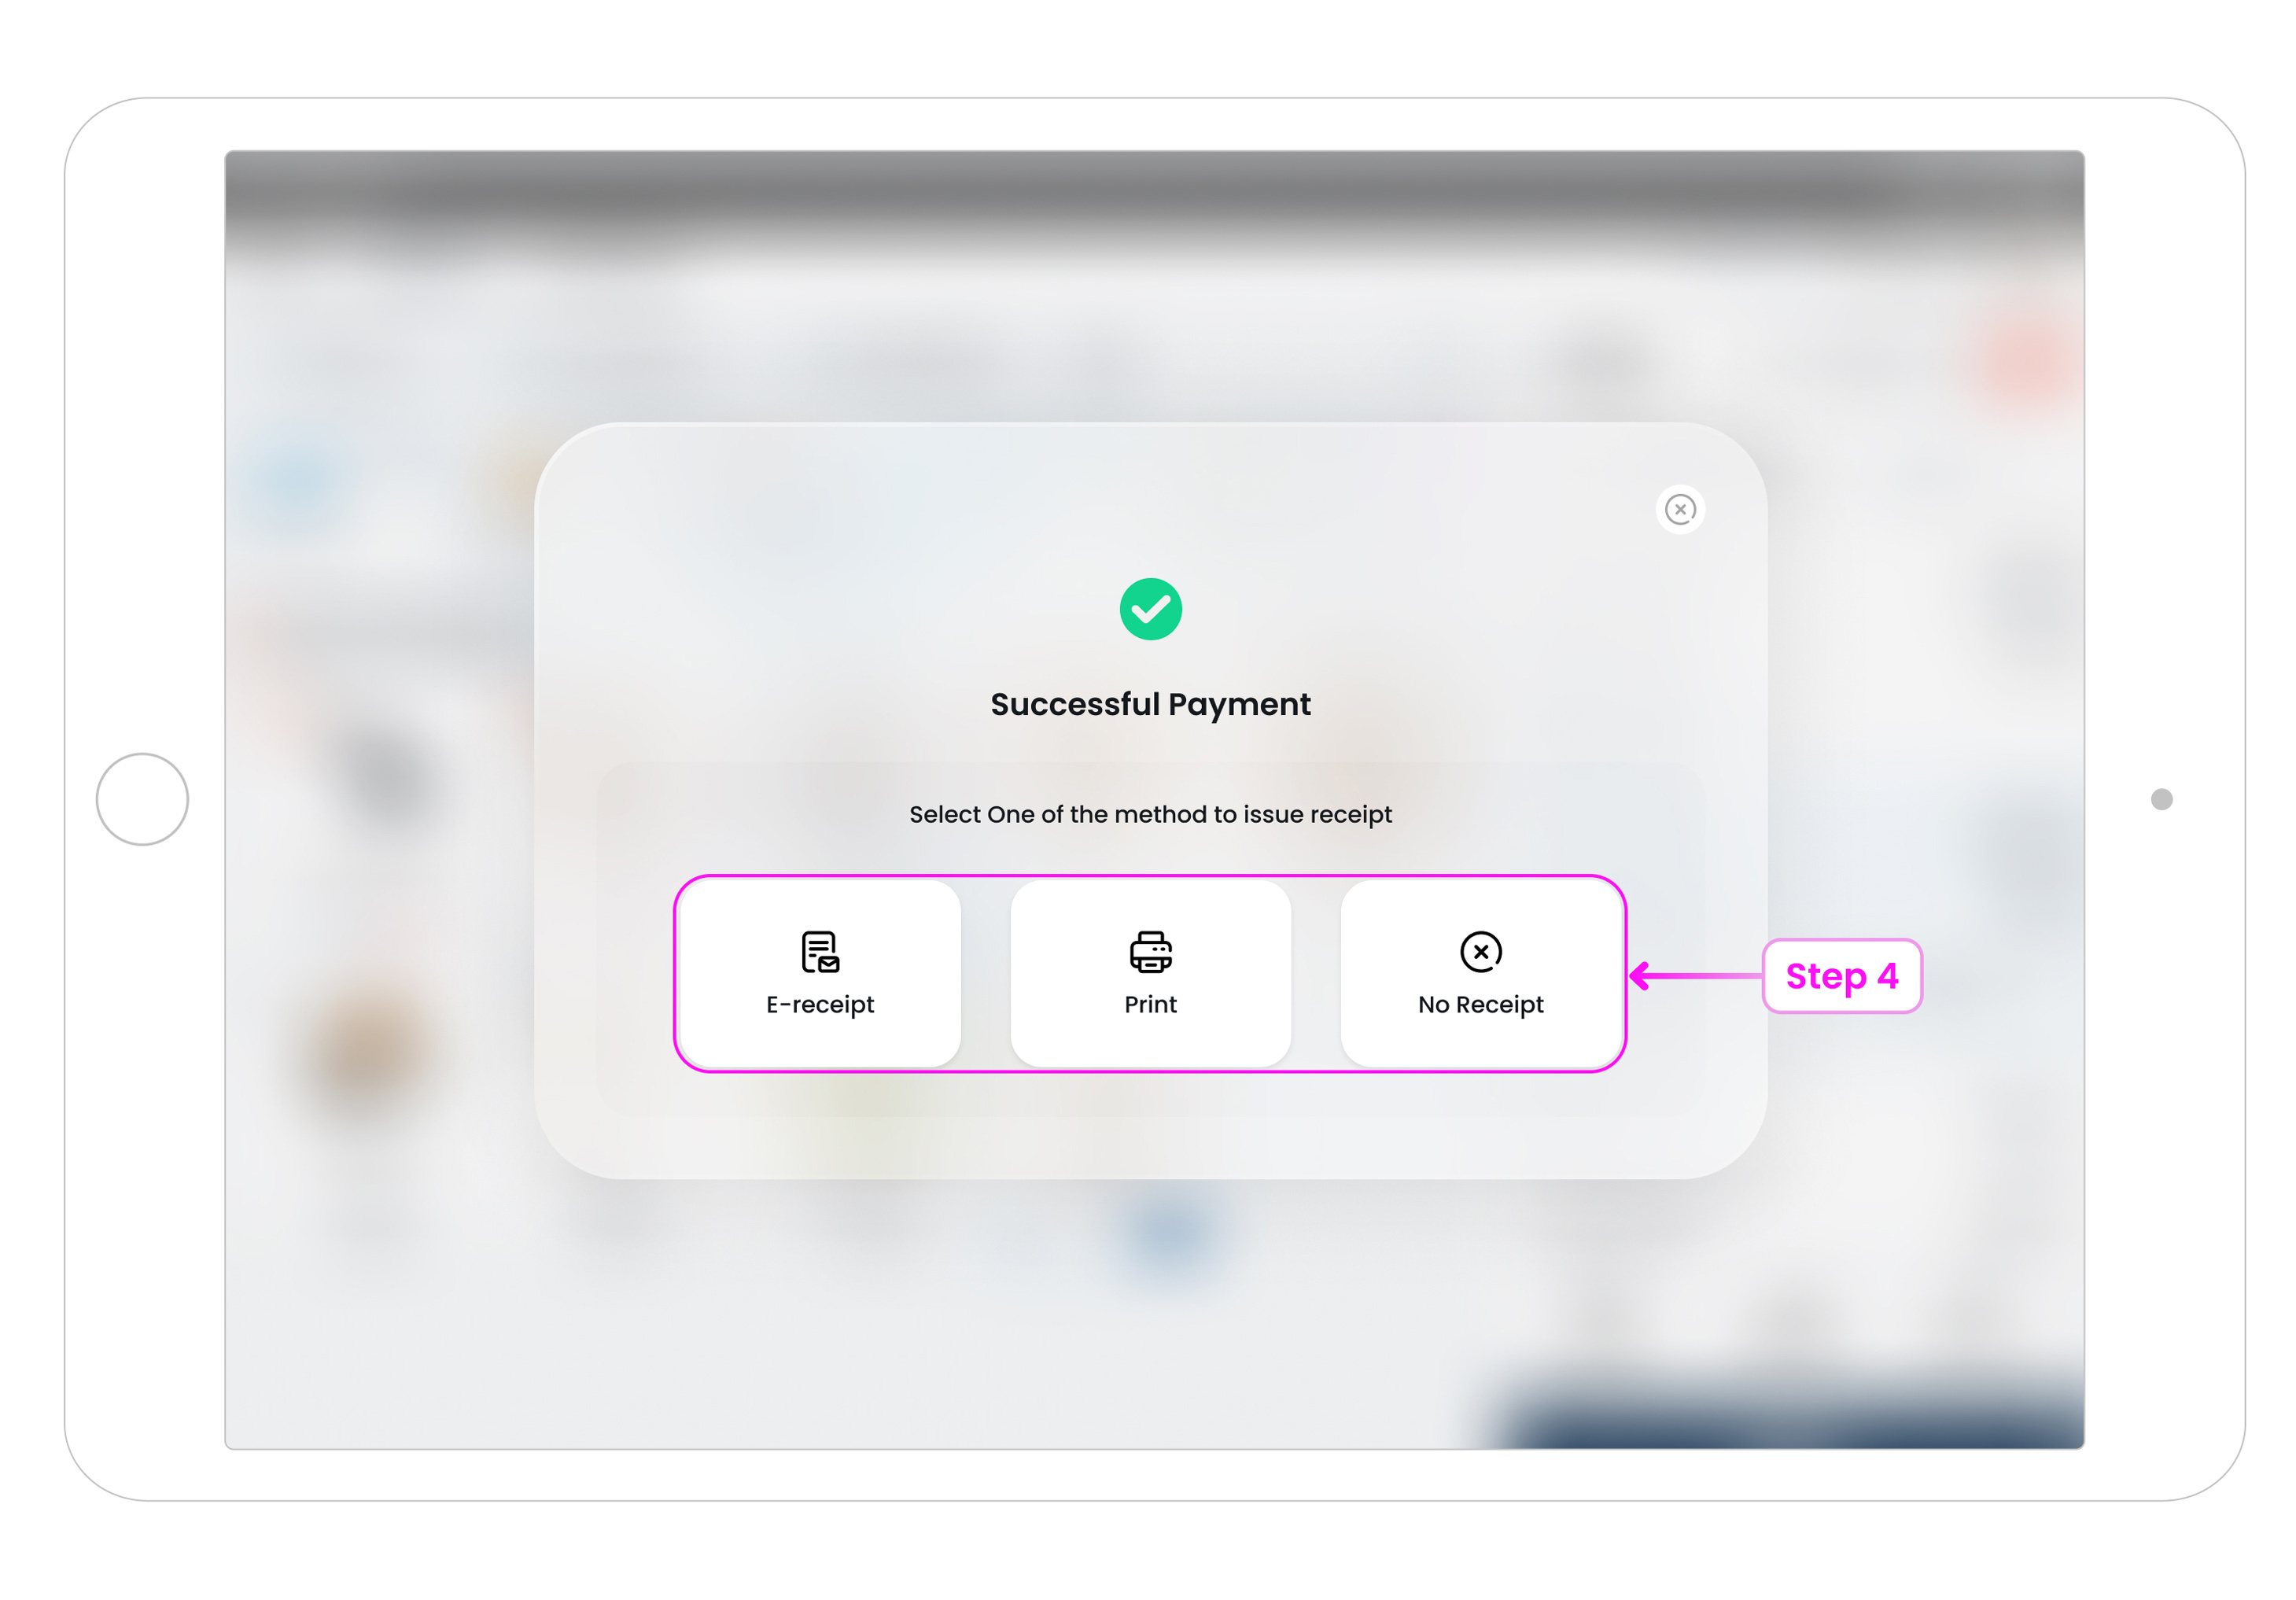
Step 4: Receipt Options
On success, the Receipt Options popup appears (e-receipt / print / no receipt). Complete this step to finish the order.
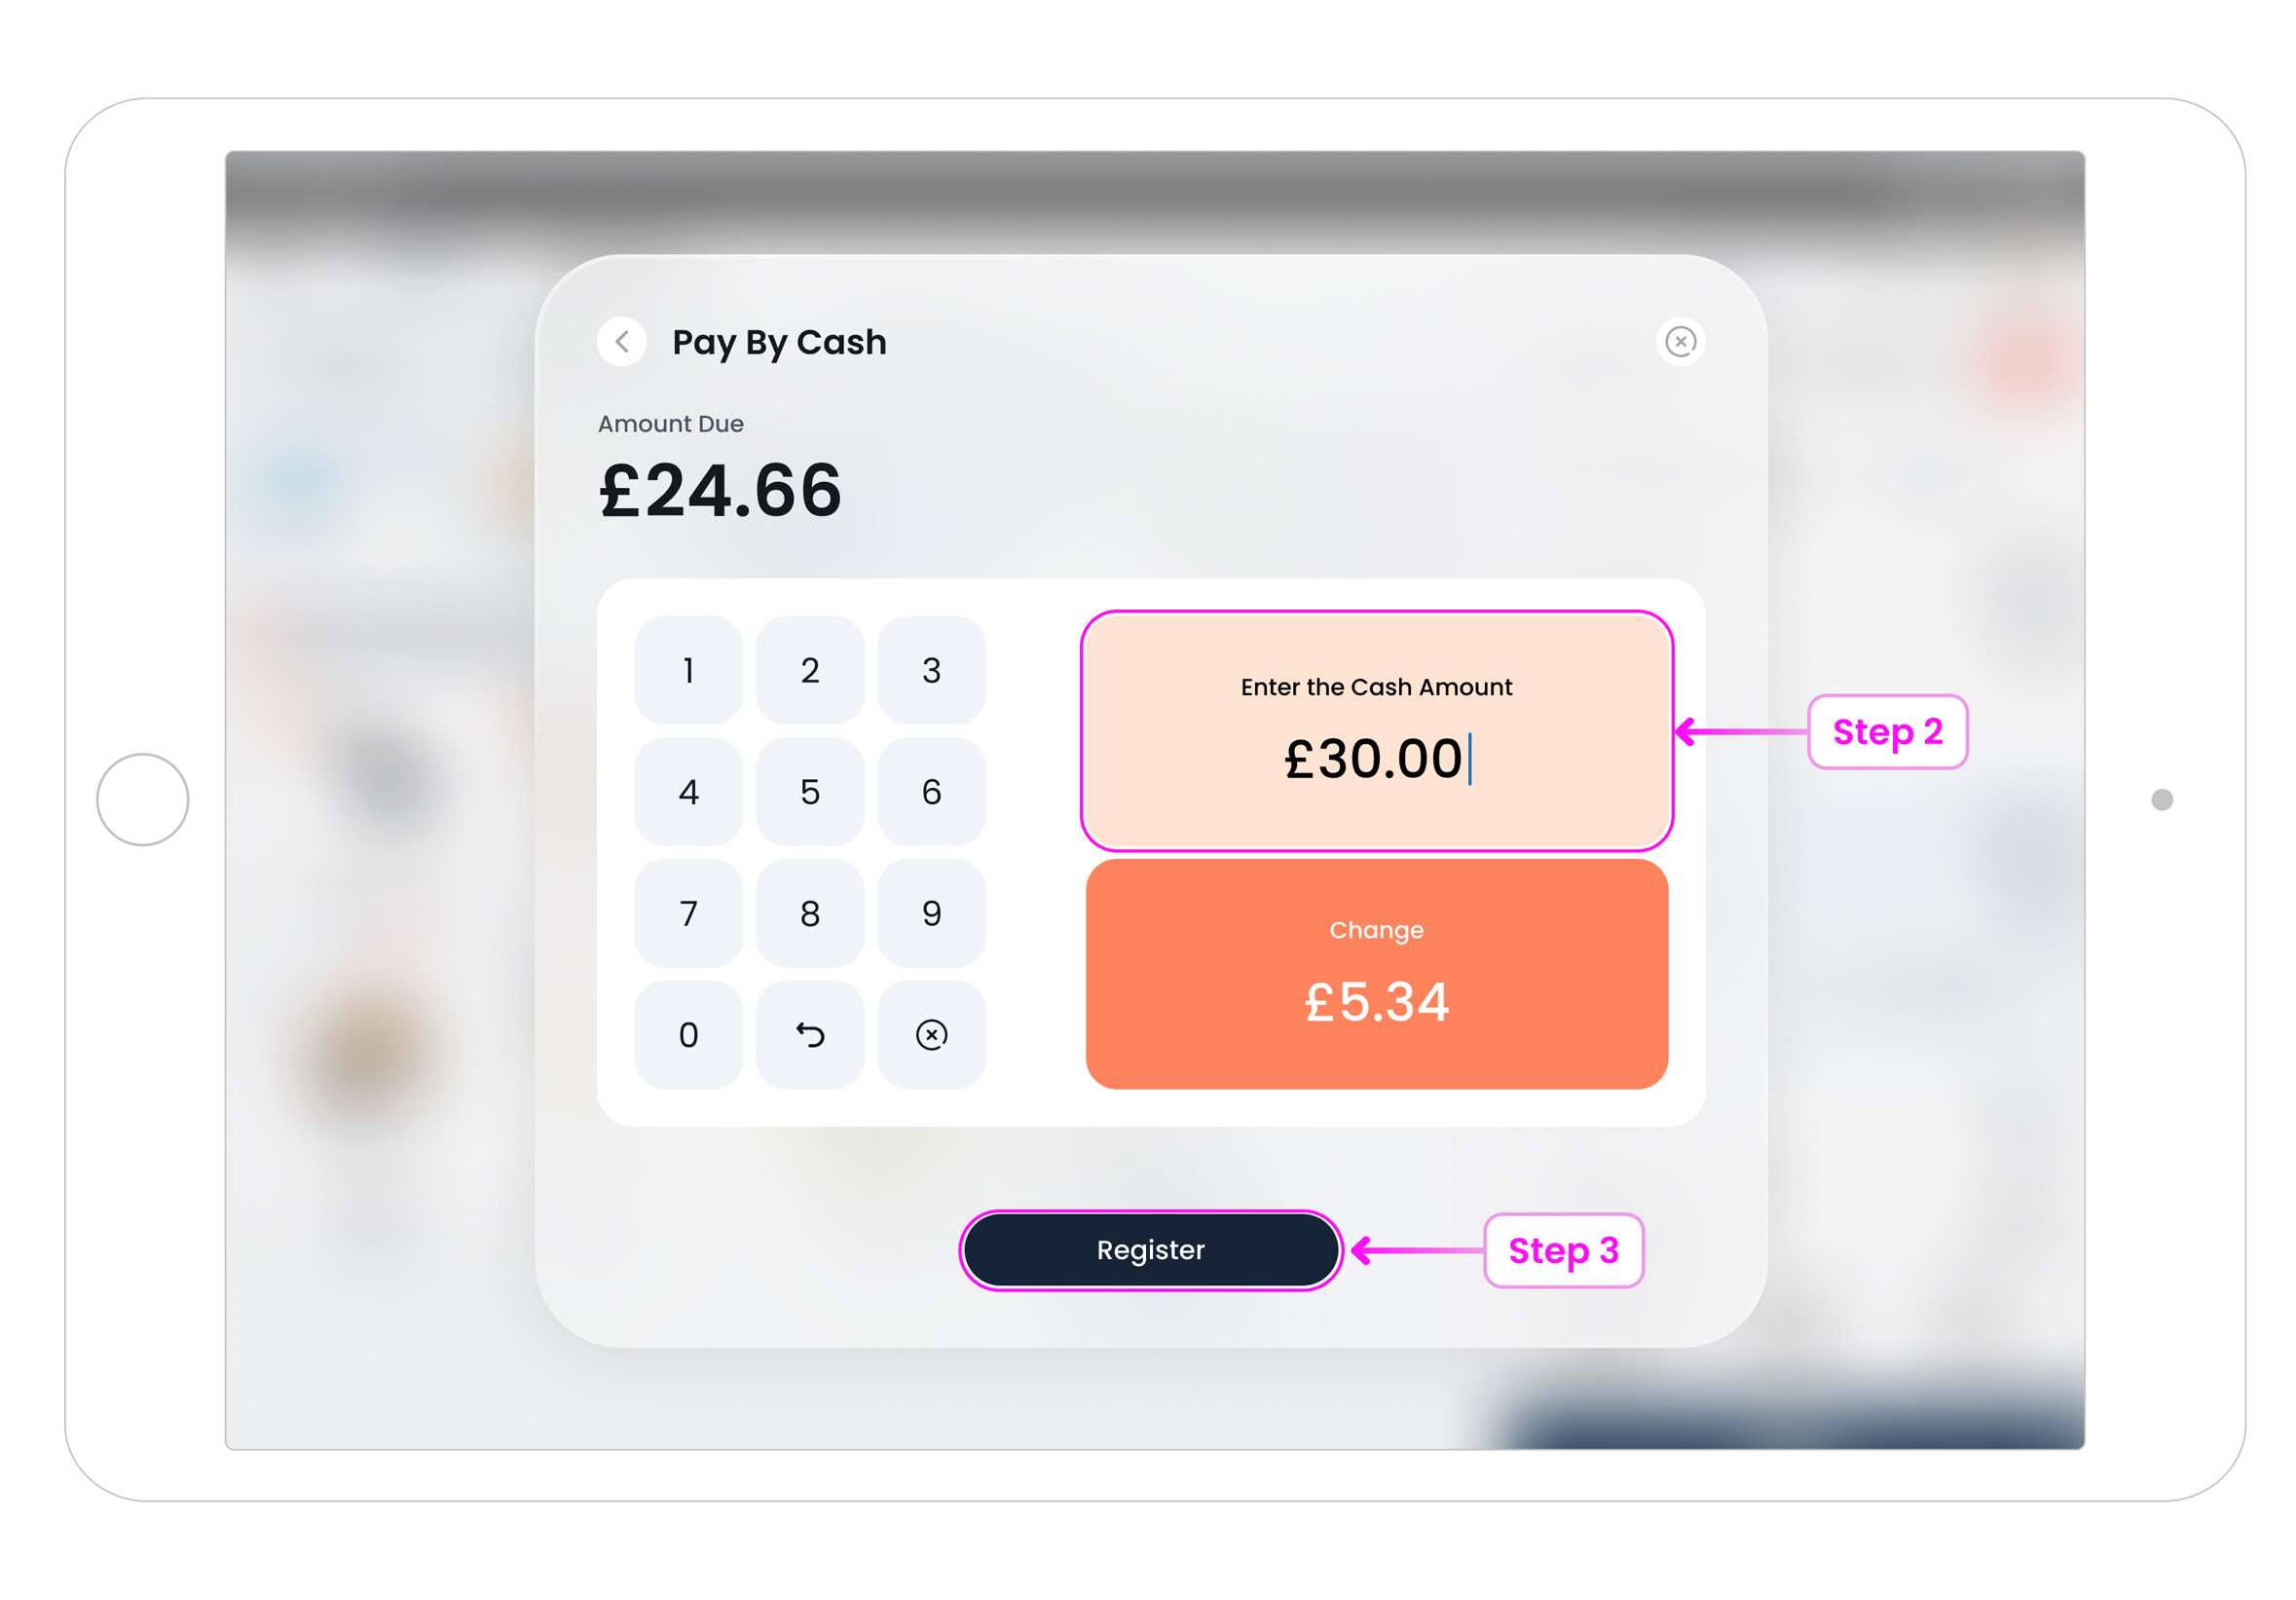
c. Pay by Cash
Use this when the customer pays with cash. The system will calculate change for you.
-
Step 1: Open Cash
Tap Cash to open the numpad.
-
Step 2: Enter Cash Received
Type the amount received. The popup shows the Change automatically (if any).
-
Step 3: Register
Tap Register to record the payment and continue to Receipt Options.
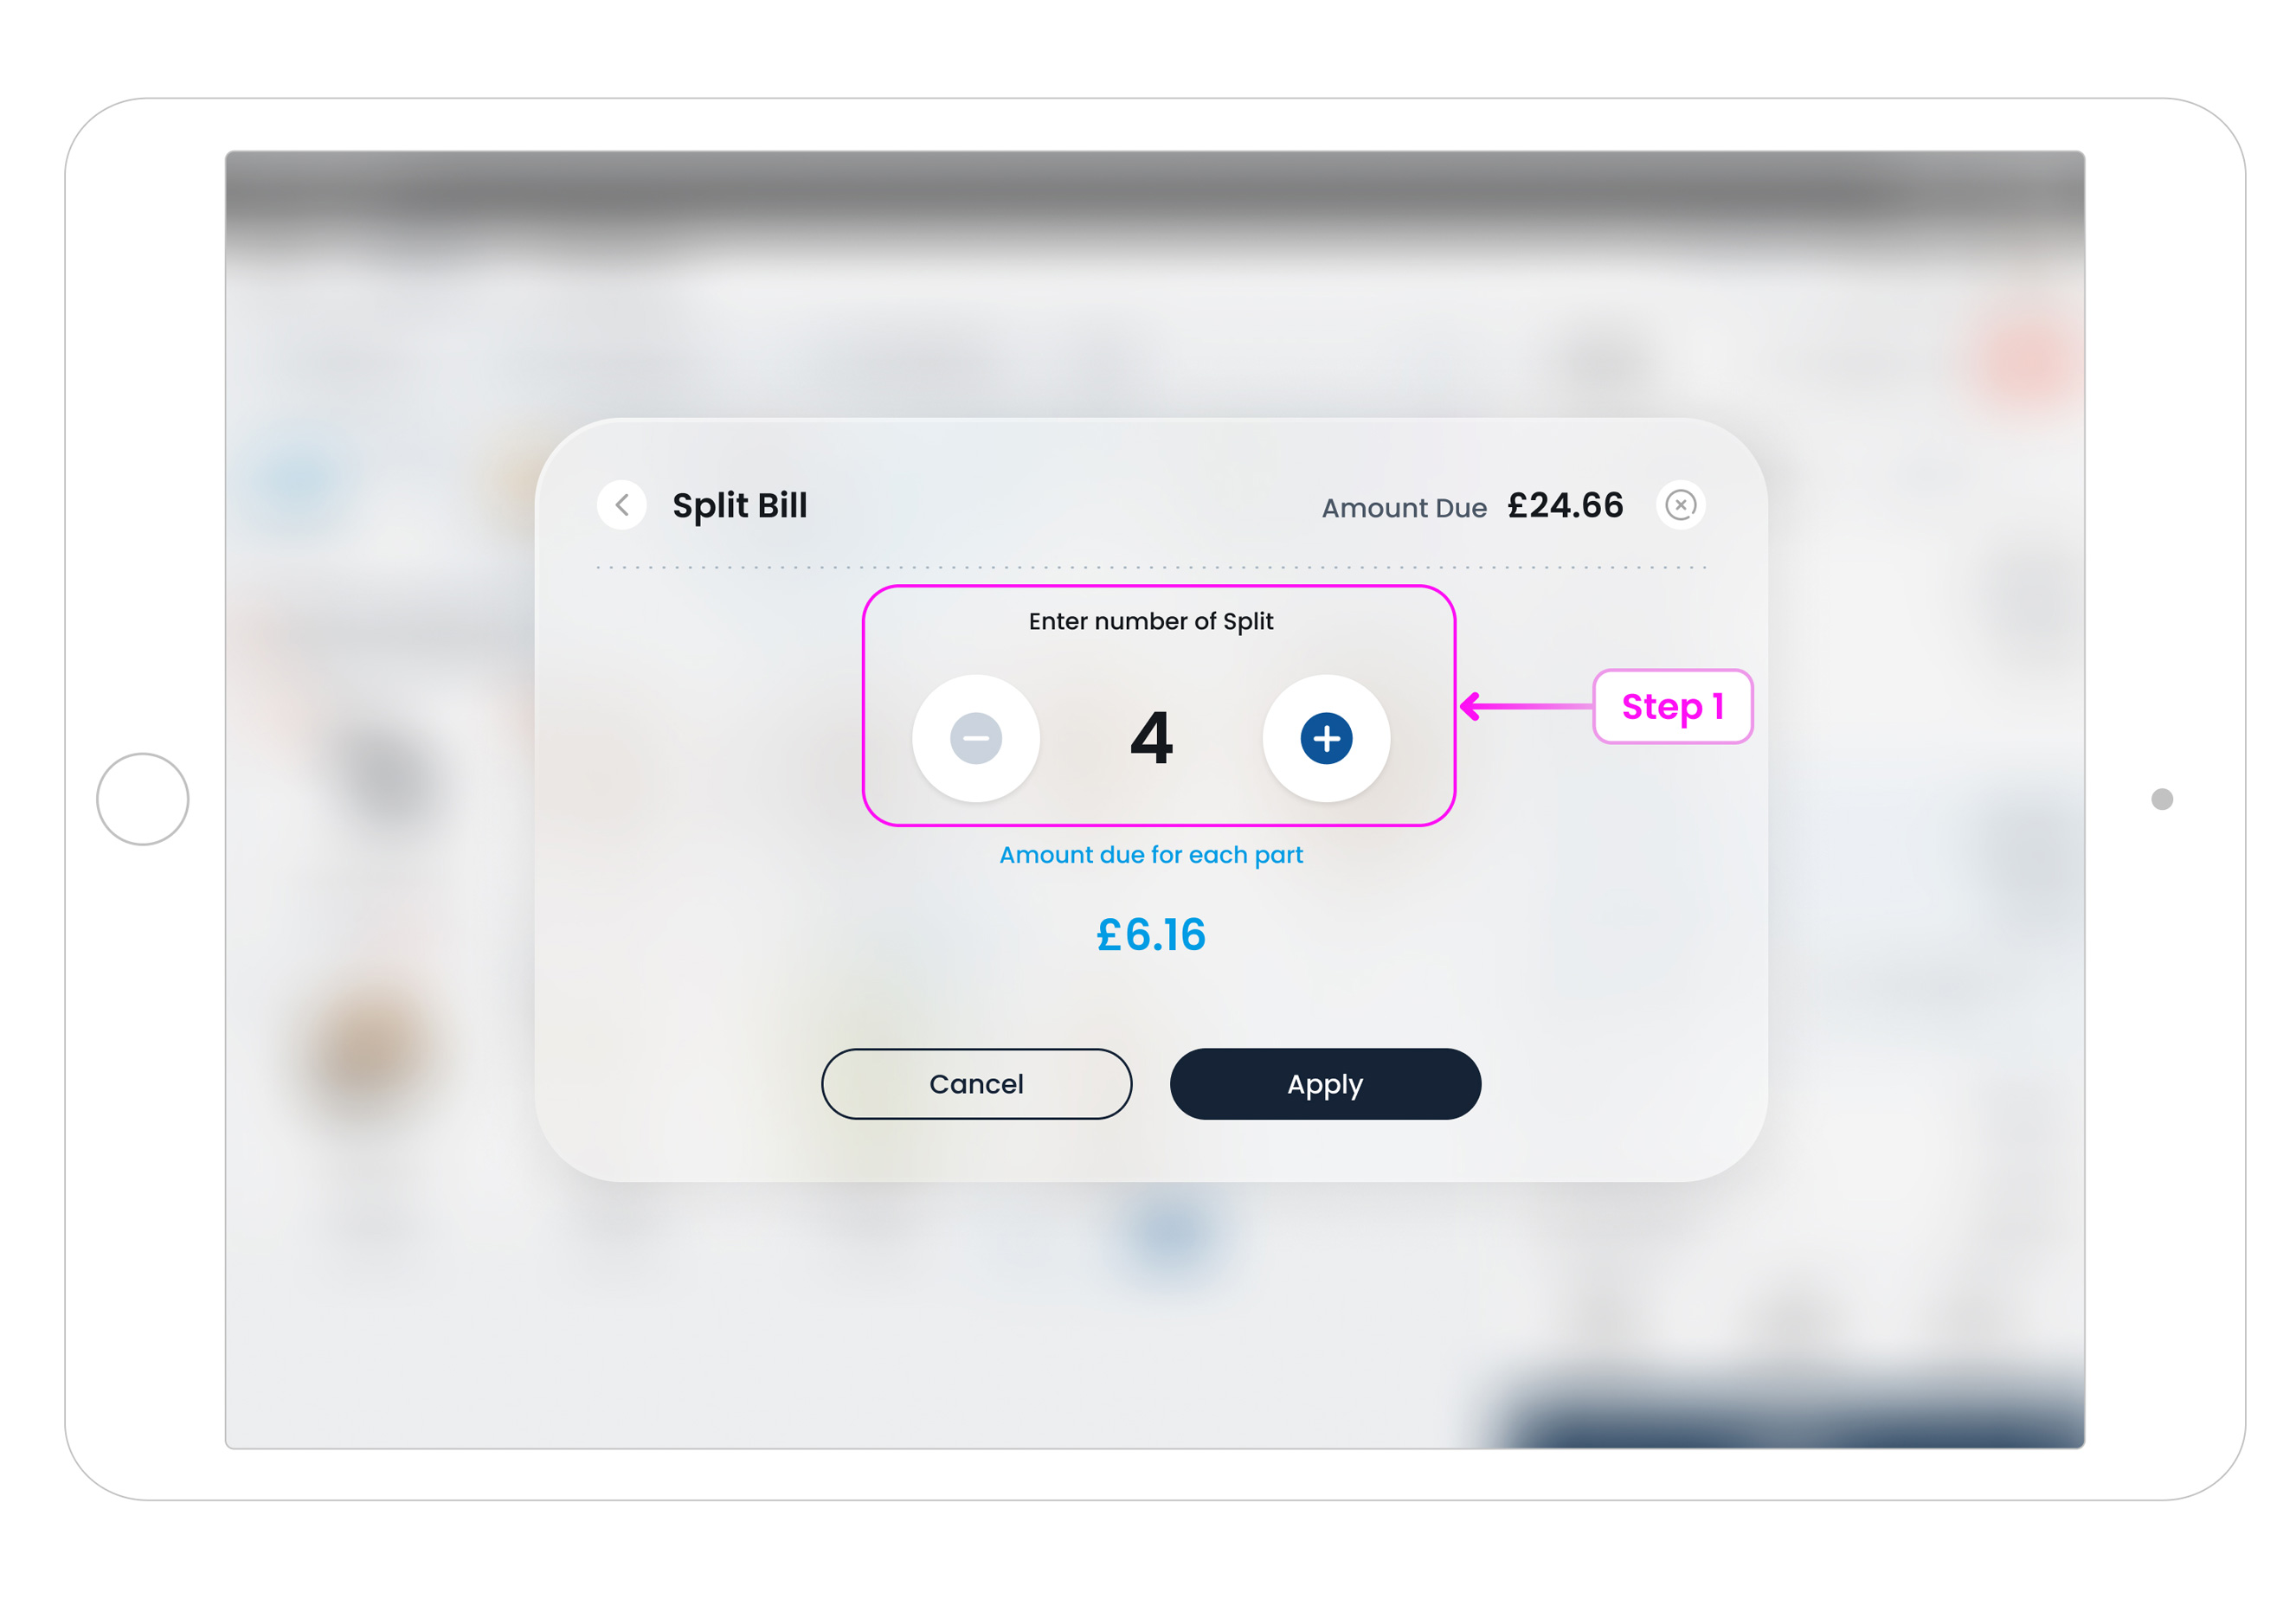
d. Split the Bill (equal parts and pay by shares)
Split the total into evenly divided parts, then settle each part with any method.
-
Step 1: Select splits & pay shares
Tap Split Bill, choose the number of splits (e.g., 5). POS shows the amount per share. Select how many shares to pay in this transaction (e.g., 3 shares), then choose Card, Cash, or Gift Card to settle those shares. The remaining shares stay open and visible until they’re paid.
-
Step 2: Finish
Repeat for the remaining shares. When all shares are paid, Receipt Options appear.
Example:
Two families dine together: Family A (3 people) and Family B (2 people). You split the bill into 5 shares. Family A’s payer selects 3 shares and pays them by card. Family B then selects the remaining 2 shares and pays by cash. The order completes once all 5 shares are settled.
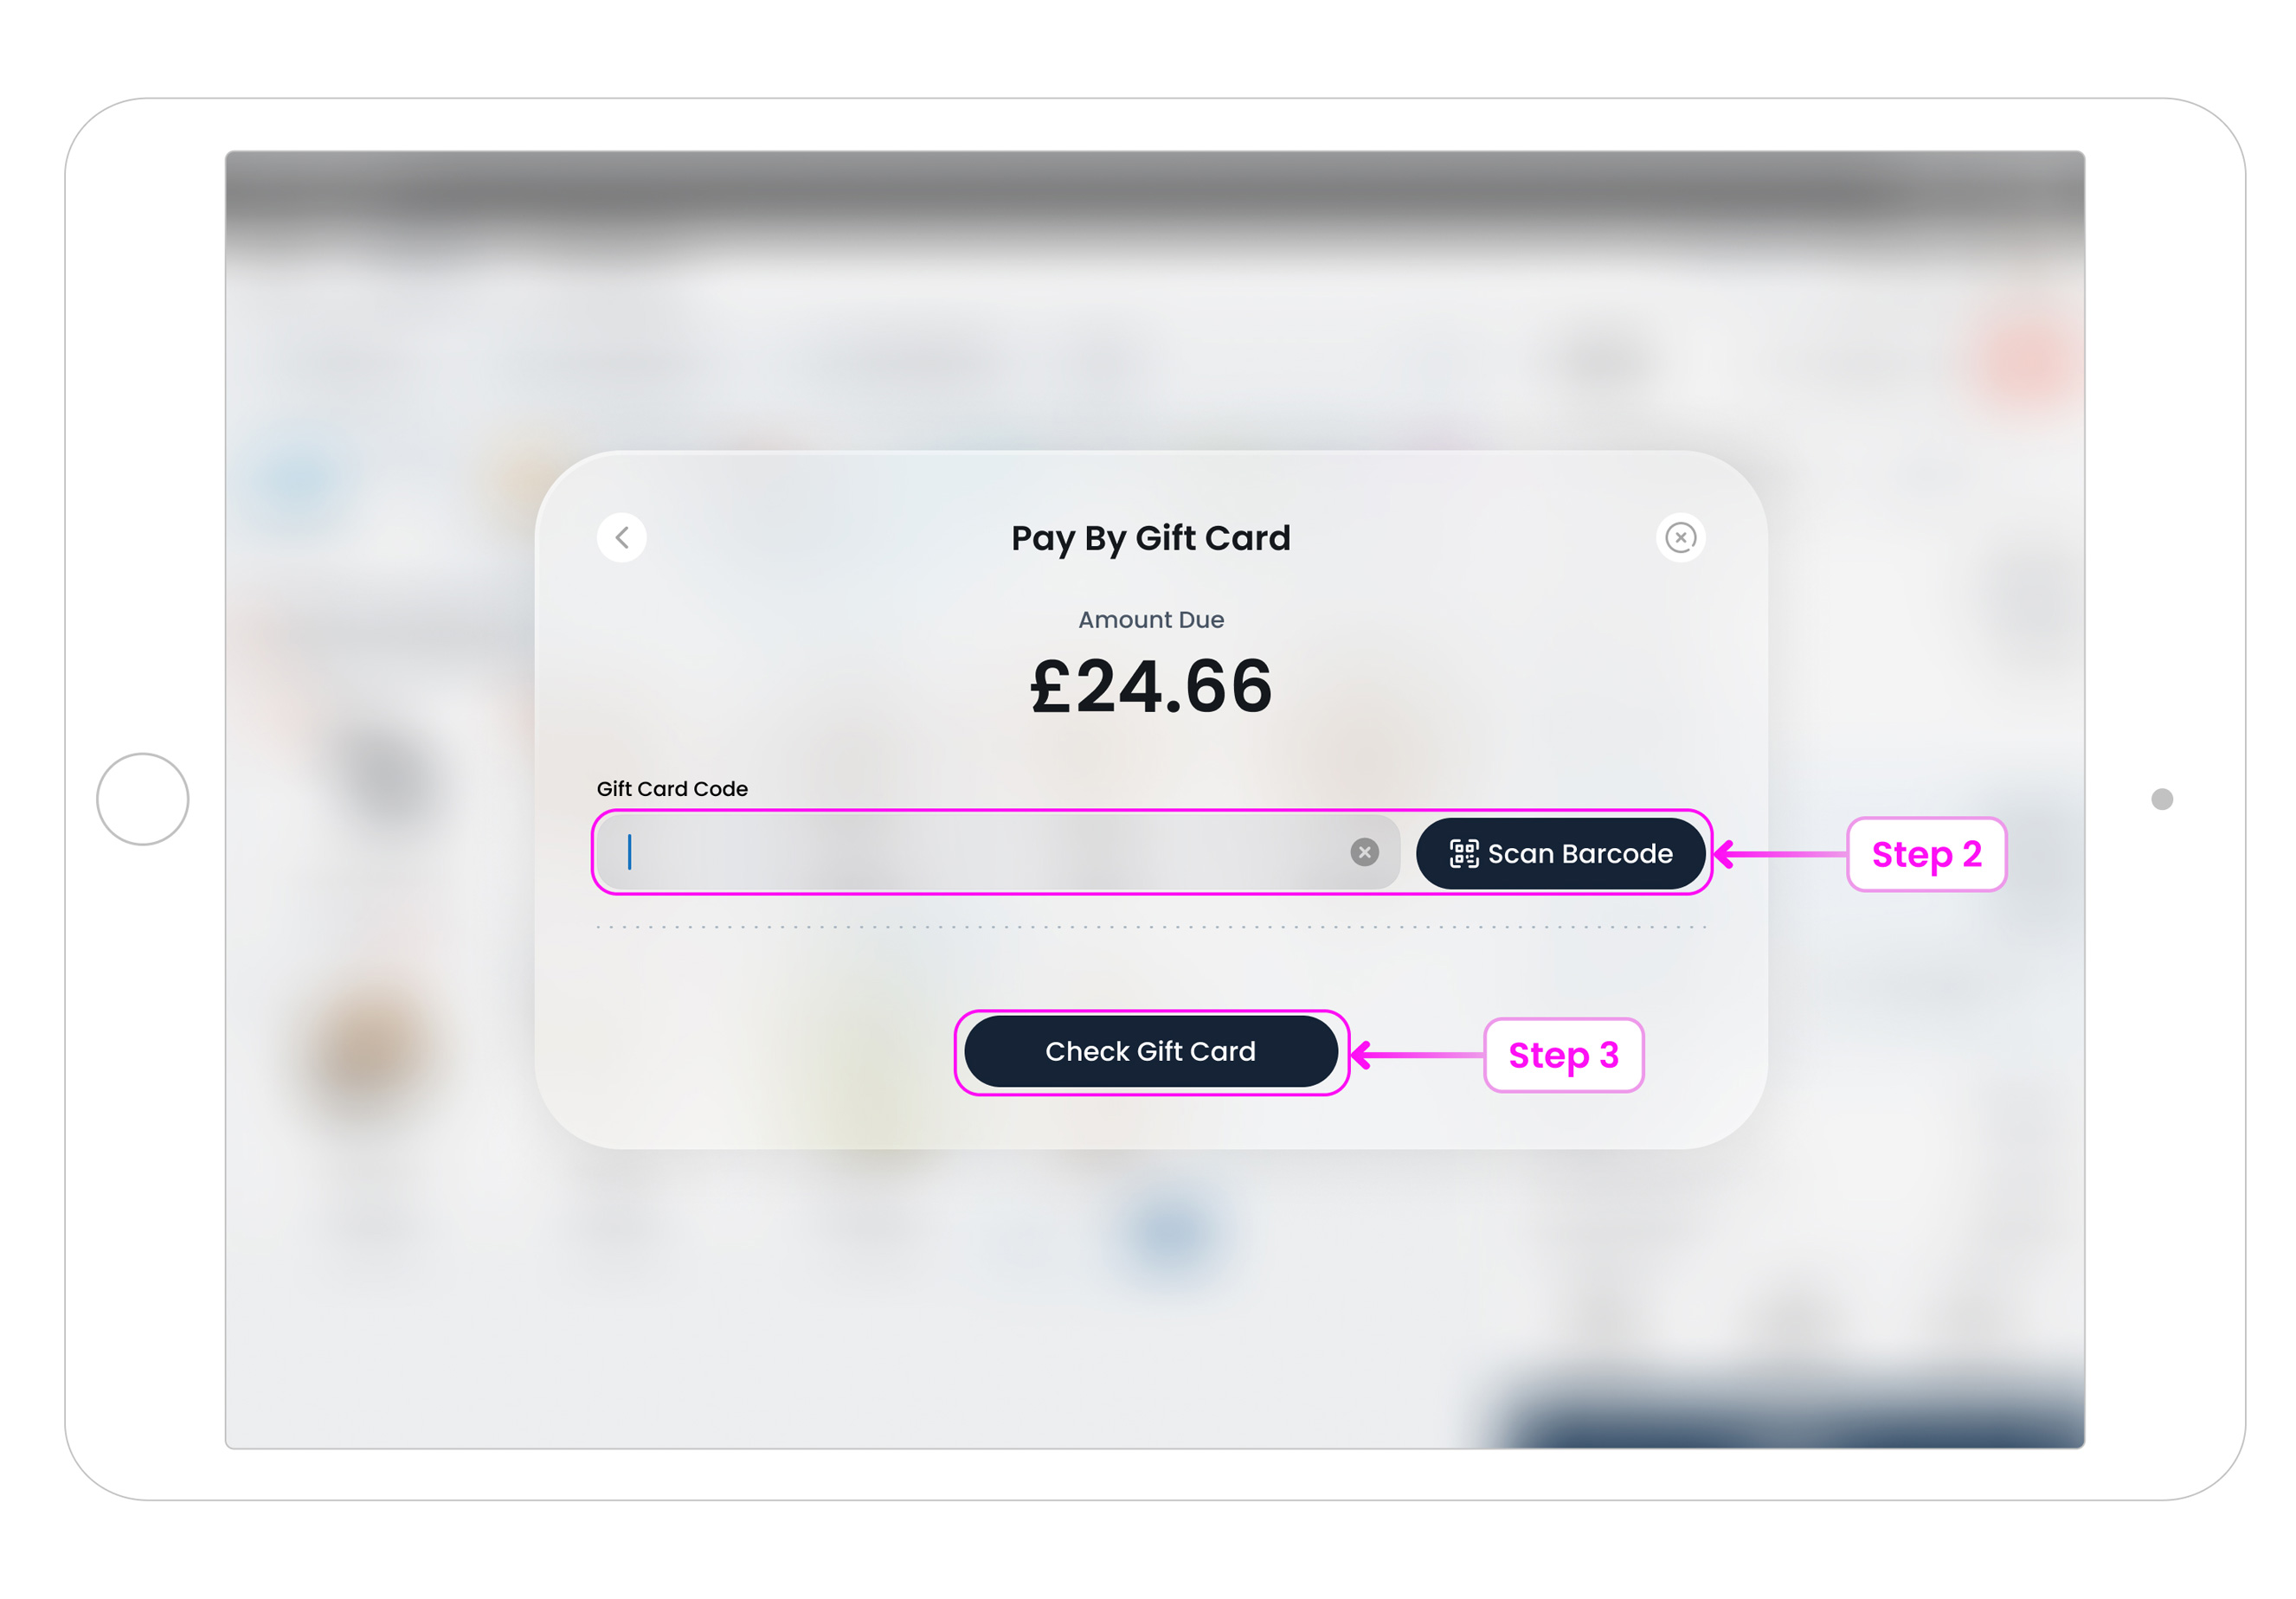
e. Pay with Gift Card
Accept store gift cards by scanning or entering the code. If the balance is lower than the total, you can pay the remainder with another method.
-
Step 1: Open Gift Card
Tap Gift Card to open the gift card screen.
-
Step 2: Scan or Type
Scan the barcode/QR or type the code into the field, then check the displayed card value.
-
Step 3: Apply & Settle Balance
Apply the gift card. If there’s any balance remaining, finish with Card or Cash.
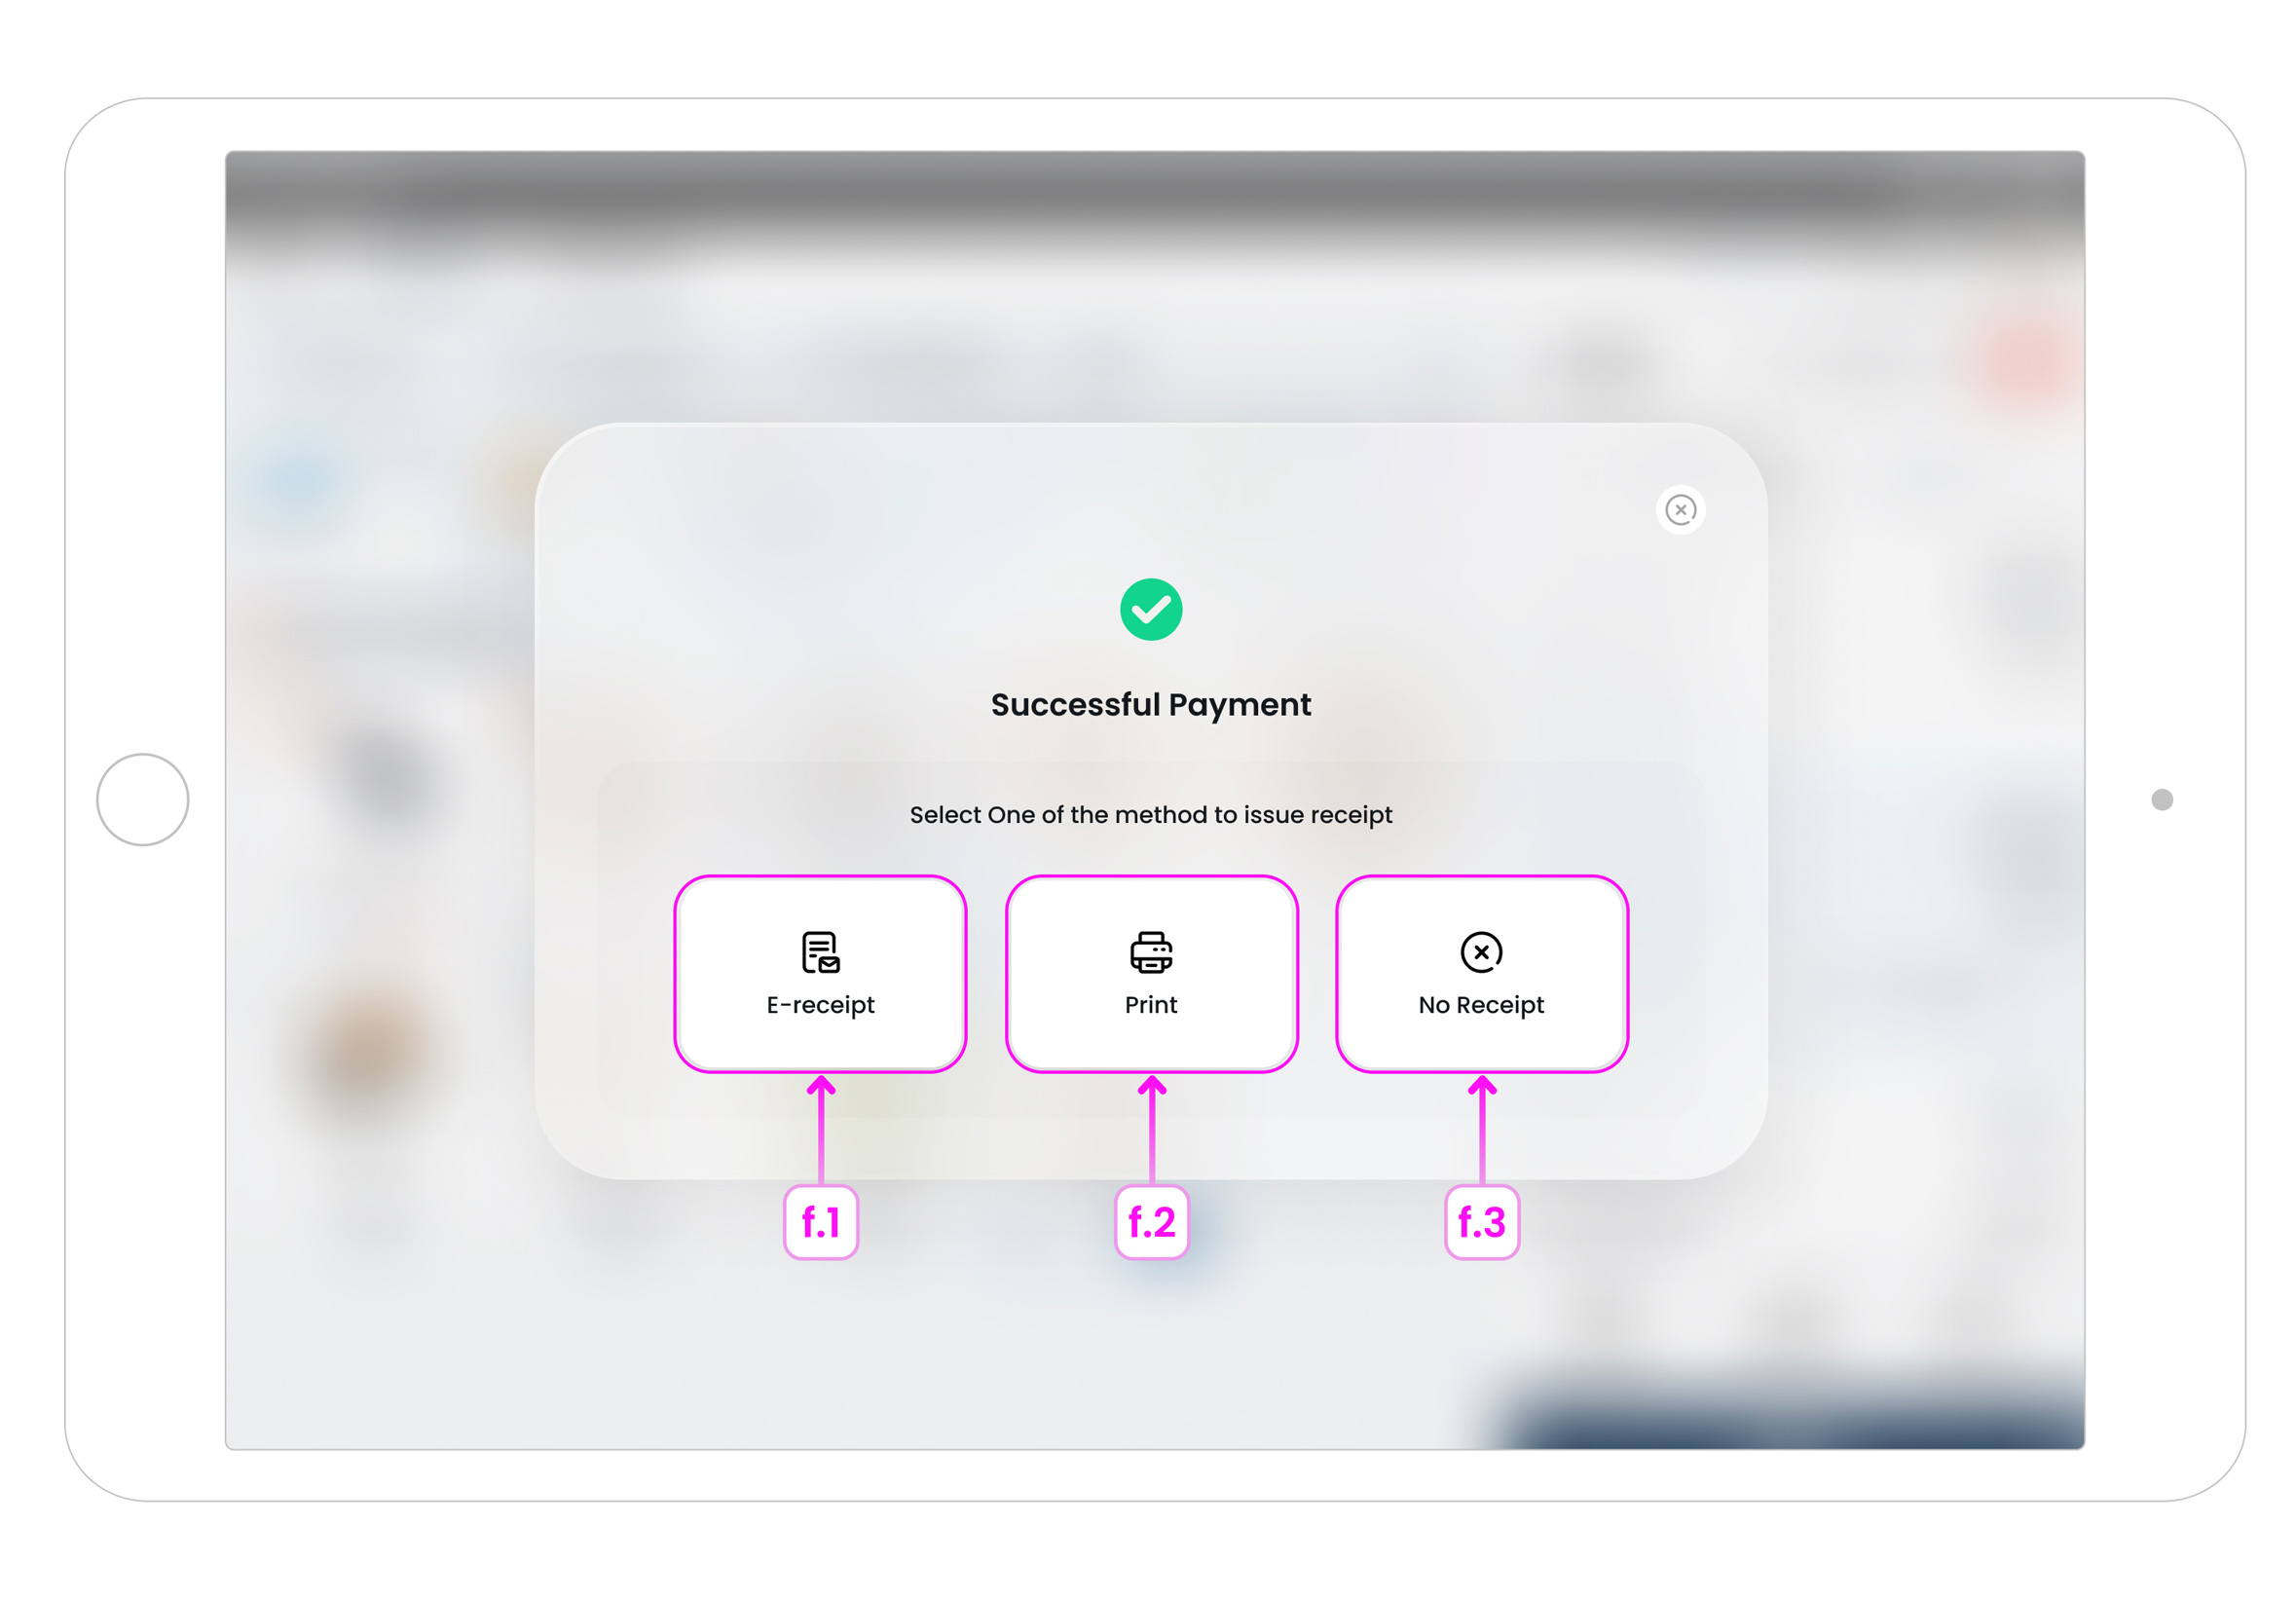
f. Receipt Options
After any successful payment, choose how to issue the receipt.
-
f.1. E-receipt
Enter the customer’s email to send a digital receipt.
-
f.2. Print
Print using your configured print template and printer.
-
f.3. No receipt
Finish the order without issuing a receipt.
Tips
- Use Quick Cash or Quick Card on the Take Order page to skip the popup for rapid checkout.
- If a customer wants to pay part cash and part card, use Split Bill and settle each part with the chosen method.
- If payment fails on the terminal, confirm the amount and try again, or choose another method.
Additional Tools on This Page
This is a quick summary. For full details and more screenshots, see the POS Page Overview.
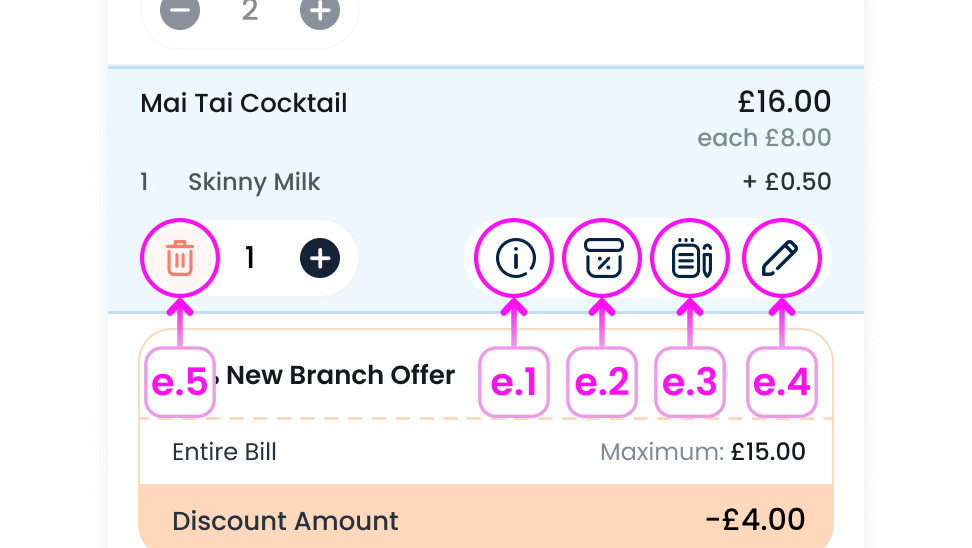
Item Actions
-
1. Edit Item
Appears for items with modifiers. Reopen the modifier popup to change options before checkout.
-
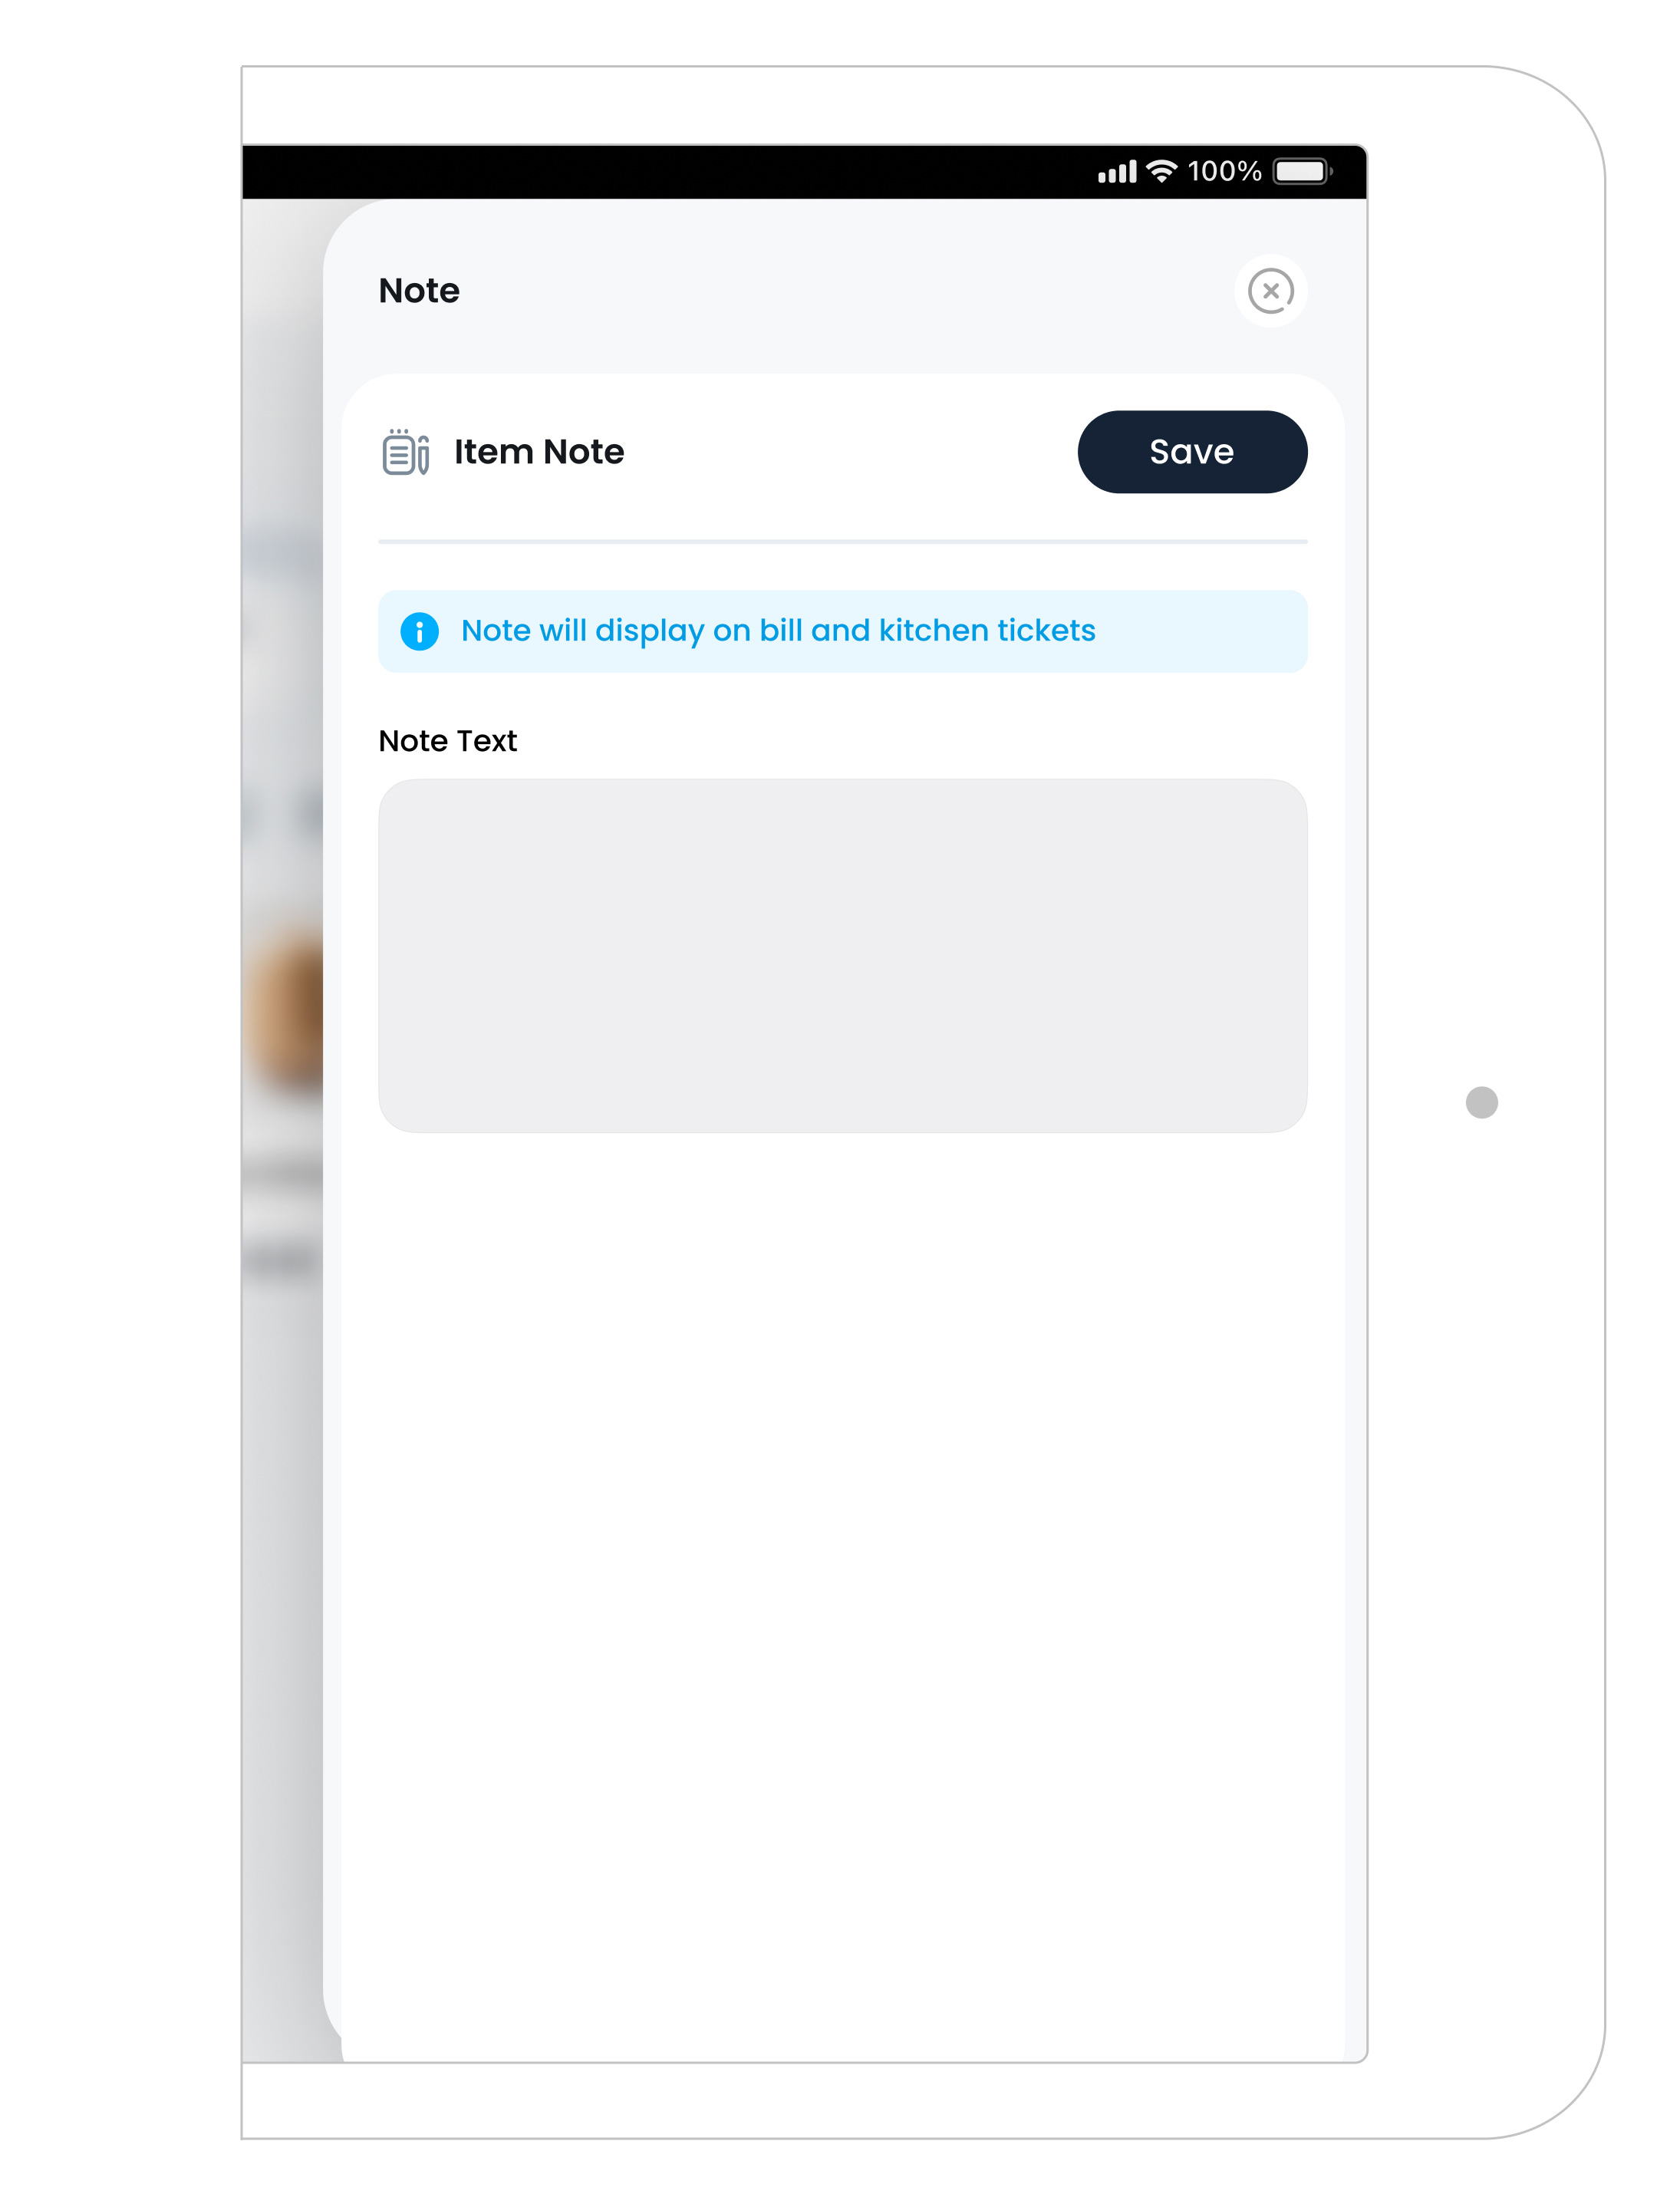
2. Item Note
Add a note that only applies to this item (e.g., “no onions”). Prints to kitchen/KDS where configured.
-
3. Item Discount / Manual Promotion
Apply a promotion or discount to this single item. Other items are not affected.
4. Item Info
Open item details in a modal to view key information about the item.
-
5. Quantity & Delete
Use +/– to adjust quantity. When quantity is 1, the left control becomes a delete button to remove the item.
Order Actions
-
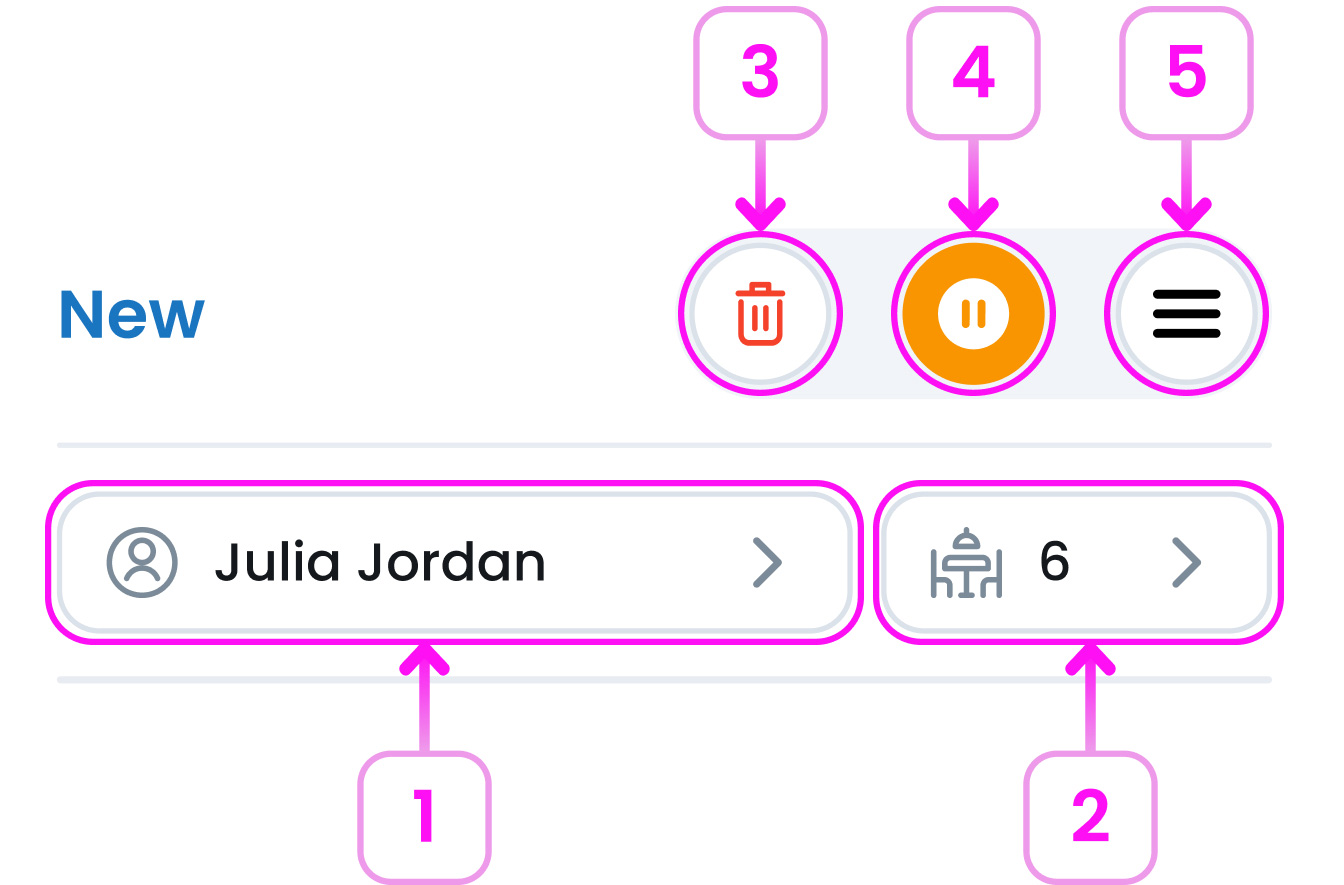
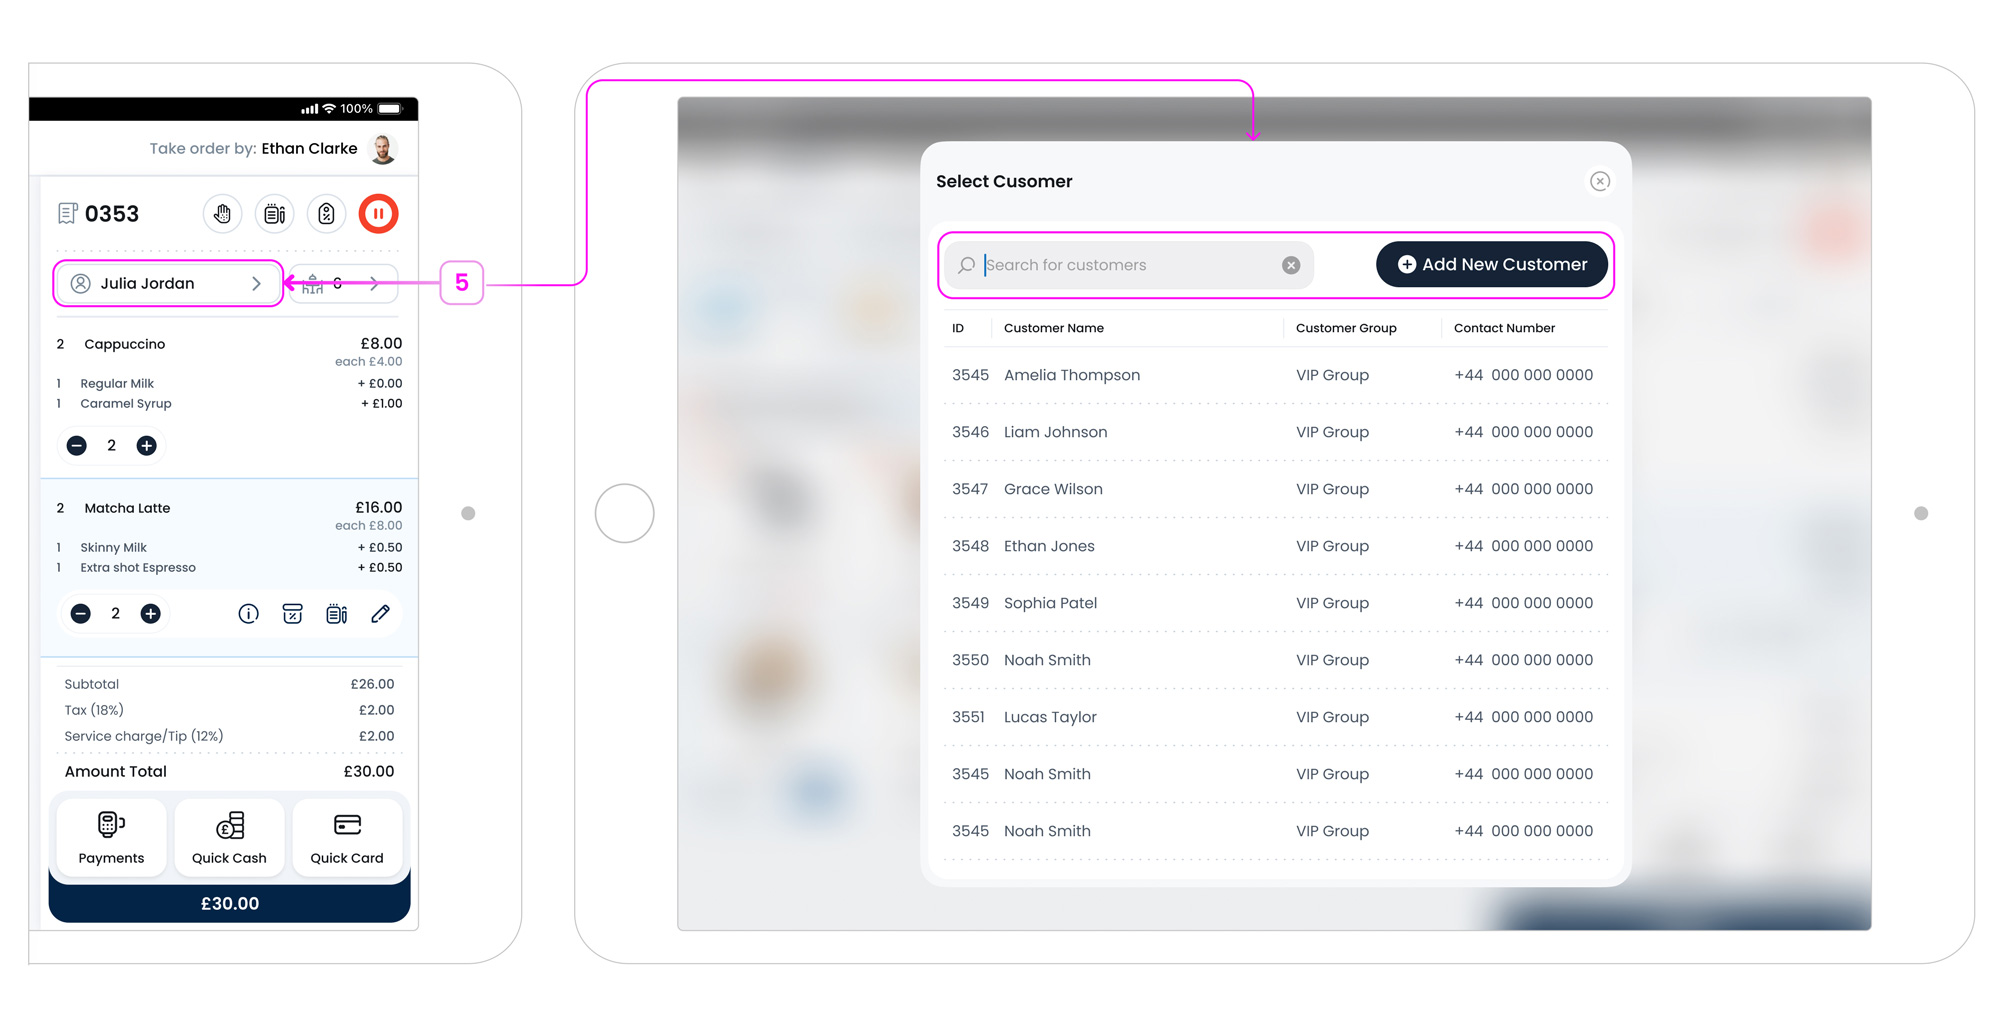
1. Add Customer (Optional)
Attach a customer by searching existing records or creating a new profile, useful for delivery/collection.
-
-
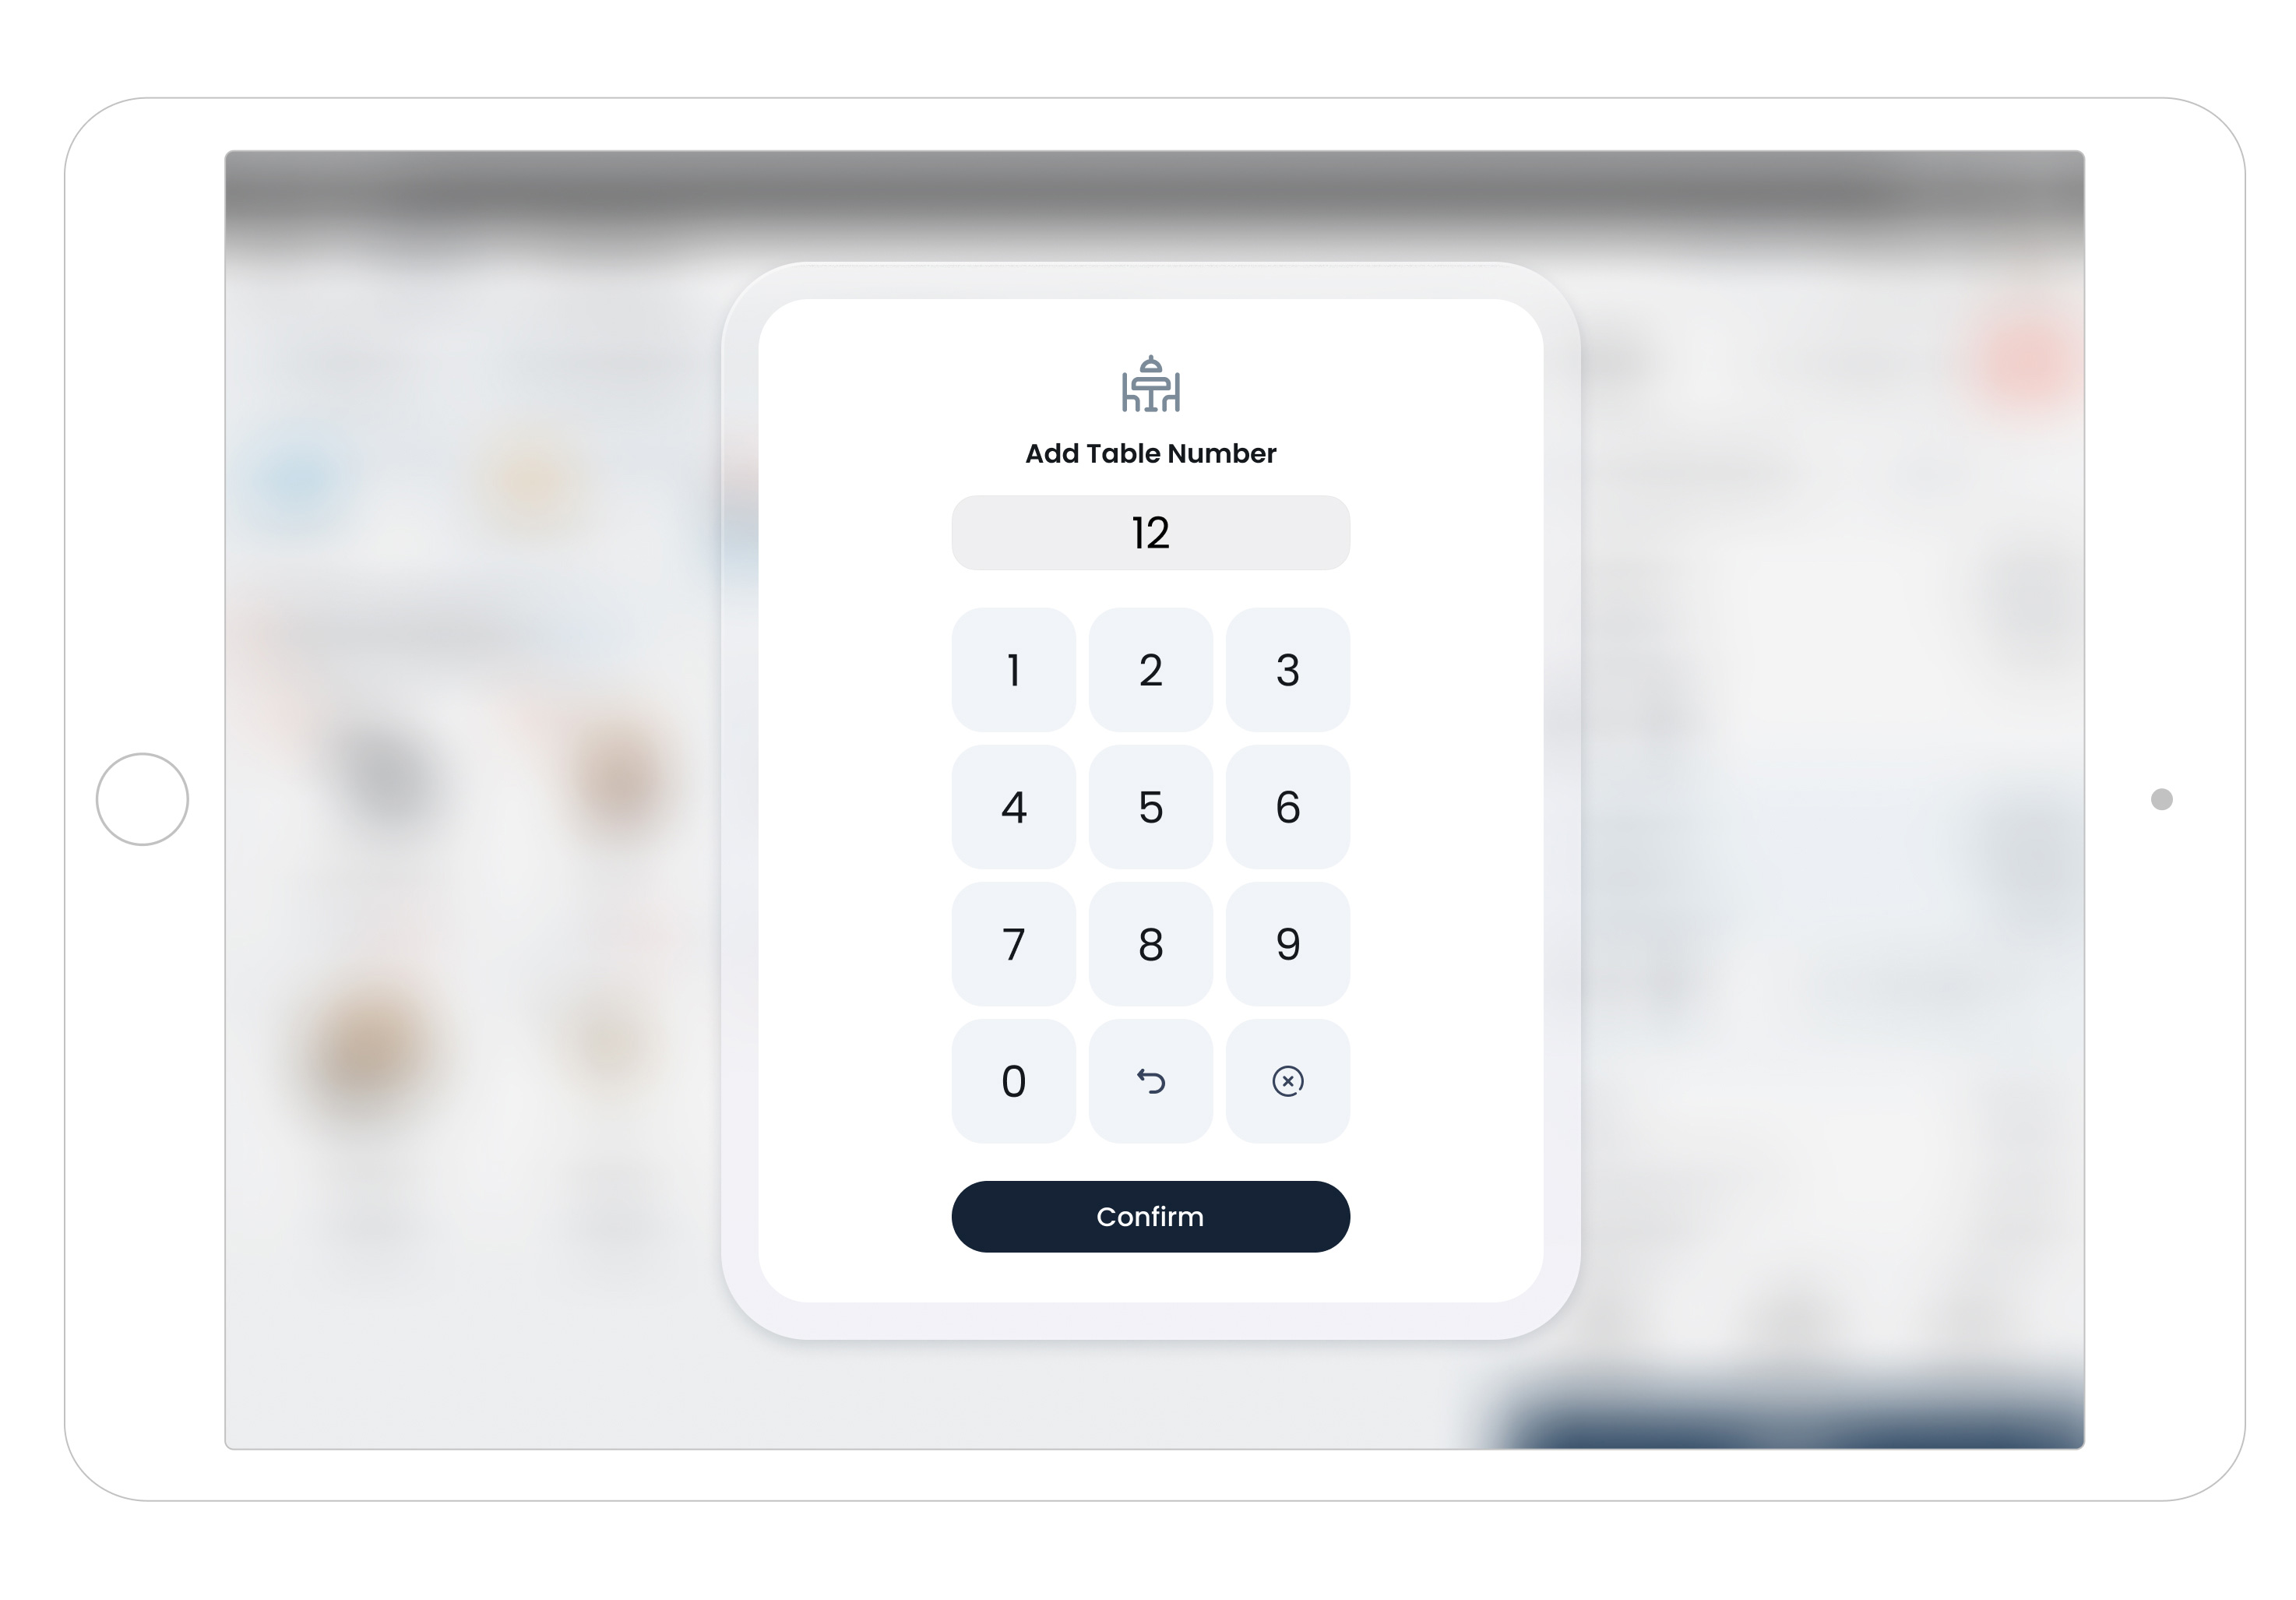
2. Add Table Number (Optional)
Open the numpad to add or edit the table number for accurate hand-off and easier filtering in POS/Order History.
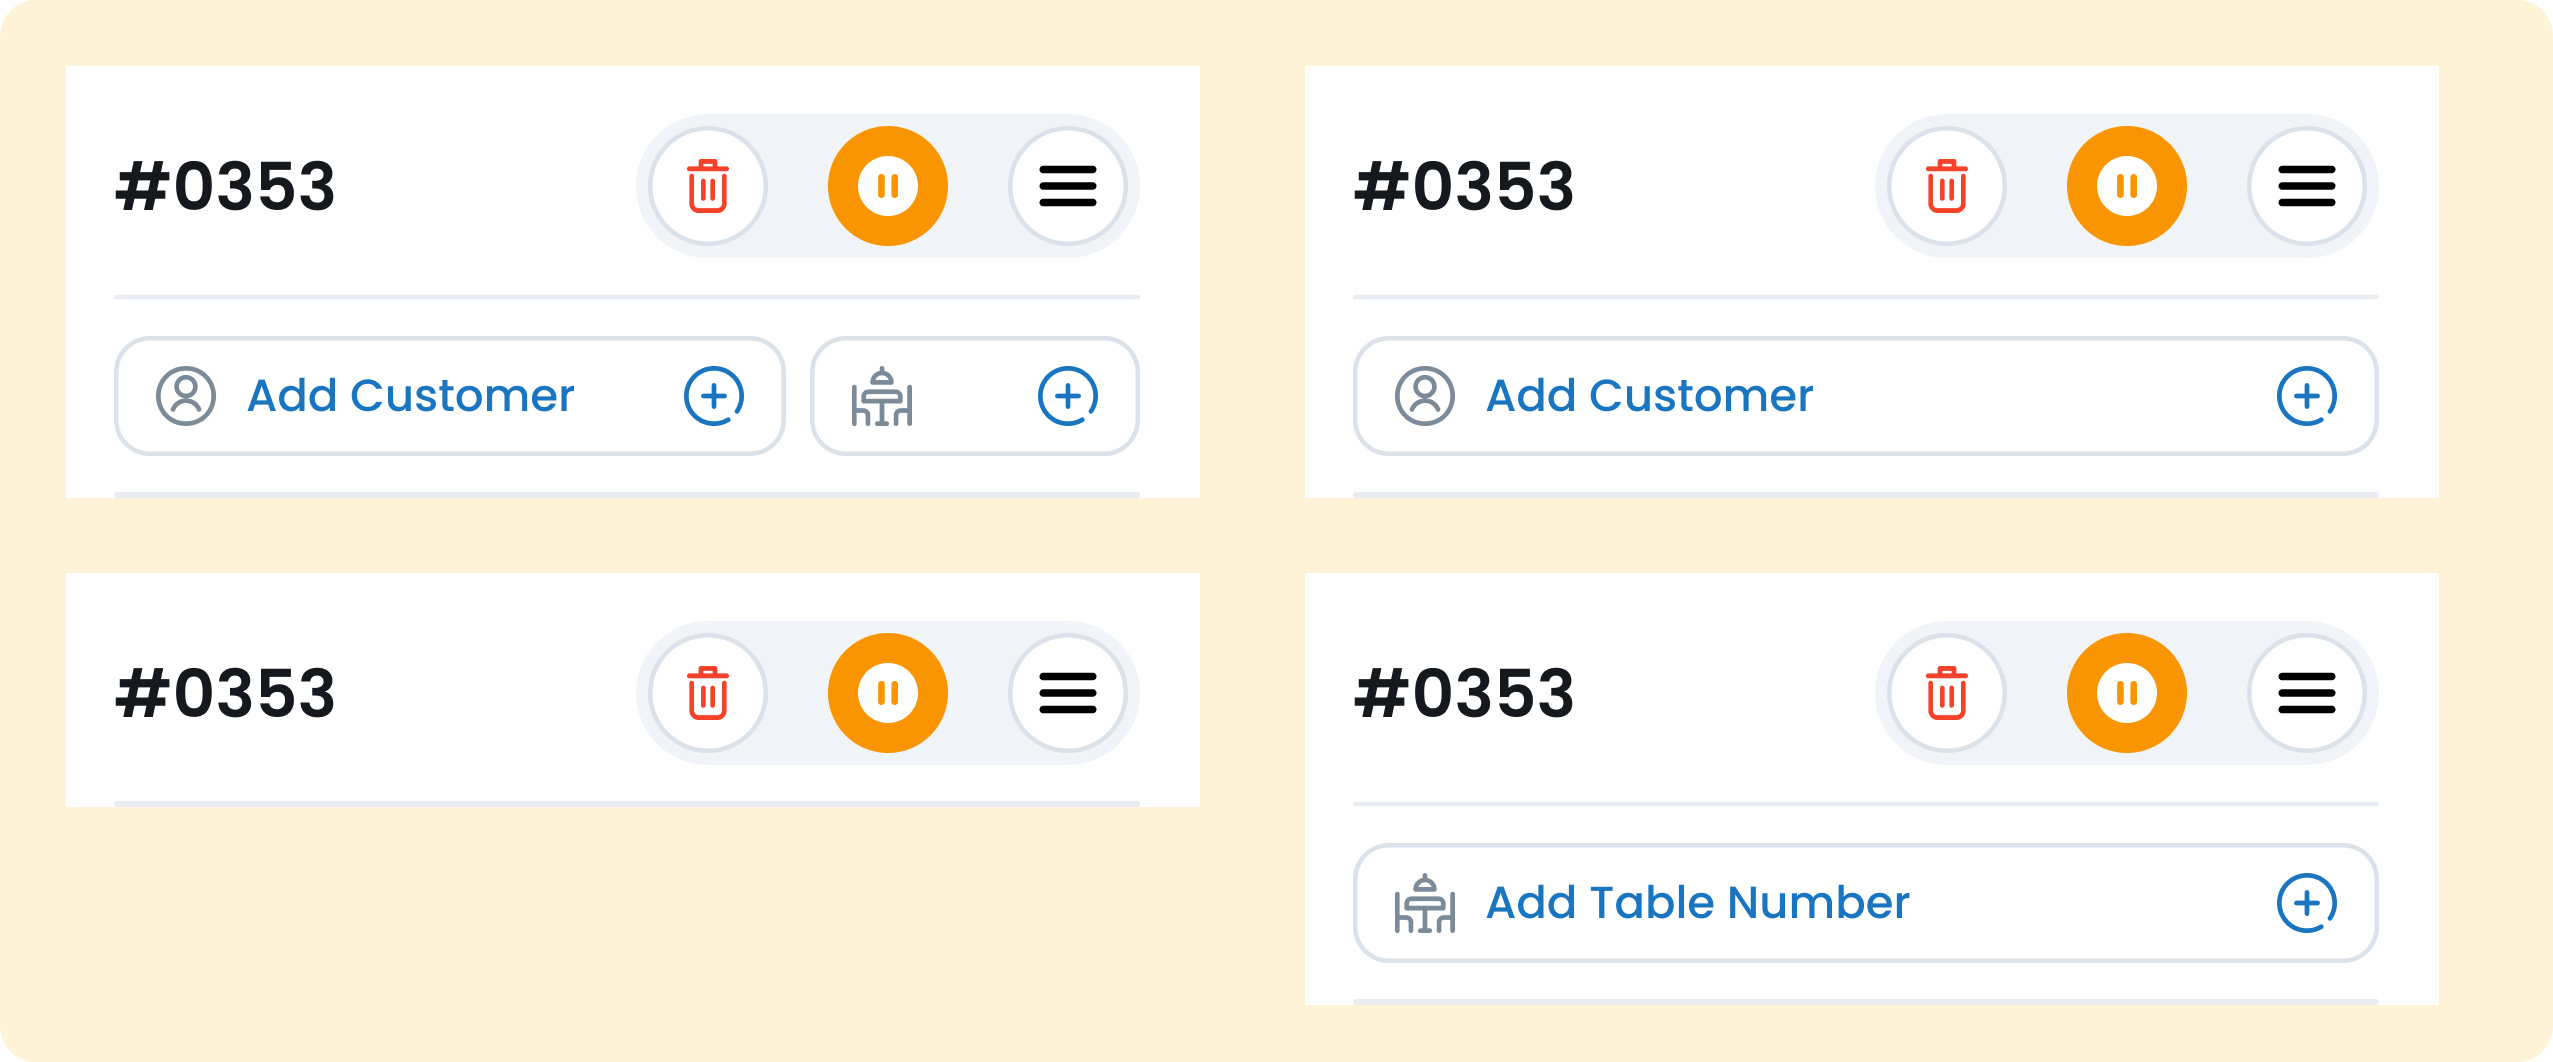
Customer & Table visibility
You can hide either (or both) of the header controls in the POS Profile. This is useful if you never capture customer names, don’t use table numbers, or want a cleaner header.
- Both ON: Shows Add Customer and Table controls.
- Customer only: Shows Add Customer the Table selector is hidden.
- Table only: Shows the Table selector the Add Customer control is hidden.
- Both OFF: The whole customer/table strip is hidden and the header shows just the order name/number.
Configure in the Portal: Settings > Devices & Profiles > POS Profiles (edit the profile) and turn the customer/table header controls ON or OFF.
-
3. Clear Order
Clear the current Take Order screen to reset the order and start over. This removes all items and changes from the basket.
-
4. Hold Order
Save the current bill to Held Orders to resume it later. This is useful when a customer steps away, wants to add more items later, or you need to temporarily switch to another order.
-
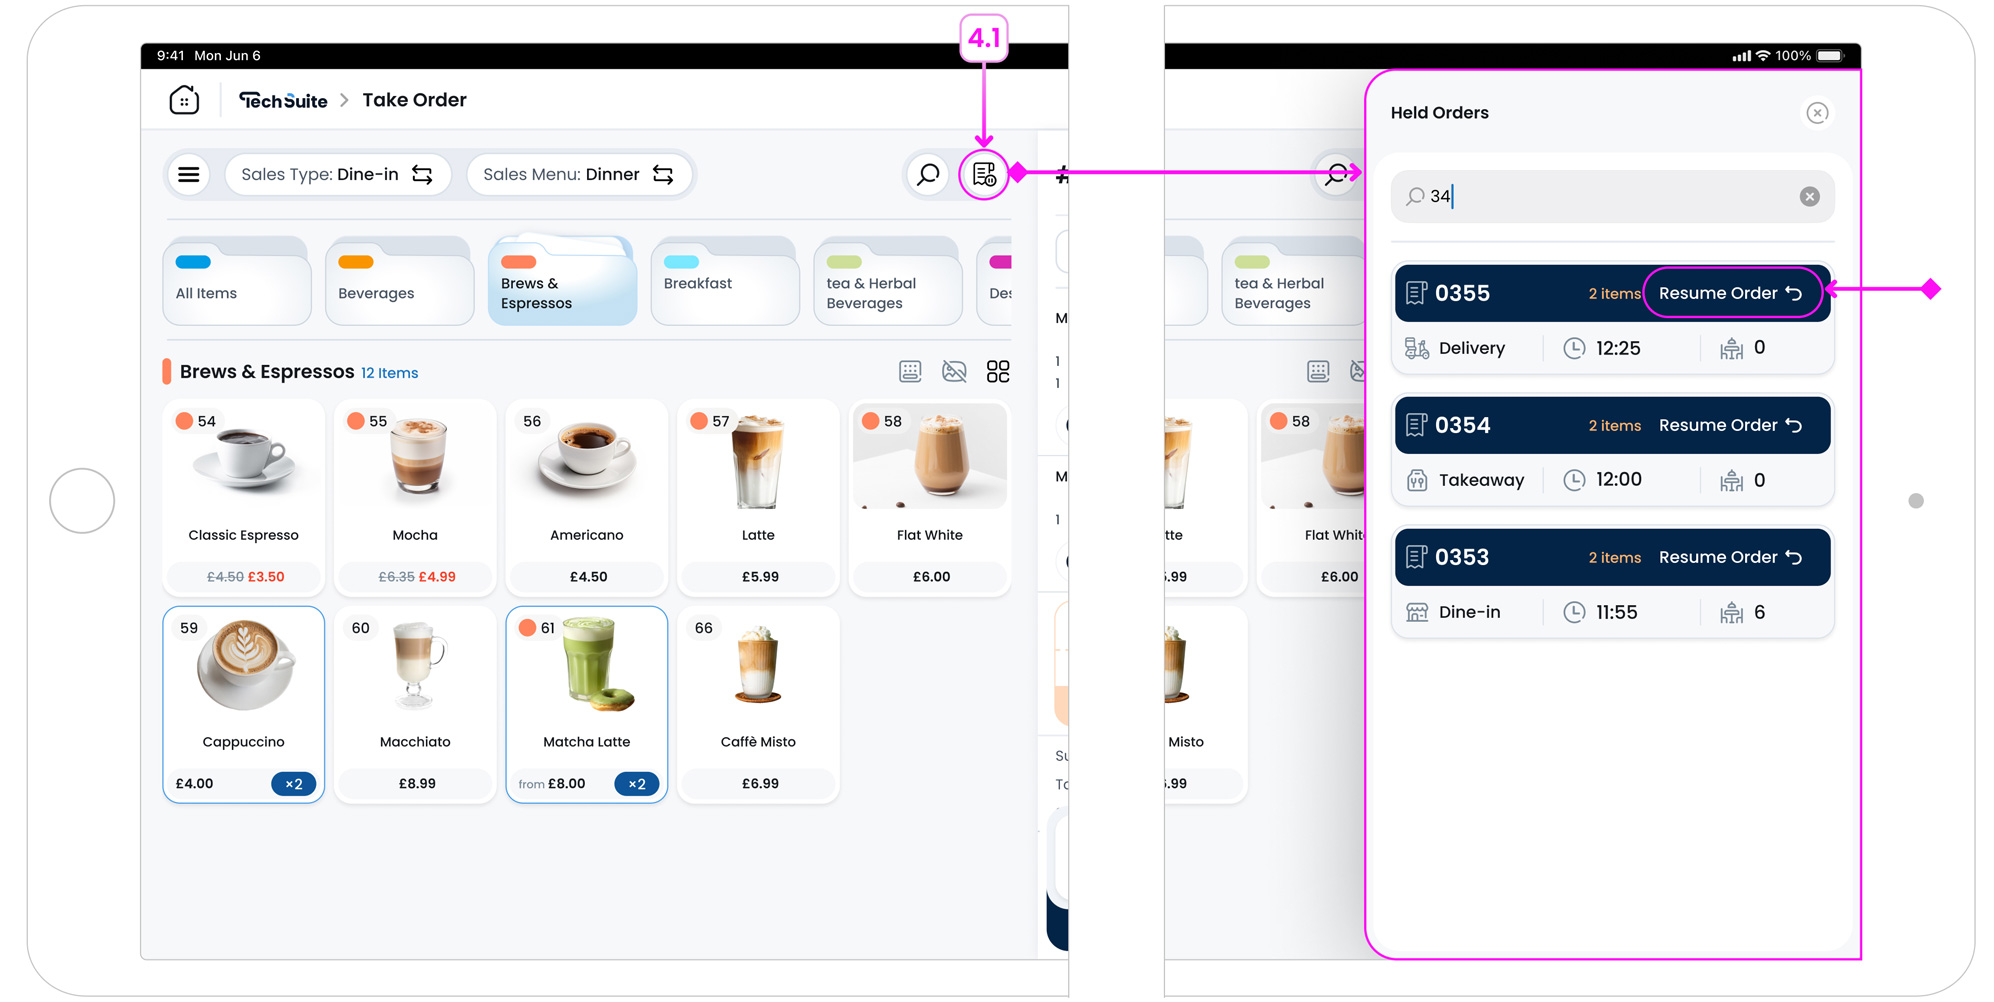
4.1 Resume from Held Orders
When you place an order on hold, it moves to the Held Orders list. Tap the Held Orders icon to open the modal and view all saved orders.
Select the order you want and tap Resume Order to continue editing and completing the bill.
-
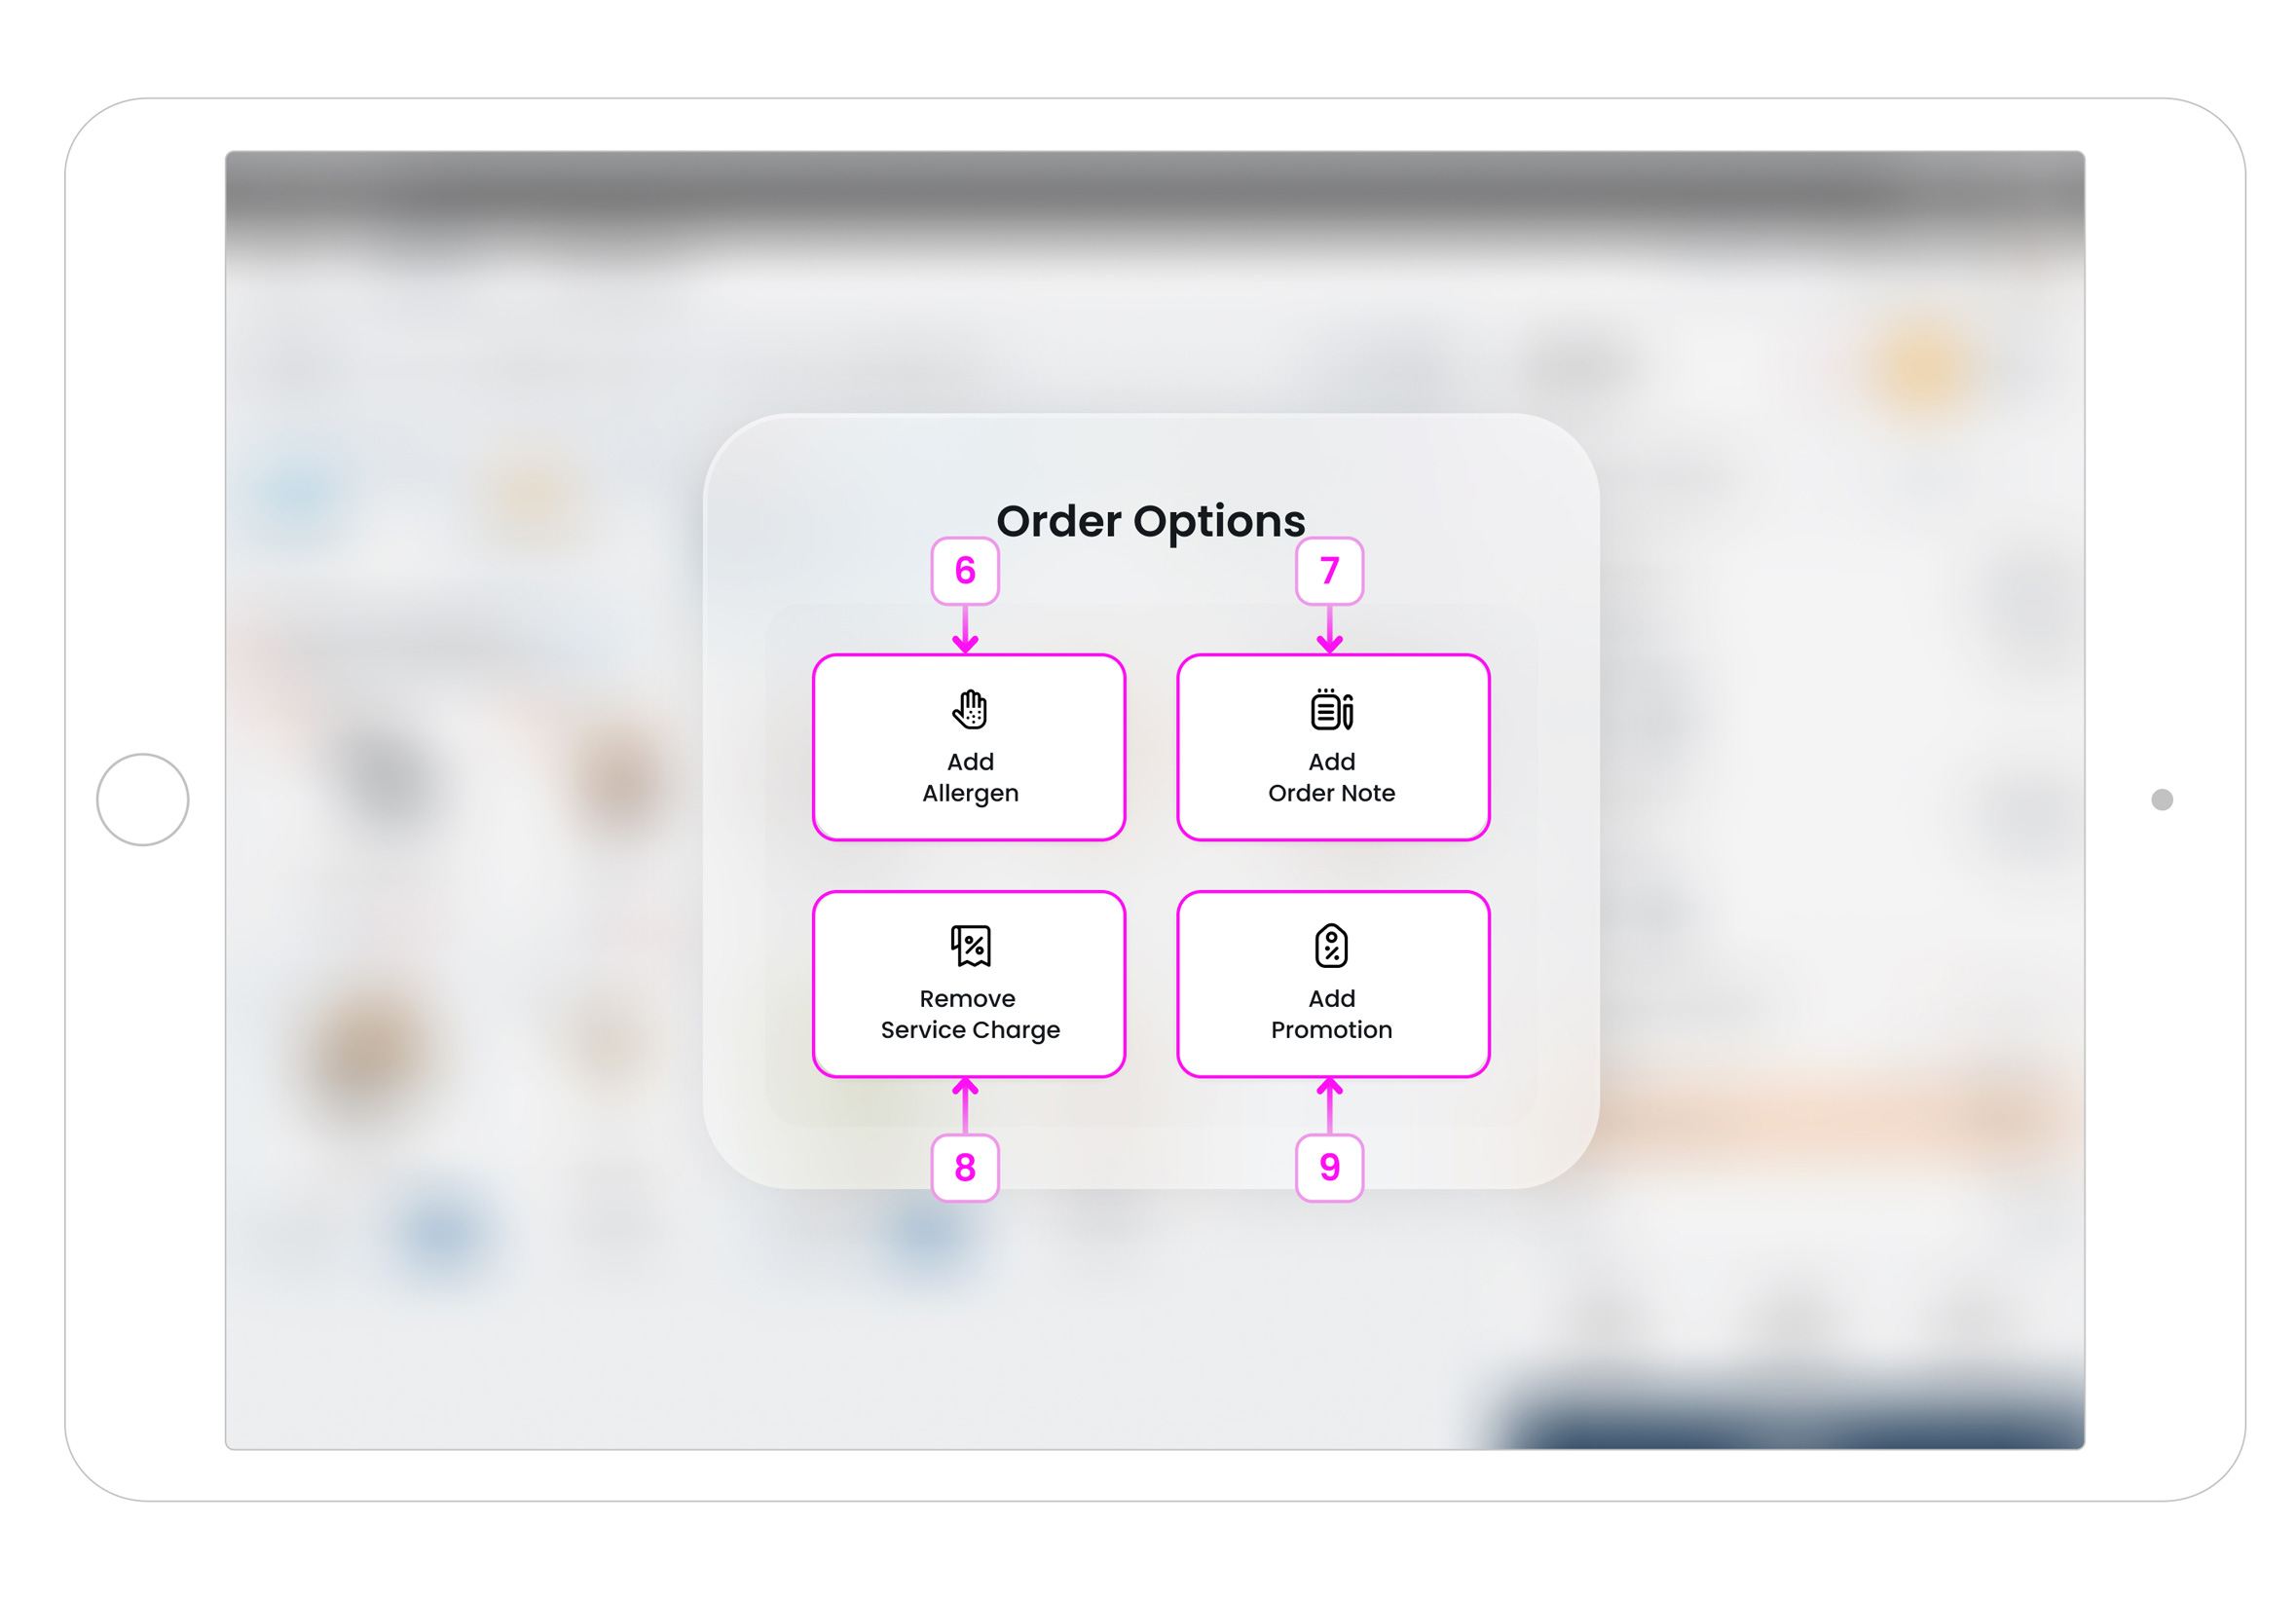
5. More Actions (Hamburger Menu)
Tap the hamburger menu to open additional order-level actions such as allergens, order notes, service charge removal, and promotions.
-
6. Add Allergen
Open a popup to record the customer’s allergens for this order, then confirm to save. This helps the kitchen prepare items safely.
-
7. Add Order Note
Add a note for the entire order (for example, delivery instructions or special requests). This note prints to the kitchen or appears on the KDS if configured.
-
8. Remove Service Charge
Remove the automatically applied service charge from the order when needed. This only affects the current order and does not change your global service charge settings.
-
9. Add Promotion
Apply an available order-level promotion to the entire order. This does not affect individual item discounts unless specifically configured.