Create a New Modifier Group
In this article, we walk you through how to create a new modifier group. You can customise each group with a name, add one or more modifier options, set selection limits, control where the group appears across your menus, and optionally add images to individual modifier items.
To Get Started
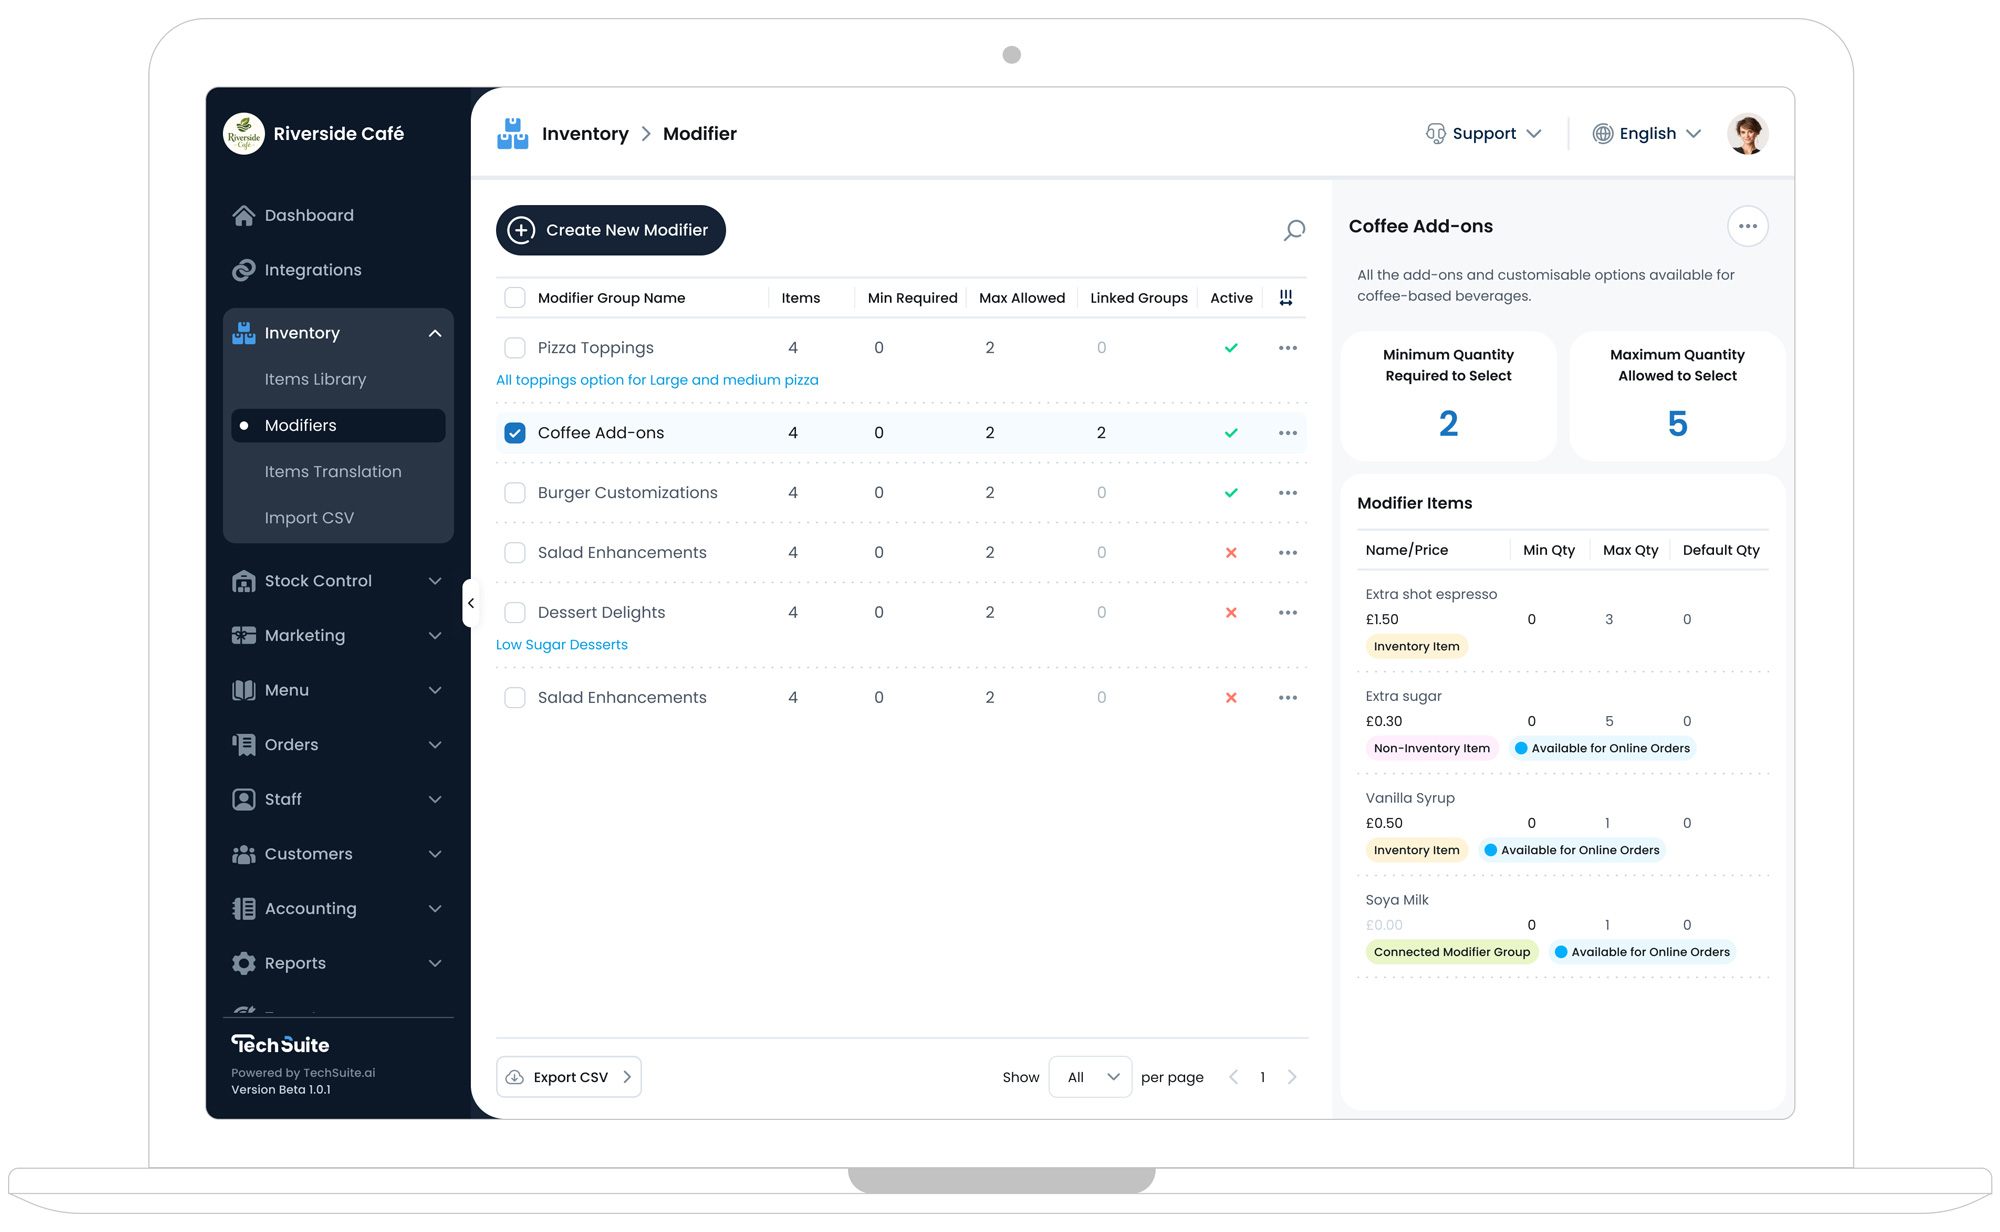
To create a new modifier group, log in to the TechSuite portal and navigate to Inventory > Modifiers from the left sidebar. Then, click the “Create New Modifier” button This will take you to the setup page.
Step 1: Set Modifier Group Info
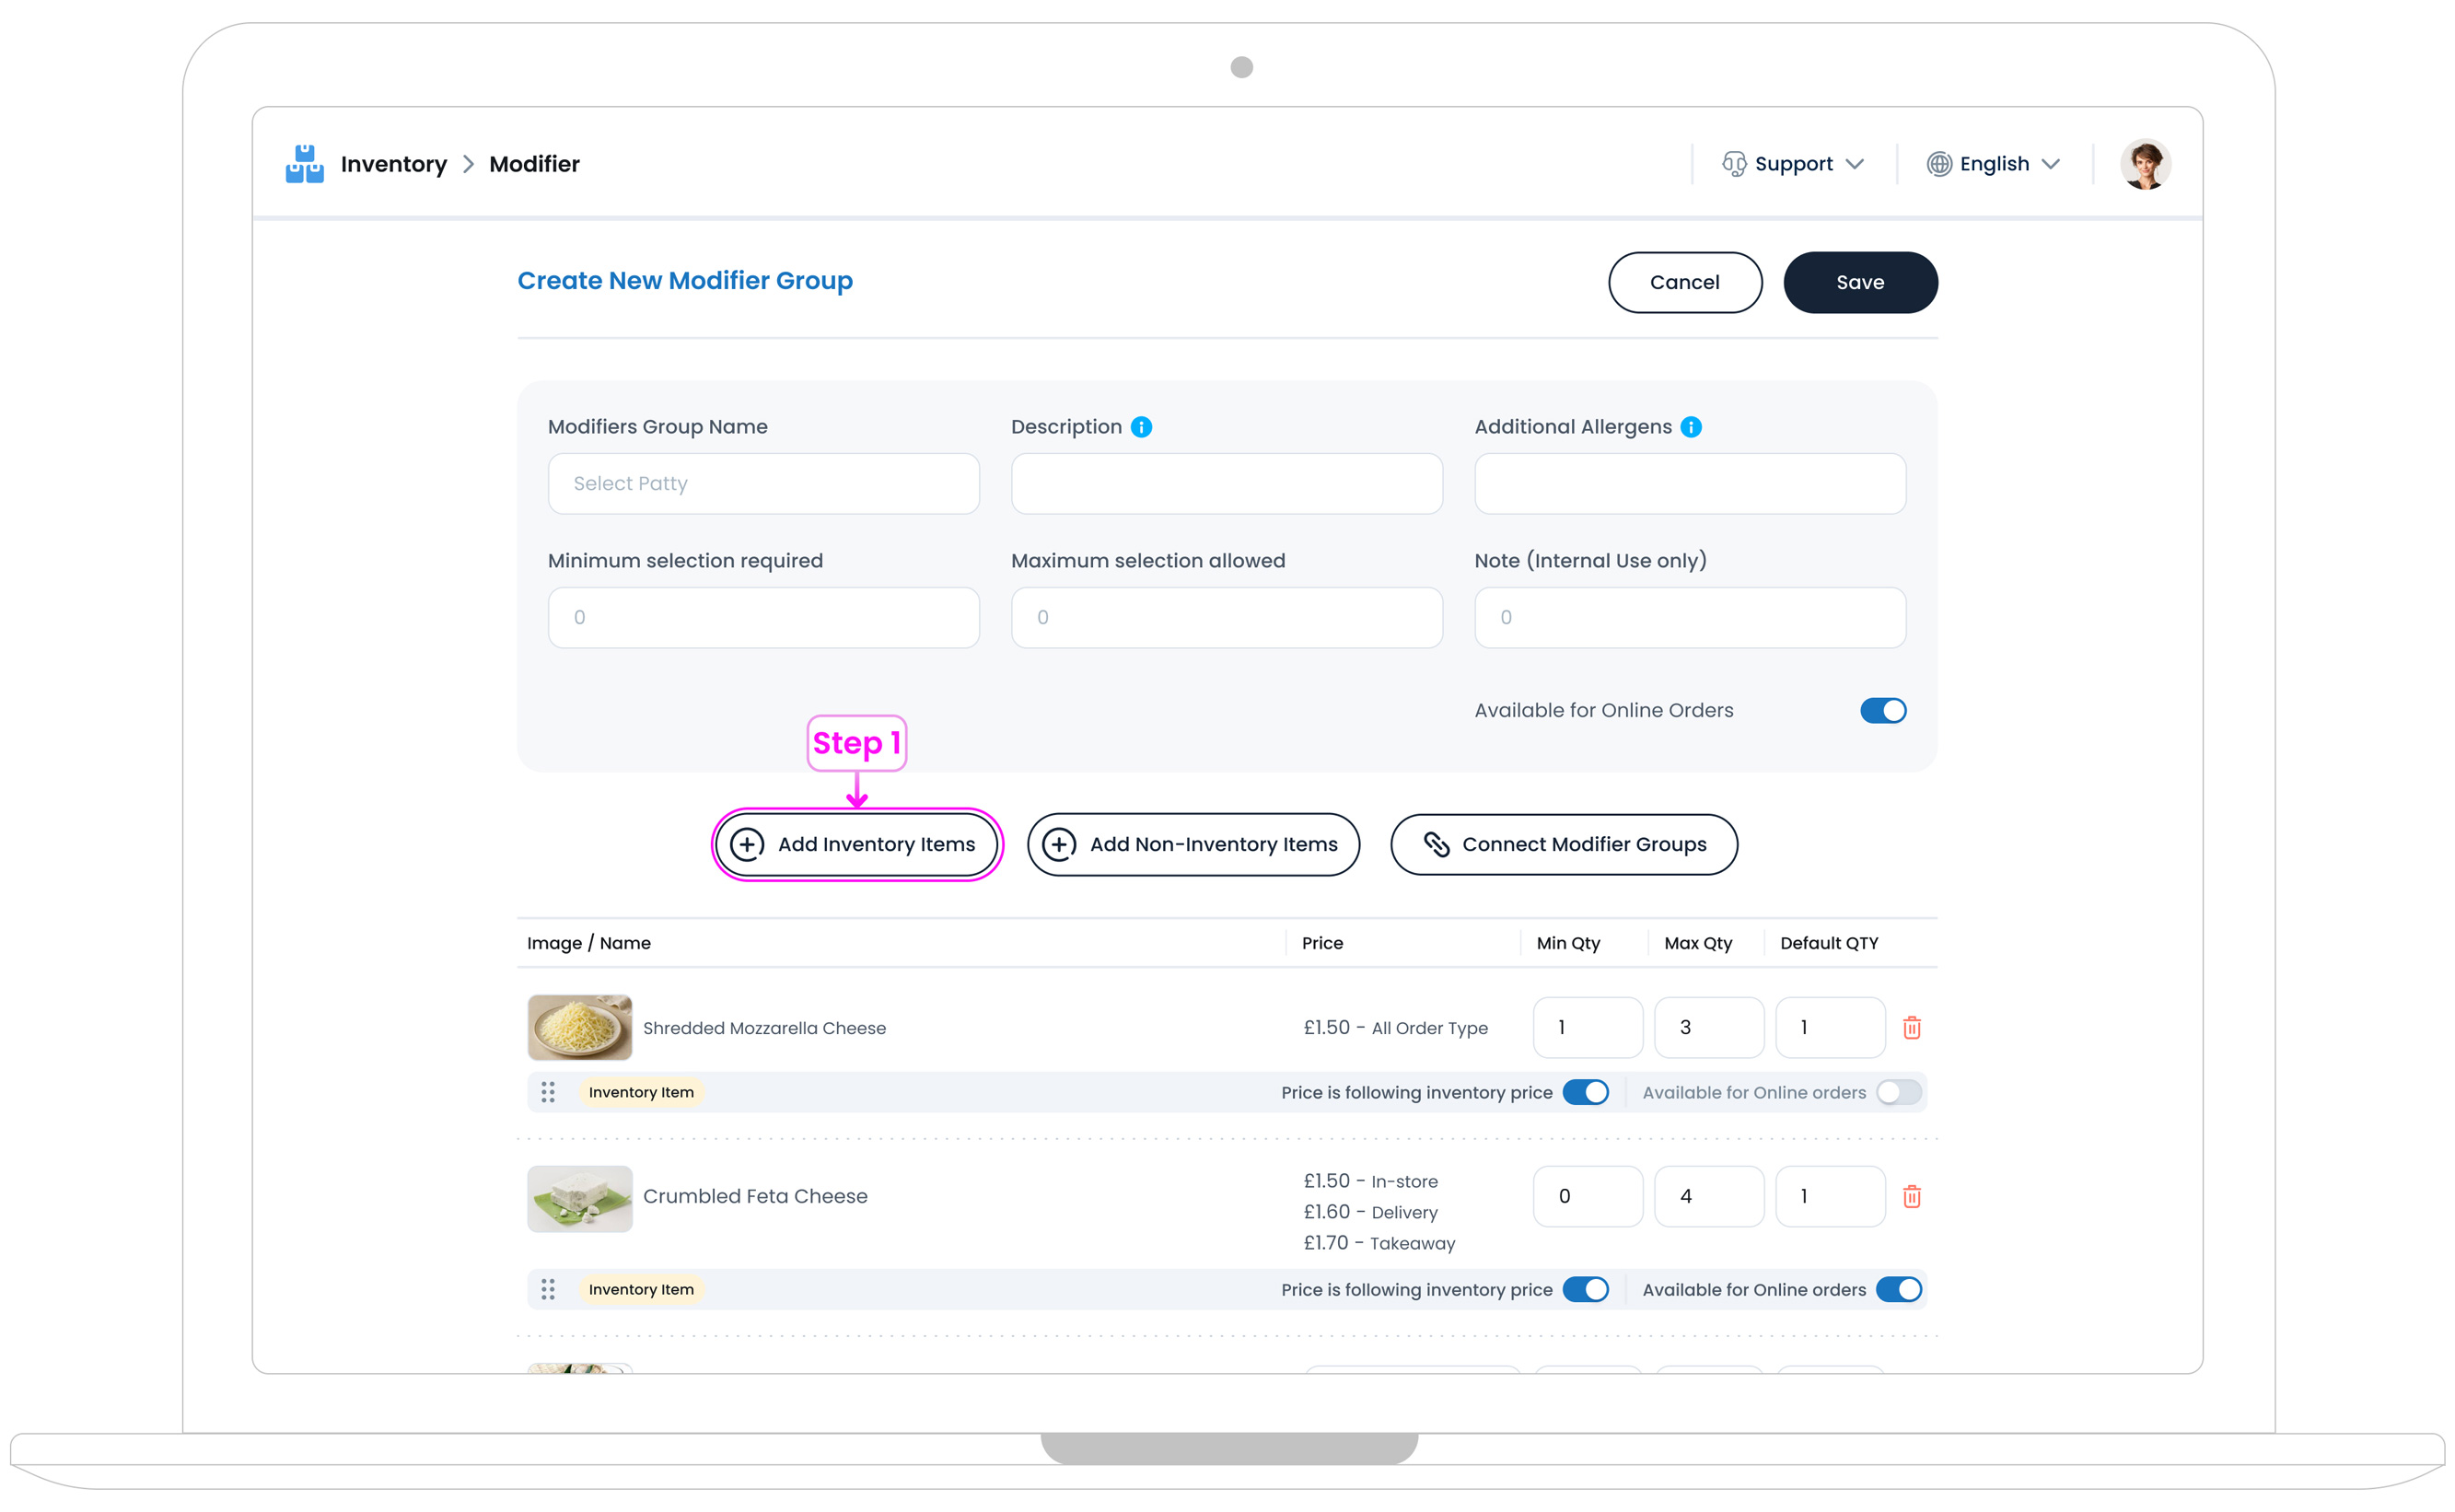
After clicking the “Create New Modifier” button, you’ll be taken to the Modifier Setup page.
At the top of the page, you can enter main details for your new modifier group.

a. Modifier Group Name
Give your modifier group a clear and descriptive name (e.g., Milk Type or Spice Level).
b. Description (Optional)
Add extra context to describe the group if needed. This is useful when you want to speak directly to the customer and clarify what the modifier group is for, how it works, or guide their selection.
Examples:
- Choose up to 2 sauces to go with your wings.
- Please select at least 1 base for your smoothie.
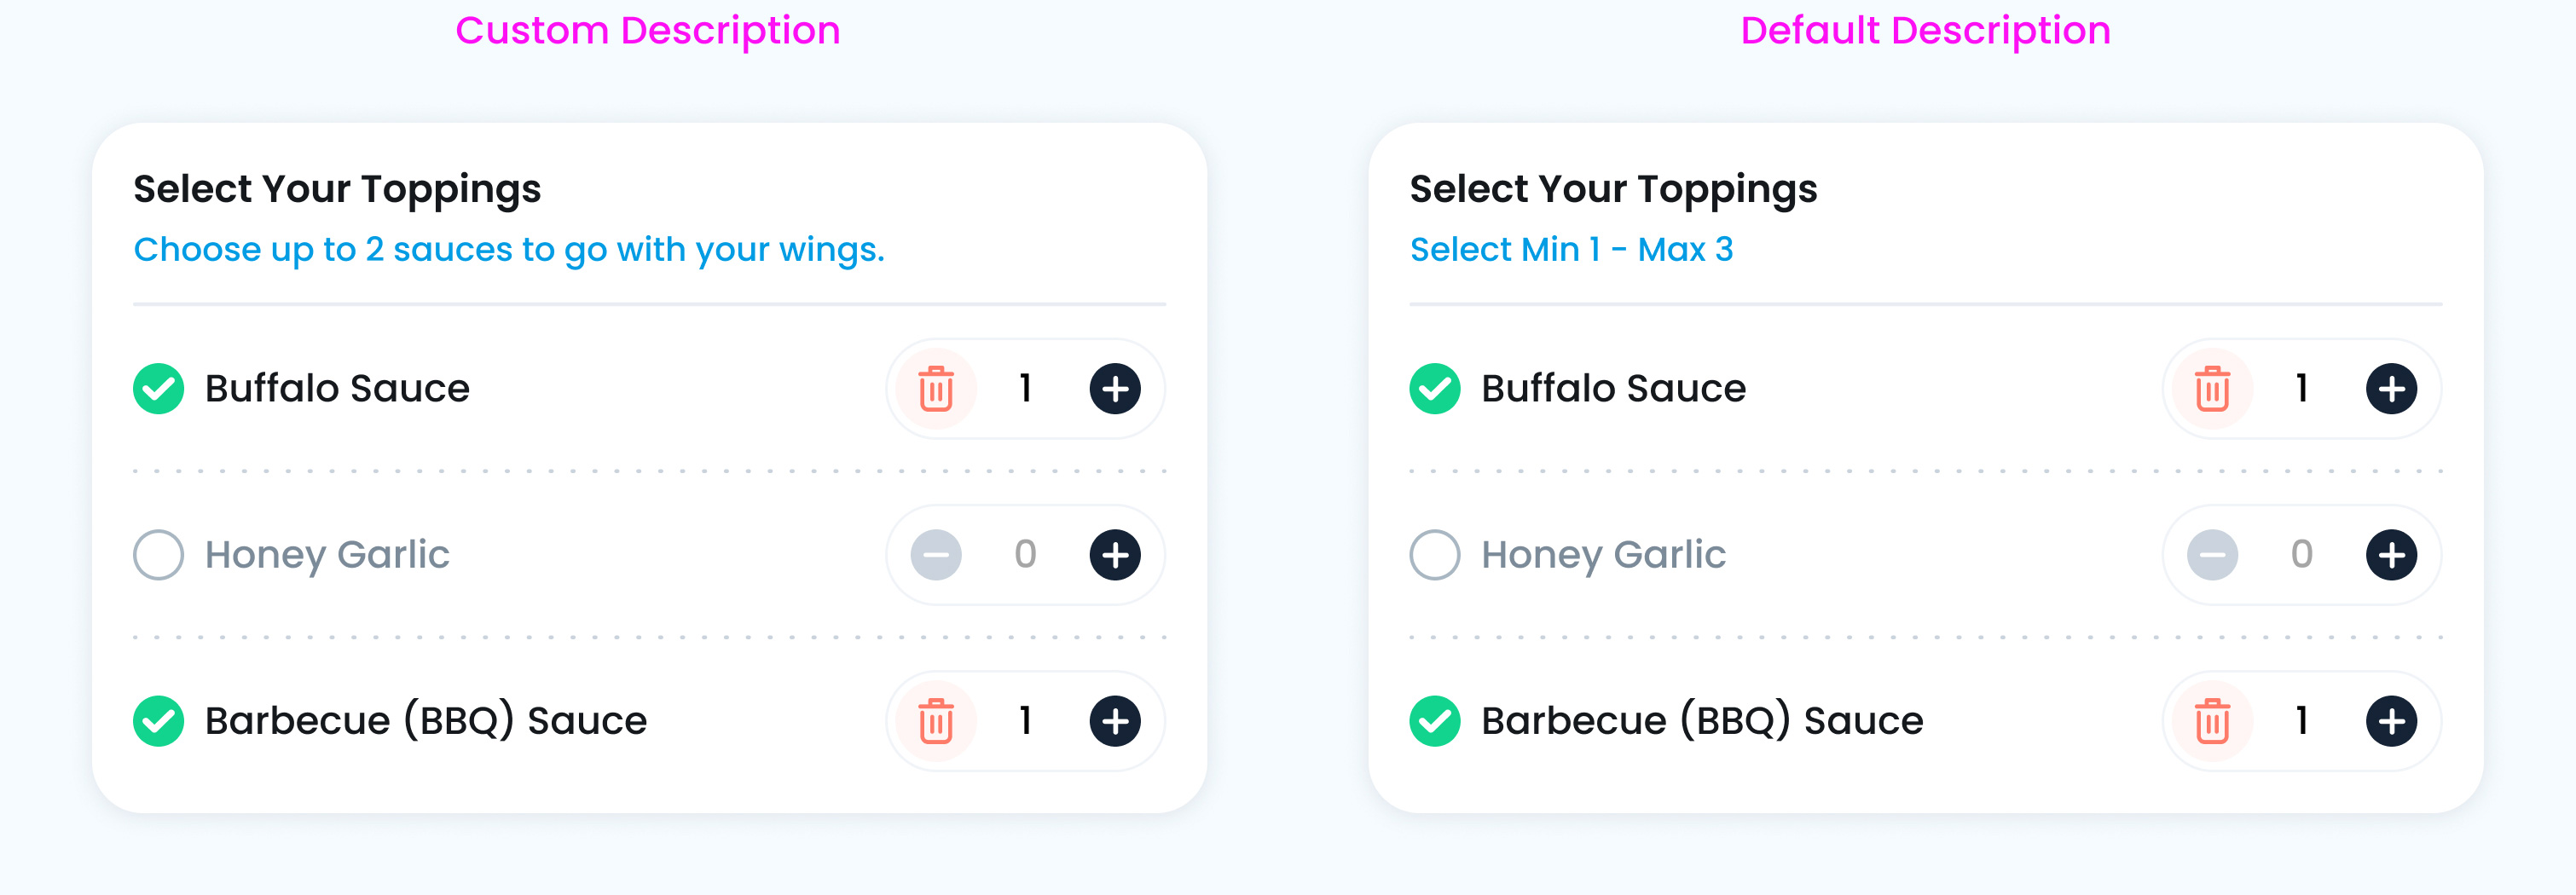
If you leave this field blank, TechSuite will automatically generate a default description based on your Minimum and Maximum selection rules.
c. Group Quantity Selection Rules
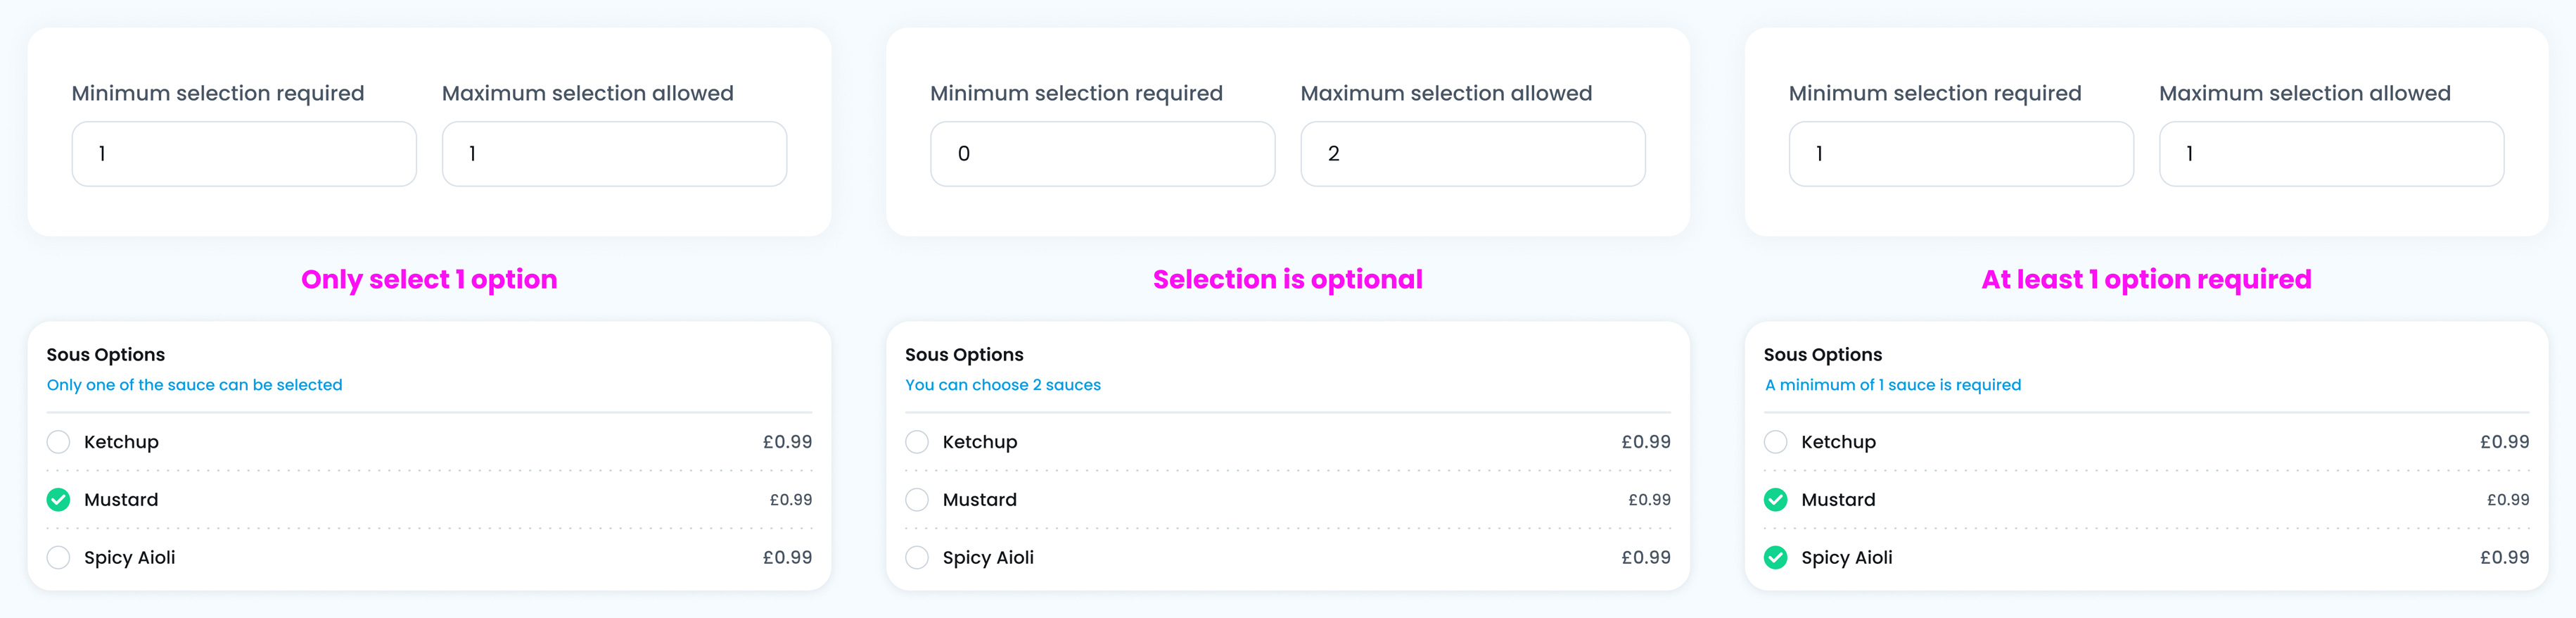
Set the quantities for ’Minimum Selection Required’ and ’Maximum Selection Allowed.’ These fields determine the minimum number of options a customer must select from this modifier group and the maximum number they are allowed to choose.
Examples:
- If the customer must select exactly one sauce, set both Minimum and Maximum to 1
- If the selection is optional and allows for up to two extras (like toppings), set Minimum to 0 and Maximum to 2.
- If you want to require at least one but allow up to two (e.g., flavour shots), set Minimum to 1 and Maximum to 2.
d. Additional Allergens (Optional)
Add allergen information for the modifier group if needed. This helps with clarity and customer safety.
e. Available Modifier Group for Online Orders
Enable this if you want this modifier group to be available for customers ordering online (such as through your website, app, or delivery platforms).
If this checkbox is off, the modifier group will still be available in-store (e.g., POS or kiosk), but it won’t appear in online ordering channels.
Why this matters:
Sometimes, you may want certain options to be available in person only, due to legal restrictions, delivery limitations, or customer experience reasons.
f. Internal Note
Use this field to add internal notes for your team. This note is not visible to customers.
The internal note will appear under each modifier row in the modifier list. This helps keep important operational details visible to staff without affecting the customer experience.
Step 2: Add Modifier Items
Once you’ve set up the basic details for your modifier group, it’s time to decide how to build it. TechSuite gives you three flexible ways to add modifier items, depending on how you want to manage them:
- Option 1: Add Inventory Items: Best for toppings or extras you want to track in stock (like different types of milk or cheese) .
- Option 2: Add Non-inventory Items: Great for modifiers (like temperature or size, where no stock tracking is needed)
- Option 3: Connect Modifier Group: Perfect when you want to reuse a full set of modifiers (like a pre-made Sauce Options group).

Option 1: Add Inventory Items
This option lets you pull existing items directly from your inventory. This is the best choice when you want to keep an eye on ingredient stock levels or use consistent pricing and naming across your system.
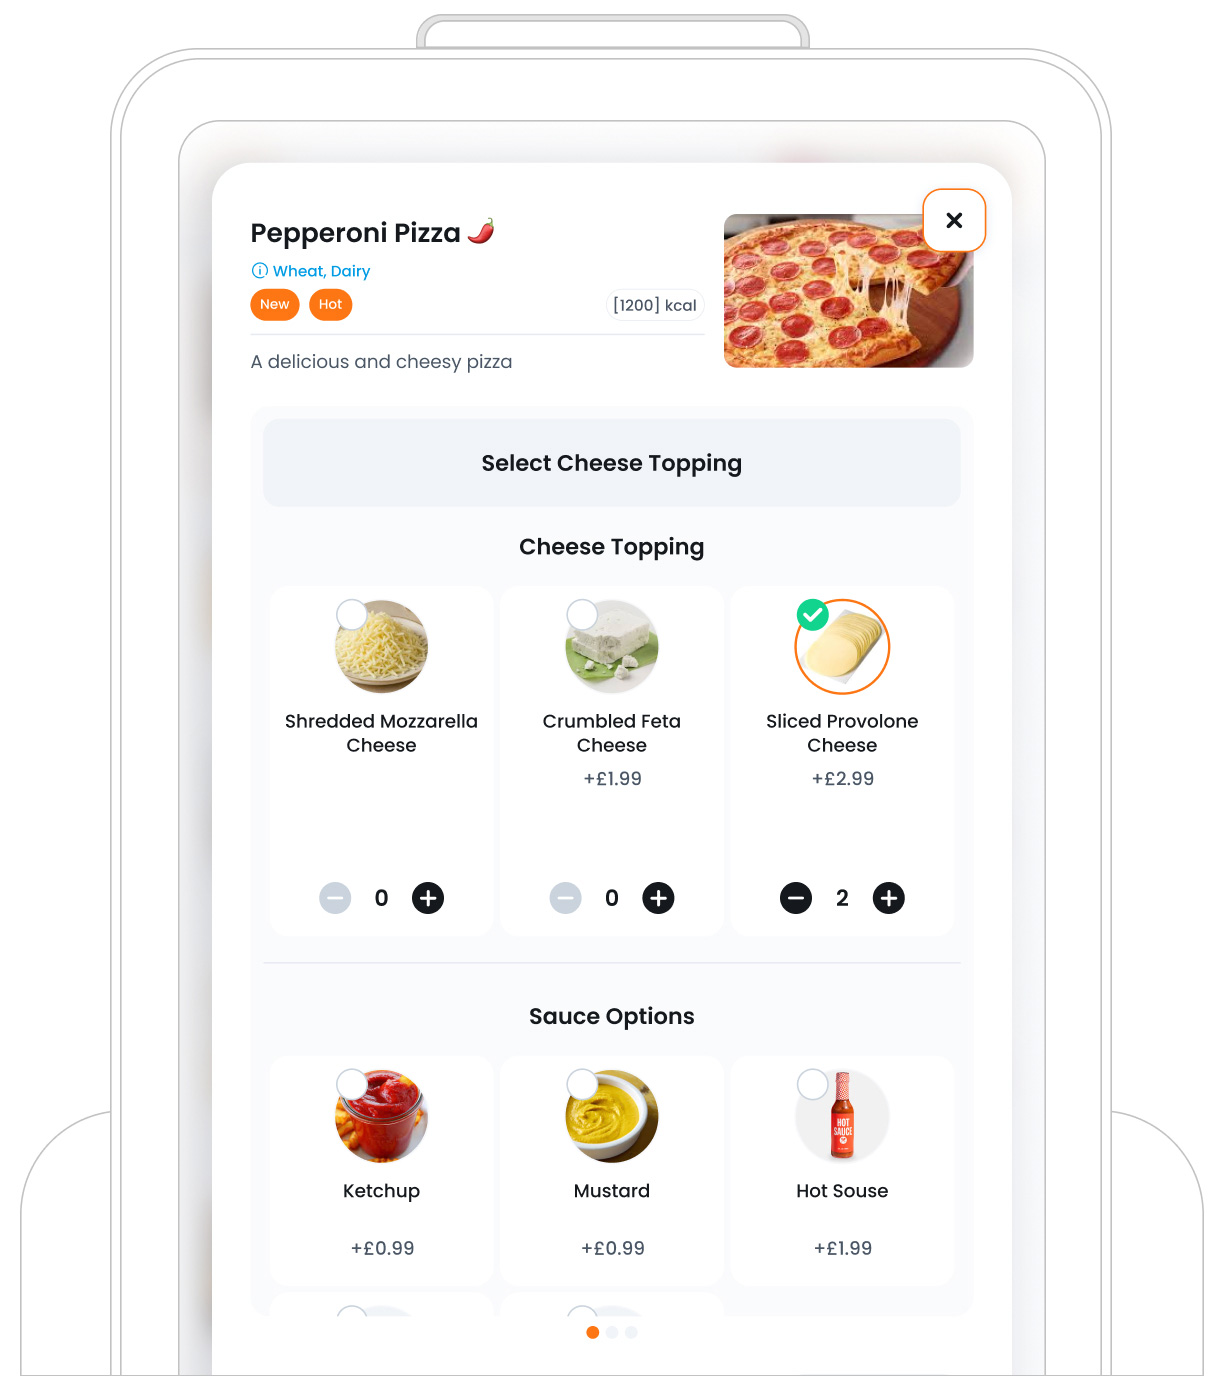
Example:
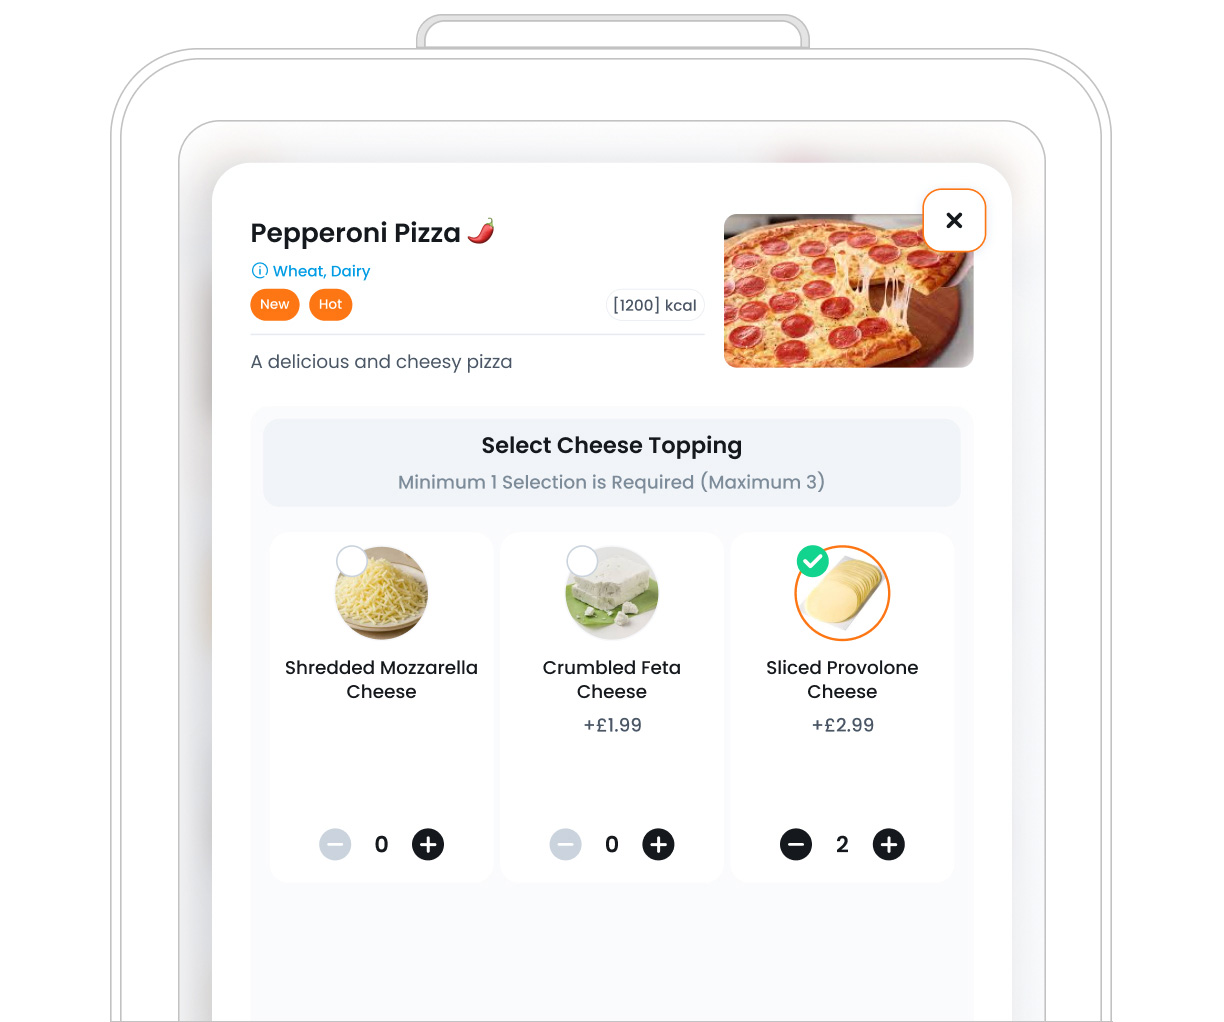
If you’re creating a “Cheese Topping” modifier group, you can add inventory items like “Shredded Mozzarella”, “Crumbled Feta”, and “Sliced Provolone". These will be tracked in Stock Management just like other items in your inventory.
Here’s how:
- Step 1: Click “Add Inventory Items”
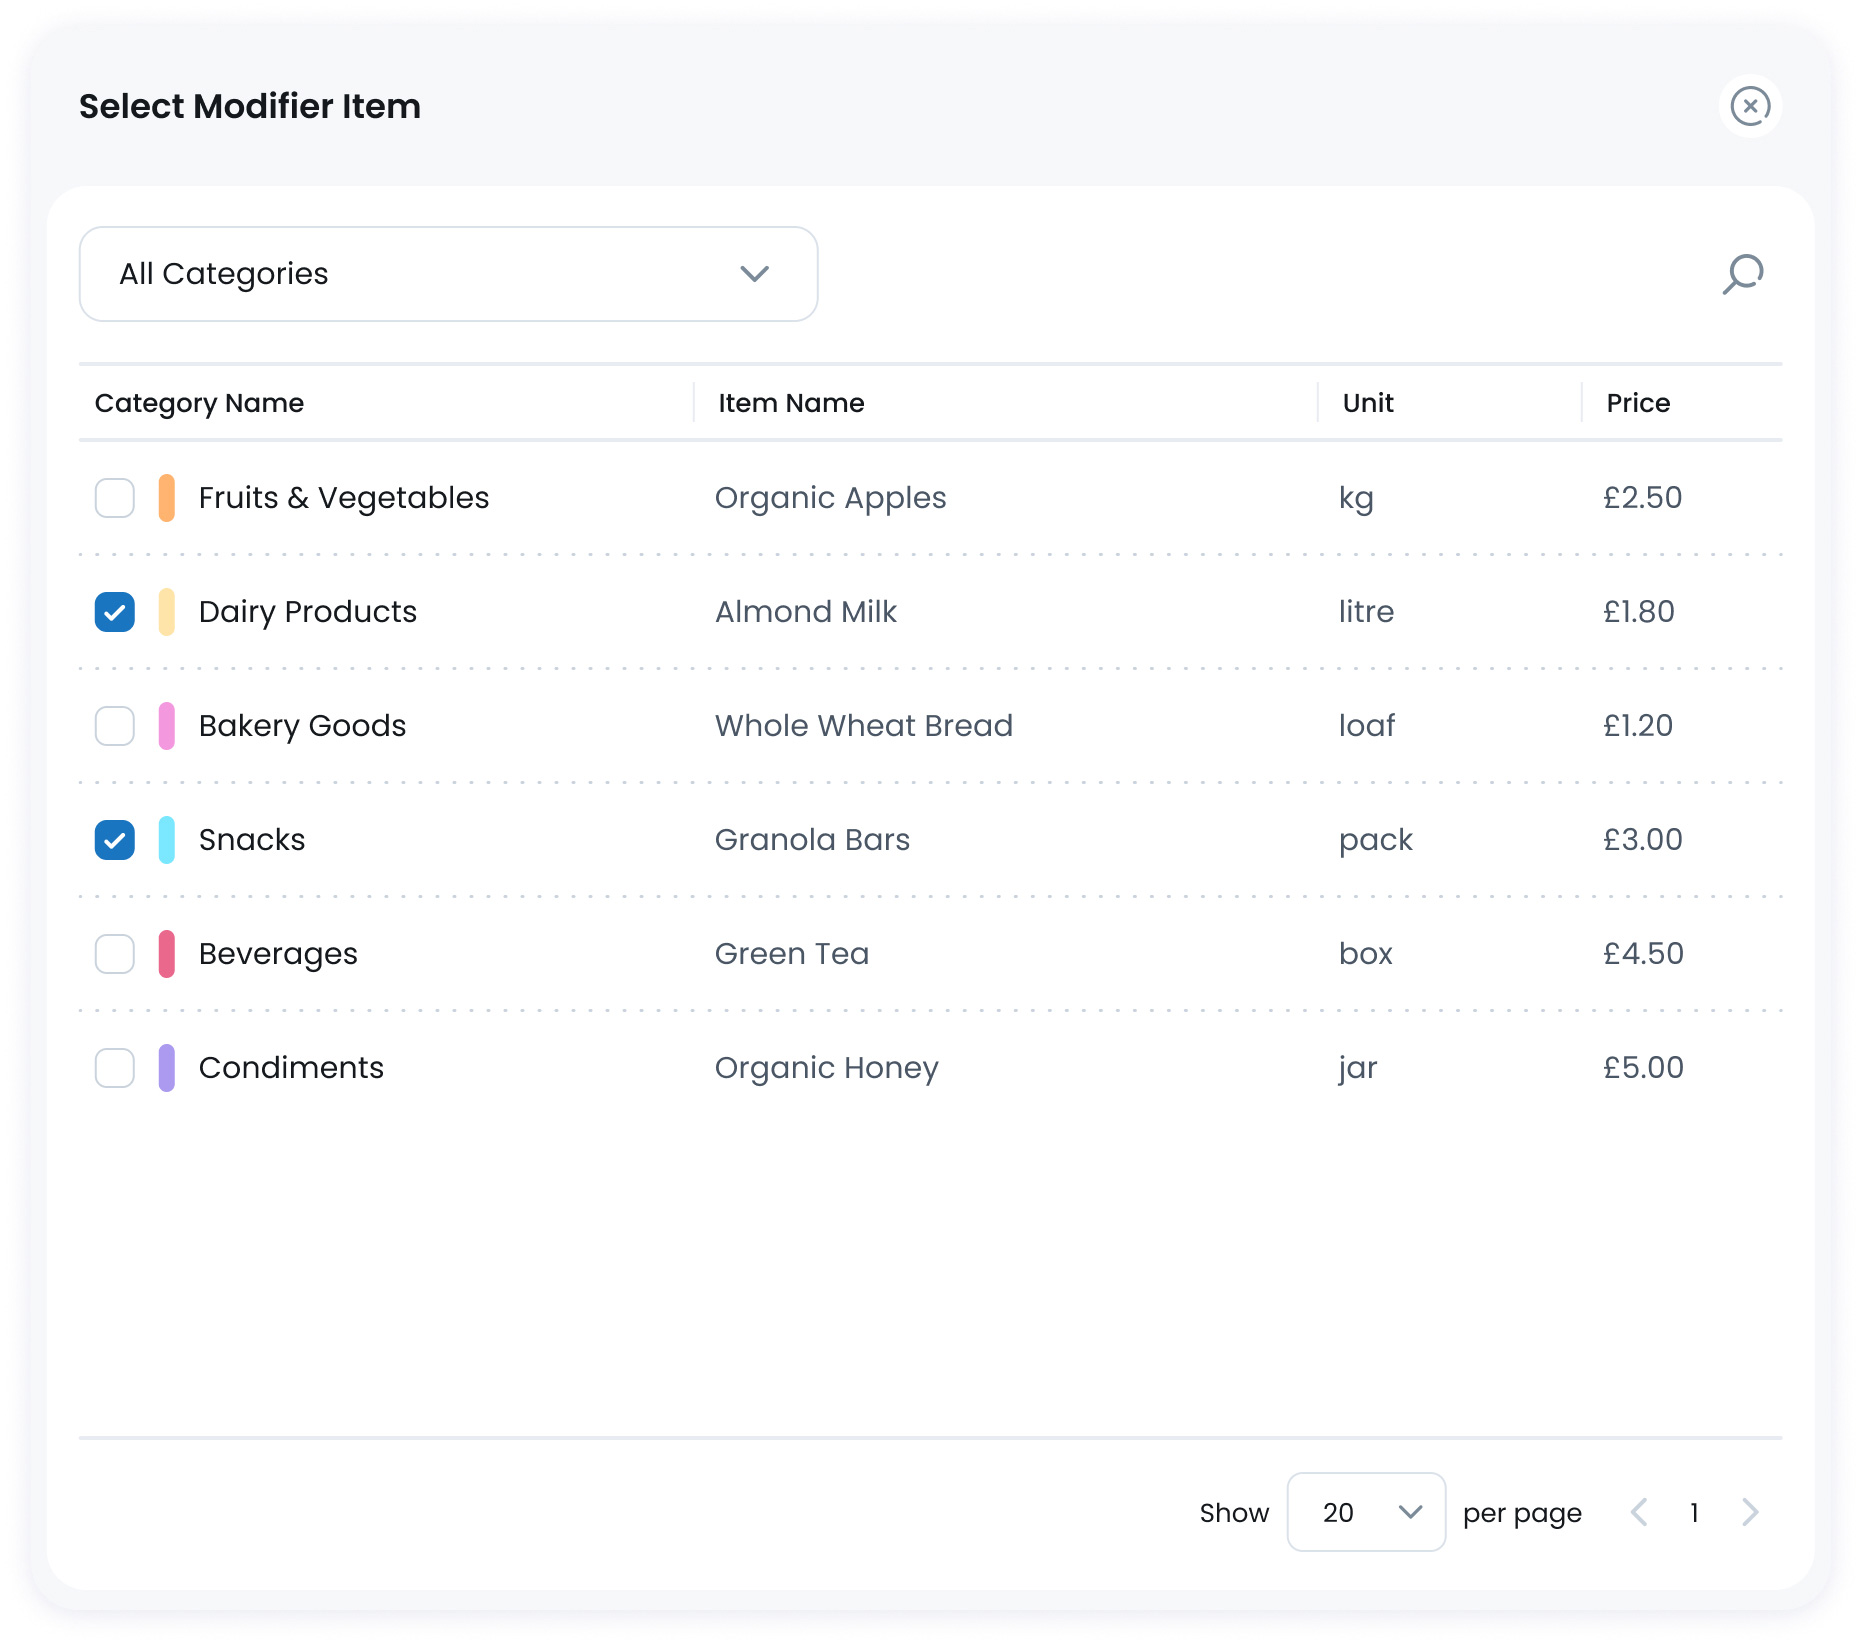
This will open a popup showing all your existing inventory items grouped by category.
- Step 2: Find and Select an Item
Use the category filter or search bar to quickly locate the item you want to use as a modifier, then click on it (e.g., Chia or Coconut Flakes) to add it to the group. The selected item will appear below.
- Step 3: Customise Item Properties
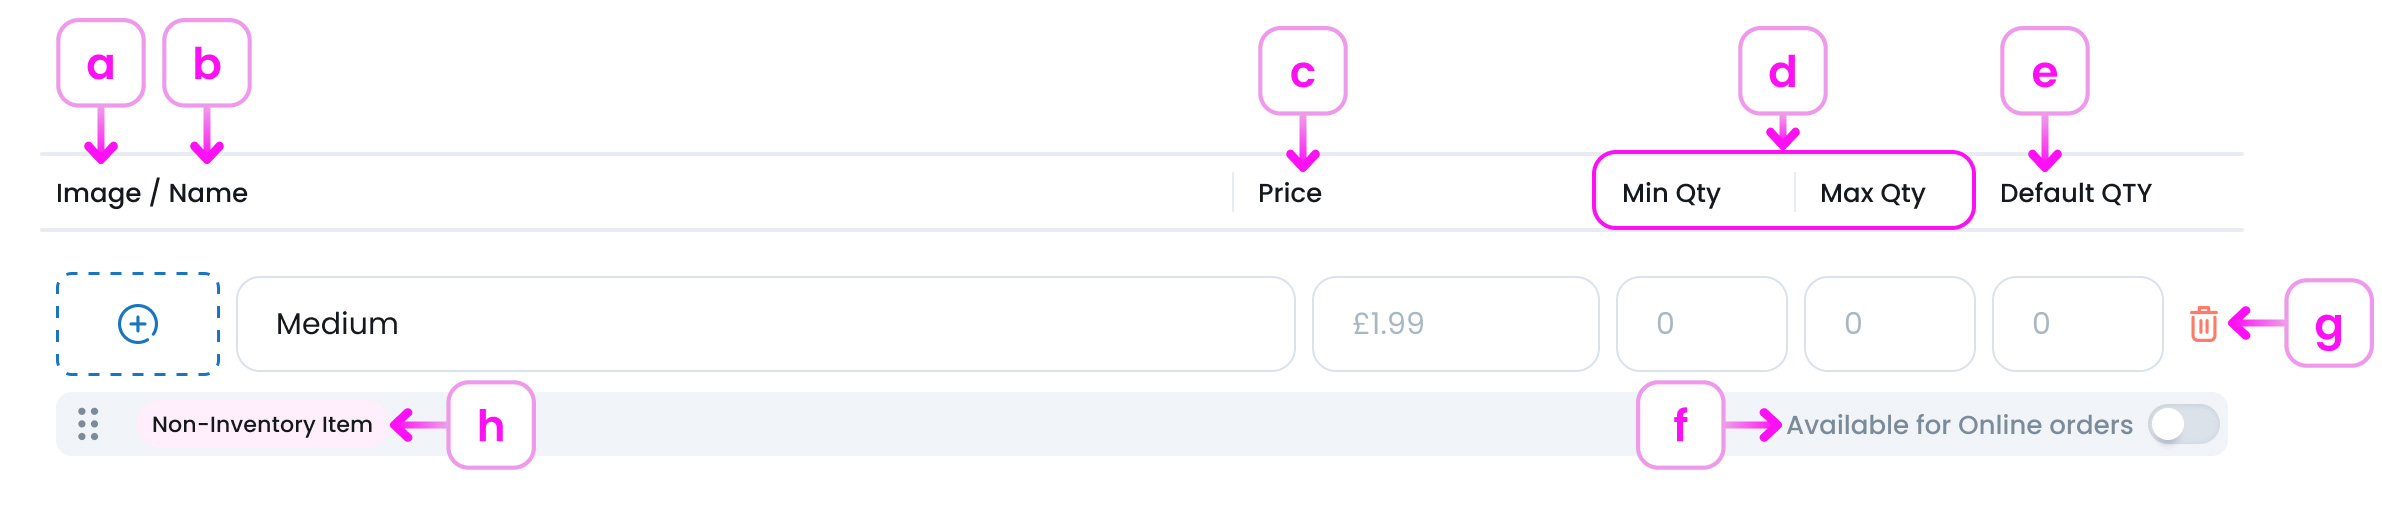
After adding an inventory item, you’ll need to manually fill out its details. Here’s what each property means and how to use them:
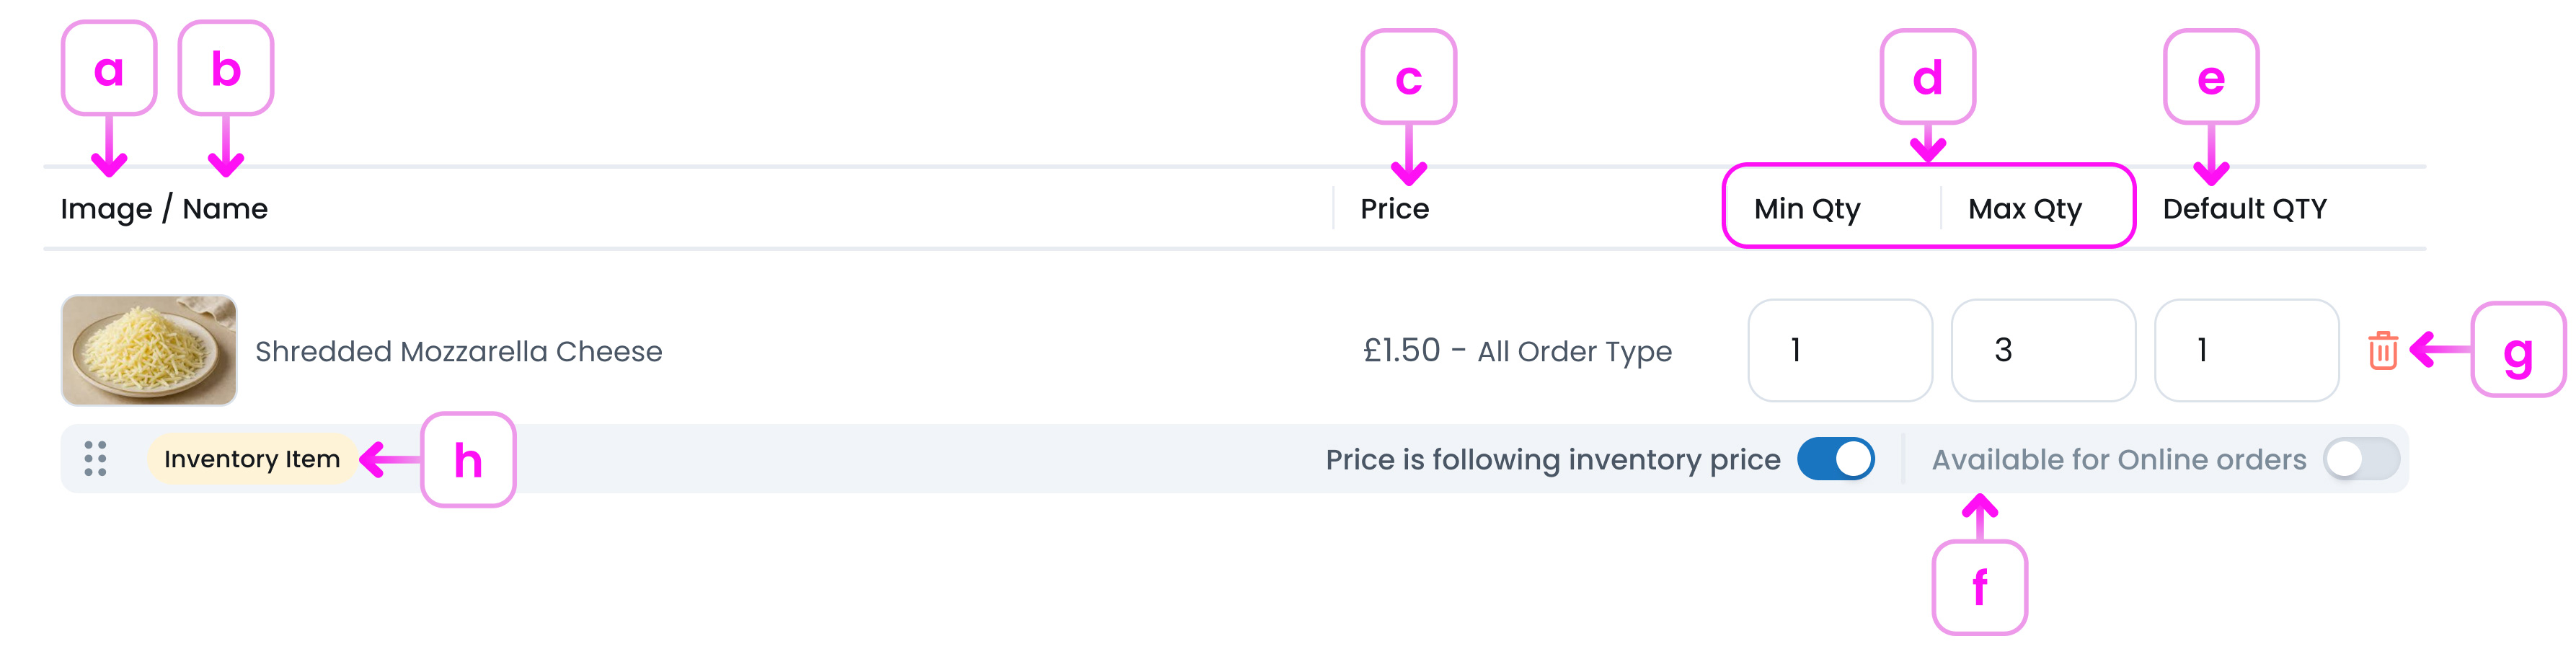
a. Item Image
Each modifier item can have its own image. Adding an image is optional, but it can help customers visually recognise their options, especially on kiosks.
For inventory items, images are pulled directly from the item’s Inventory details:
- If the inventory item already has an image, it will automatically appear here.
- If there is no image, you can add one by editing the item in Inventory > Items and uploading an image there.
If you want an inventory item to show an image in modifier groups, make sure the image is added at the item level first.
b. Item Name
This section shows the name of the item.
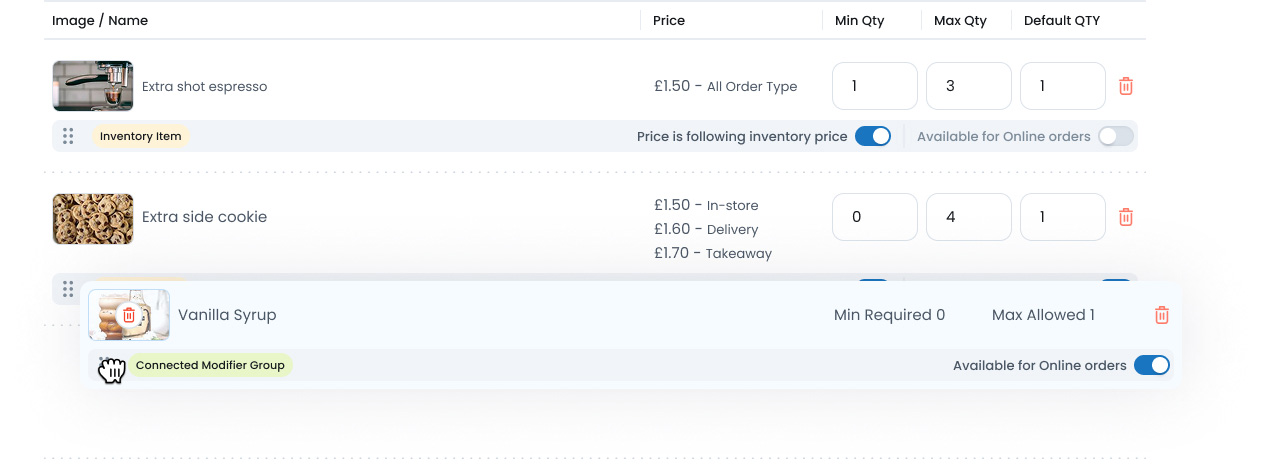
c. Item Price
Prices are inherited from the inventory item:
- If the inventory item has one price for all sales types, that price is shown.
- If the inventory item has different prices per sales type (In-store, Delivery, Takeaway), all prices are displayed here.
By default, Price is following inventory price is enabled. If you want to charge a different price for this modifier:
- c.1. Turn off Price is following inventory price
- c.2. Enter a custom price directly in the modifier group

Once overridden, the price will no longer update if the inventory price changes.

d. Quantity Limits for Items
These fields let you control how many times a customer can select this item.
-
Minimum Quantity: Set the least number of options a customer is required to choose.
Set it to 0 if the selection is optional.
Set it to 1 or more if the customer must choose at least that many.
-
Maximum Quantity: Set the highest number of options a customer is allowed to select.
Set it to 1 if the customer can only choose one option.
Set it to 2 or more if you want to allow multiple selections.

e. Default Quantity
This field lets you set a default quantity for the modifier.
This is especially useful when your modifier has only one selection allowed, and you want to make sure one option is always chosen, though customers can still change it to a different option if they prefer.
f. Available in Online Order
Enable this if you want this modifier item to be available for customers ordering online (such as through your website, app, or delivery platforms).
If this checkbox is off, the modifier item will still be available in-store (e.g., POS or kiosk), but it won’t appear in online ordering channels.
Why this matters:
Sometimes, you may want certain options to be available in person only, due to legal restrictions, delivery limitations, or customer experience reasons.
g. Delete an Item
To remove an item, click the Delete icon![]() at the end of its row.
at the end of its row.
h. Item Tag
Each modifier item in your group may show a small label (like Inventory Item, Non-Inventory Item, or Connected Modifier Group) to help you quickly identify what type of item it is.
Why this matters
Some modifier groups might include a mix of item types. For example, you could create a Wing Sauces group that includes:
- Inventory items (like “Buffalo Sauce” you track in stock)
- Non-inventory items (like “Extra Spicy” that don’t affect stock)
- Connected modifier groups (like a reusable Dipping Sauce Options group).
These labels are here to make it easy for you to manage and understand your setup at a glance.
Option 2: Add Non-inventory Items
Use this option when you want to include modifier choices that don’t need to be tracked in your inventory. These are often preferences, instructions, or customisations that aren’t tied to physical ingredients, so there’s no need to manage them as inventory items.
Examples:
- You might add options (like Extra spicy, No onions, or No straw needed) which help the kitchen or staff understand the customer’s preferences without affecting stock levels.
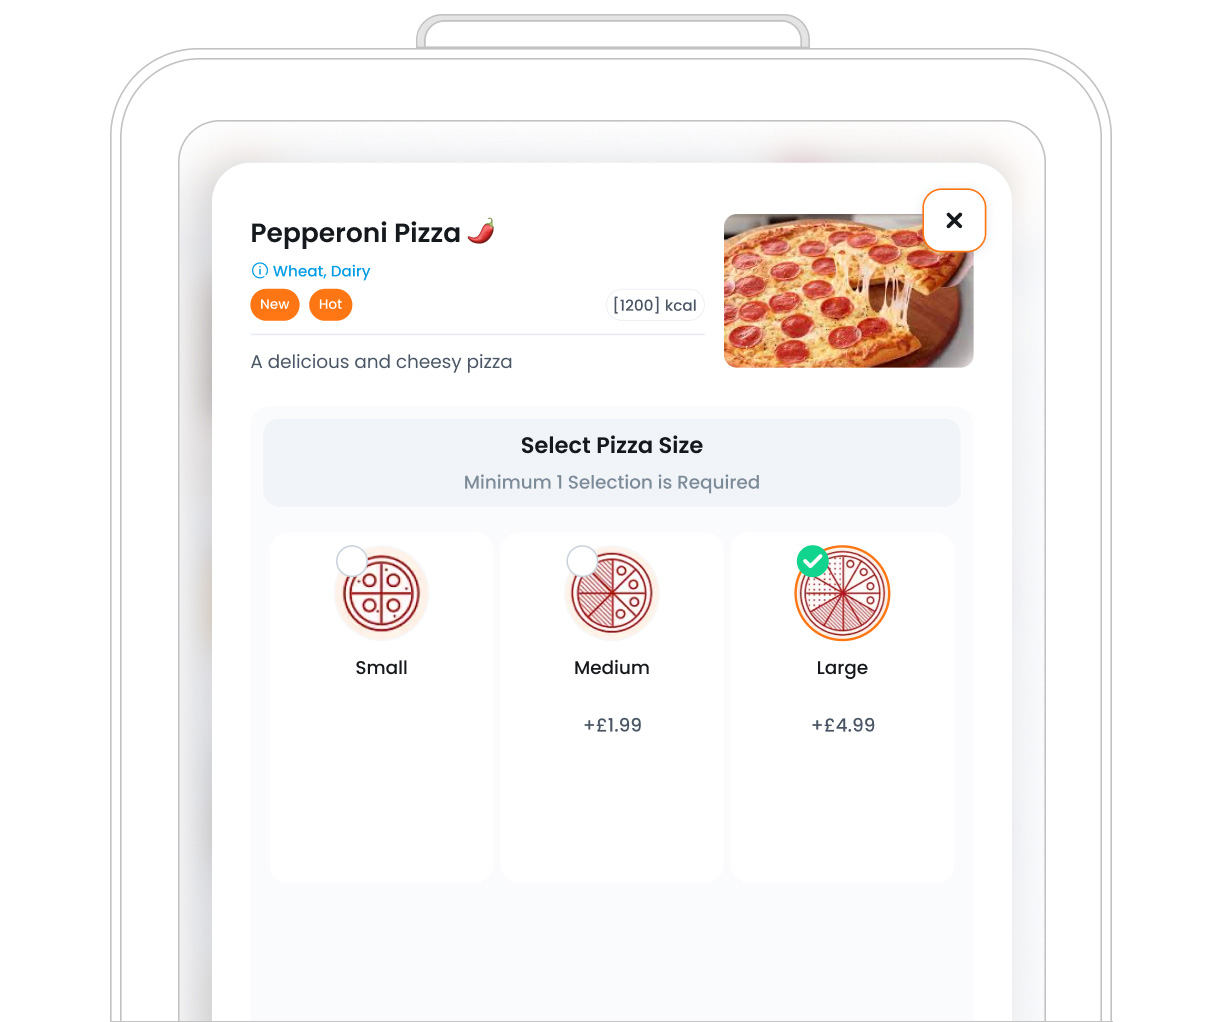
- You could also include cooking levels (like Hot or Well done, or size choices like Small, Medium, and Large) especially when these don’t correspond to actual inventory items.
Here’s how:
- Step 1: Click “Add Non-inventory Items”
This will immediately add a blank item line to your modifier list, there is no popup like with inventory items. Instead, you enter the details directly in the table.
- Step 2: Customise Item Properties
After adding a non-inventory item, you’ll need to manually fill out its details. Here’s what each property means and how to use them:
a. Item Image
Each non-inventory modifier item can have its own image. Adding an image is optional, but it can help customers quickly recognise their choice, especially on kiosks.
Unlike inventory items, non-inventory item images are added directly from the Create New Modifier Group page. You can upload the image when creating or editing the modifier item, without needing to go to the Inventory section.
b. Item Name
Since these items don’t come from your inventory, you’ll need to type the item name yourself (e.g.,No Ice or Extra Sauce). Unlike inventory items, this name isn’t pulled in automatically, so choose something clear and customer-friendly.
c. Item Price
You can set a custom price for each non-inventory item. If there’s no extra charge, just leave the price as 0.
d. Quantity Limits
These fields let you control how many times a customer can select this item.
-
Minimum Quantity: Set the least number of options a customer is required to choose.
Set it to 0 if the selection is optional.
Set it to 1 or more if the customer must choose at least that many.
-
Maximum Quantity: Set the highest number of options a customer is allowed to select.
Set it to 1 if the customer can only choose one option.
Set it to 2 or more if you want to allow multiple selections.
e. Default Quantity
This field lets you set a default quantity for the modifier.
This is especially useful when your modifier has only one selection allowed, and you want to make sure one option is always chosen, though customers can still change it to a different option if they prefer.
f. Available in Online Order
Enable this if you want this modifier item to be available for customers ordering online (such as through your website, app, or delivery platforms).
If this checkbox is off, the modifier item will still be available in-store (e.g., POS or kiosk), but it won’t appear in online ordering channels.
Why this matters:
Sometimes, you may want certain options to be available in person only, due to legal restrictions, delivery limitations, or customer experience reasons.
g. Delete an Item
To remove an item, click the Delete icon![]() at the end of its row.
at the end of its row.
h. Item Tag
Each modifier item in your group may show a small label (like Inventory Item, Non-Inventory Item, or Connected Modifier Group) to help you quickly identify what type of item it is.
Why this matters
Some modifier groups might include a mix of item types. For example, you could create a Wing Sauces group that includes:
- Inventory items (like “Buffalo Sauce” you track in stock)
- Non-inventory items (like “Extra Spicy” that don’t affect stock)
- Connected modifier groups (like a reusable Dipping Sauce Options group).
These labels are here to make it easy for you to manage and understand your setup at a glance.
Option 3: Connect Another Modifier Group
This option allows you to embed a complete existing modifier group inside your new one. It’s perfect when you want to reuse a group you’ve already created or create layered customisations that guide the customer step by step.
Why use it?
Sometimes, customers need to make multiple related choices. Instead of cramming everything into one big list, you can connect focused modifier groups to keep things clear and organised.
Examples:
If you’ve already created a “Sauce Options” group, and now you’re building a “Pizza Toppings” group, you can add the Sauce group inside the Toppings one to avoid repeating the same work.
Or, if you’re selling a burger:
- First, the customer picks a Side Salad (e.g., Chicken Salad, Vegan Salad)
- Then, they choose a Dressing (e.g., Caesar, Vinaigrette)
In this case, “Dressing” is a separate group connected through this feature.
This setup keeps your modifier structure clean while offering customers a smoother experience.
Here’s how:
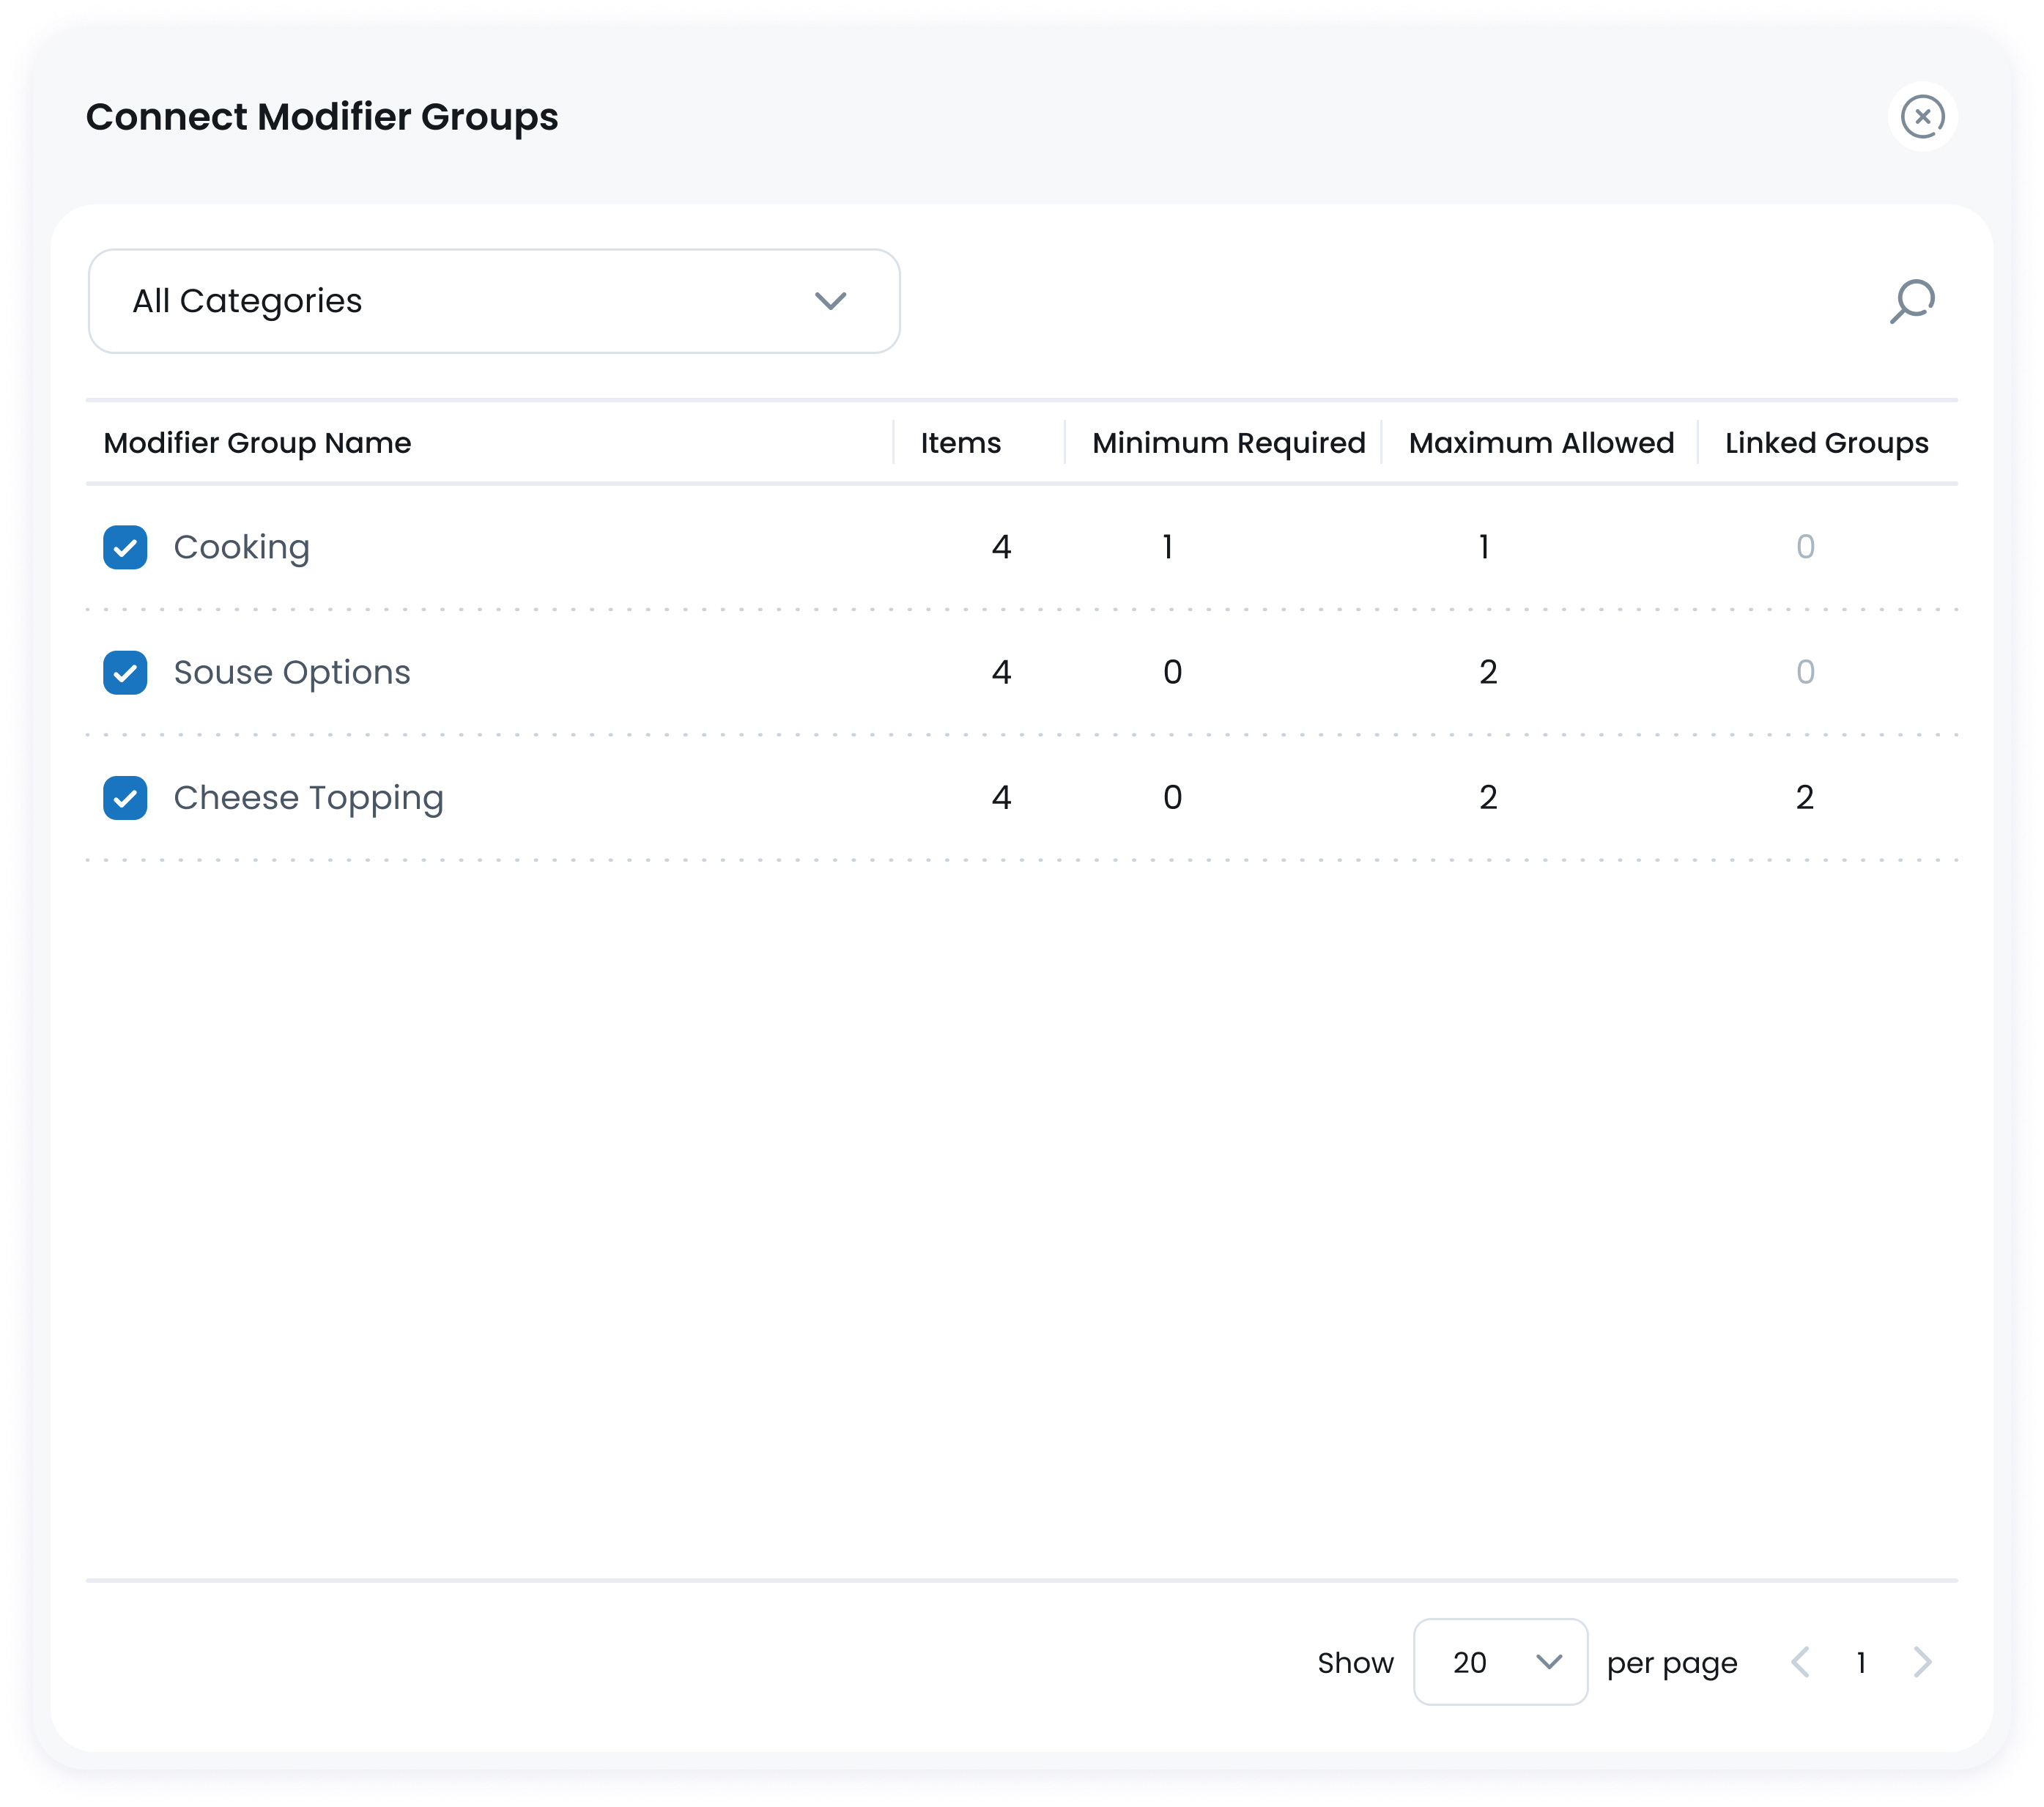
- Step 1: Click “Connect Modifier Group”
This will open a popup showing all previously created modifier groups.
- Step 2: Choose an Existing Modifier Group
Use the search bar or scroll through the list. You’ll see the group’s name, how many items it contains, and its selection rules (like min and max selections). Click to select the one(s) you want to connect.
- Step 3: Review Item Properties
Once connected, the group will appear as a new row in your modifier list, marked as a Connected Modifier Group.
Its key settings (like name, minimum, and maximum selections) are pulled from the original group. To change them, you’ll need to edit the original group directly.
Reordering Modifier Items
The six dots ![]() on the left of each modifier item allow you to reorder them using drag and drop. The order shown here is how they will appear to customers on the frontend (e.g., POS, kiosk, or online orders). Use this to highlight popular or default options first.
on the left of each modifier item allow you to reorder them using drag and drop. The order shown here is how they will appear to customers on the frontend (e.g., POS, kiosk, or online orders). Use this to highlight popular or default options first.
Step 3: Save the Modifier Group
Once all info and items are in place, click the Save button  at the top-right. Your new modifier group is now ready to assign to menu items!
What’s Next?
Next, head over to Edit & Archiving Modifiers to manage your existing modifier groups. From there, you can update modifier details, adjust item behaviour, or archive groups that are no longer needed, helping you keep your item customisations accurate and up to date.