Sales Type
Sales Types let you control where and how your items are available, such as In-Store, Delivery, or Takeaway. Each type can have its own pricing, availability, and behaviour, allowing you to tailor the ordering experience across different sales channels. You can also create custom types like “VIP Orders” to support unique workflows such as staff-only menus, pre-orders, or curb-side pickup.
Understanding Sales Types
Sales Types define where and when items appear across your system. Each one represents a different sales channel or order method, and can be assigned specific availability, pre-order rules, or pricing (set from the Item Library).
Some common use cases include:
- In-Store: For walk-in or dine-in customers using POS or Kiosk
- Delivery: For items ordered online or through third-party platforms
- Takeaway: For orders placed ahead and picked up by the customer
To Get Started
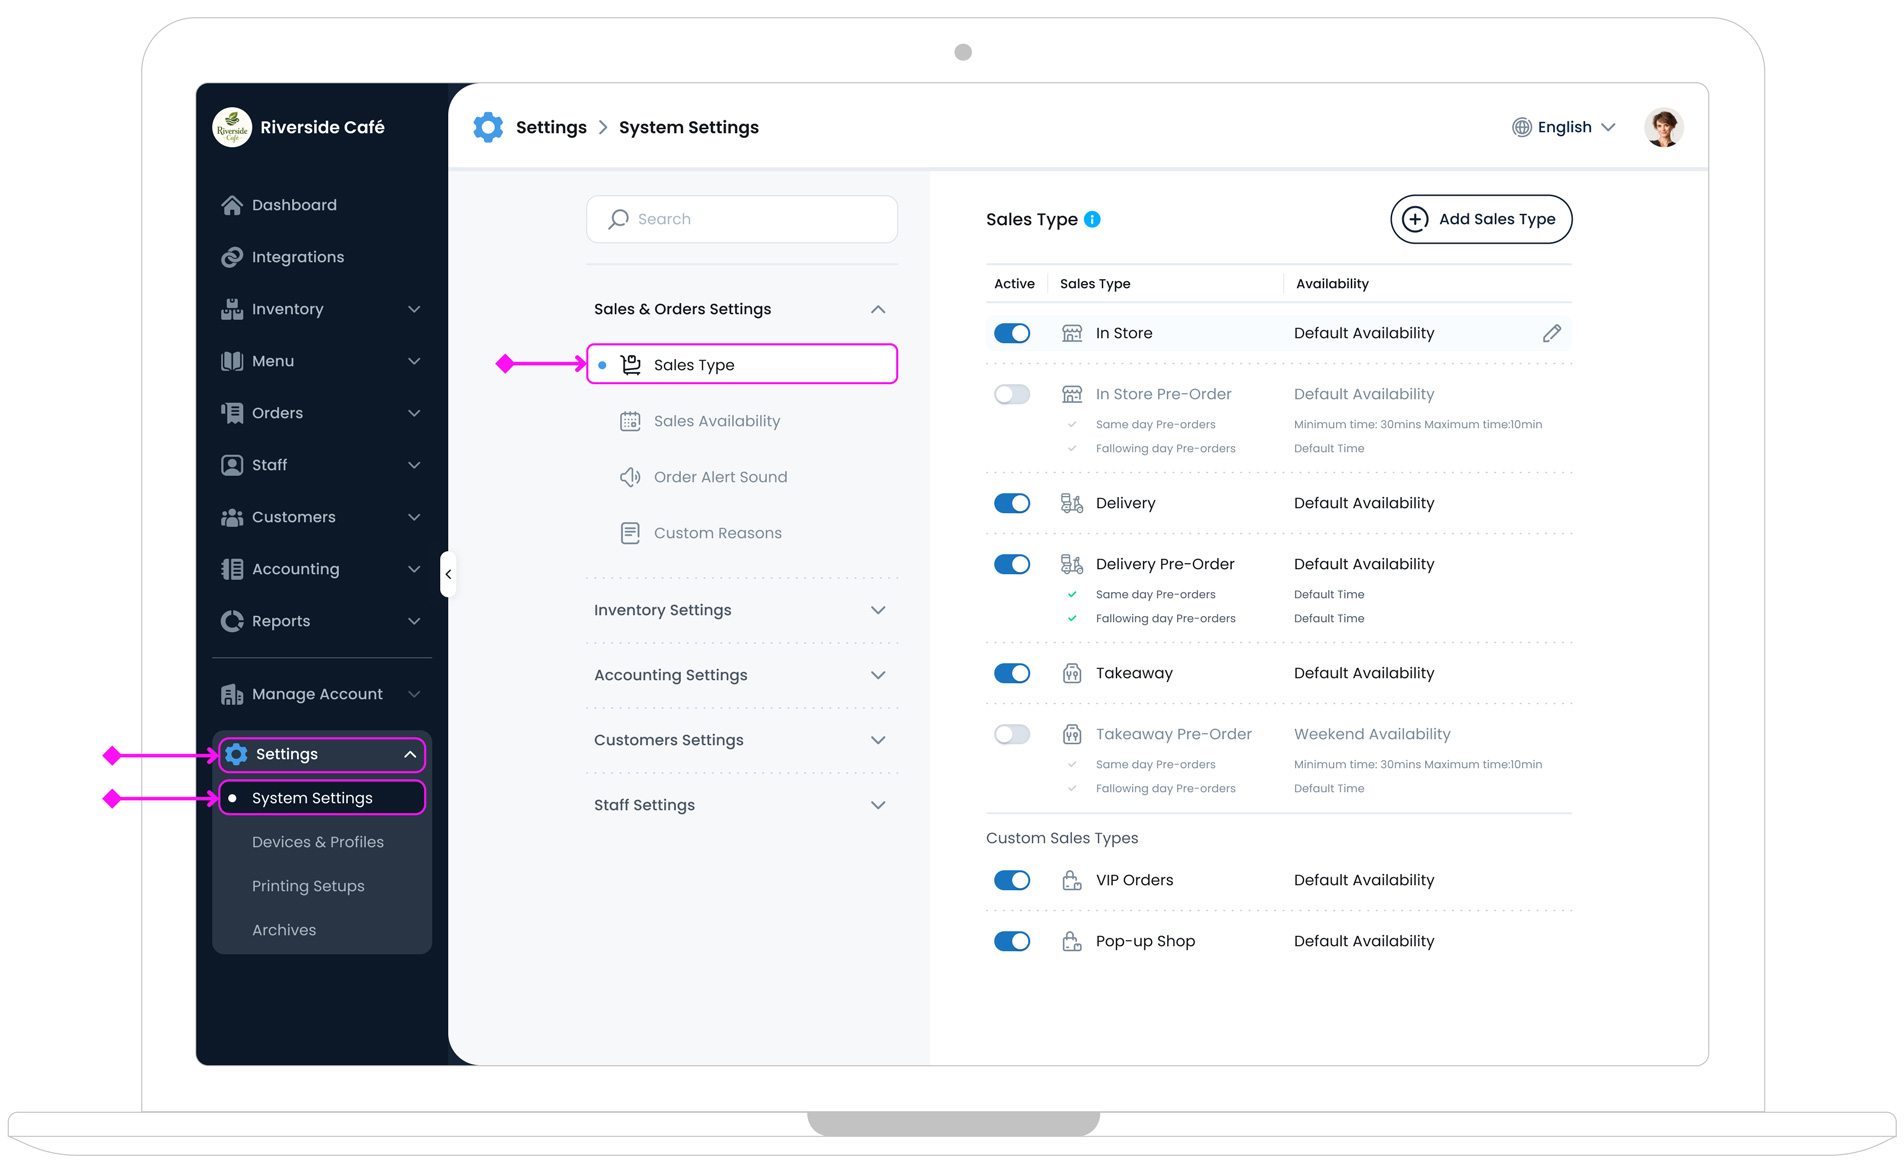
To access sales type settings, log in to the TechSuite portal and go to Settings > System Settings from the sidebar. Next, under the Sales & Orders Settings section, click Sales Type. On this page, you’ll see default types like In-Store, Delivery, and Takeaway. You can enable/disable them, assign availability, or create your own custom types.
Adding a New Sales Type
To add a new sales type, go to the top-right corner of the Sales Type settings page and click the Add Sales Type button . This will open the panel where you can configure all the key details.
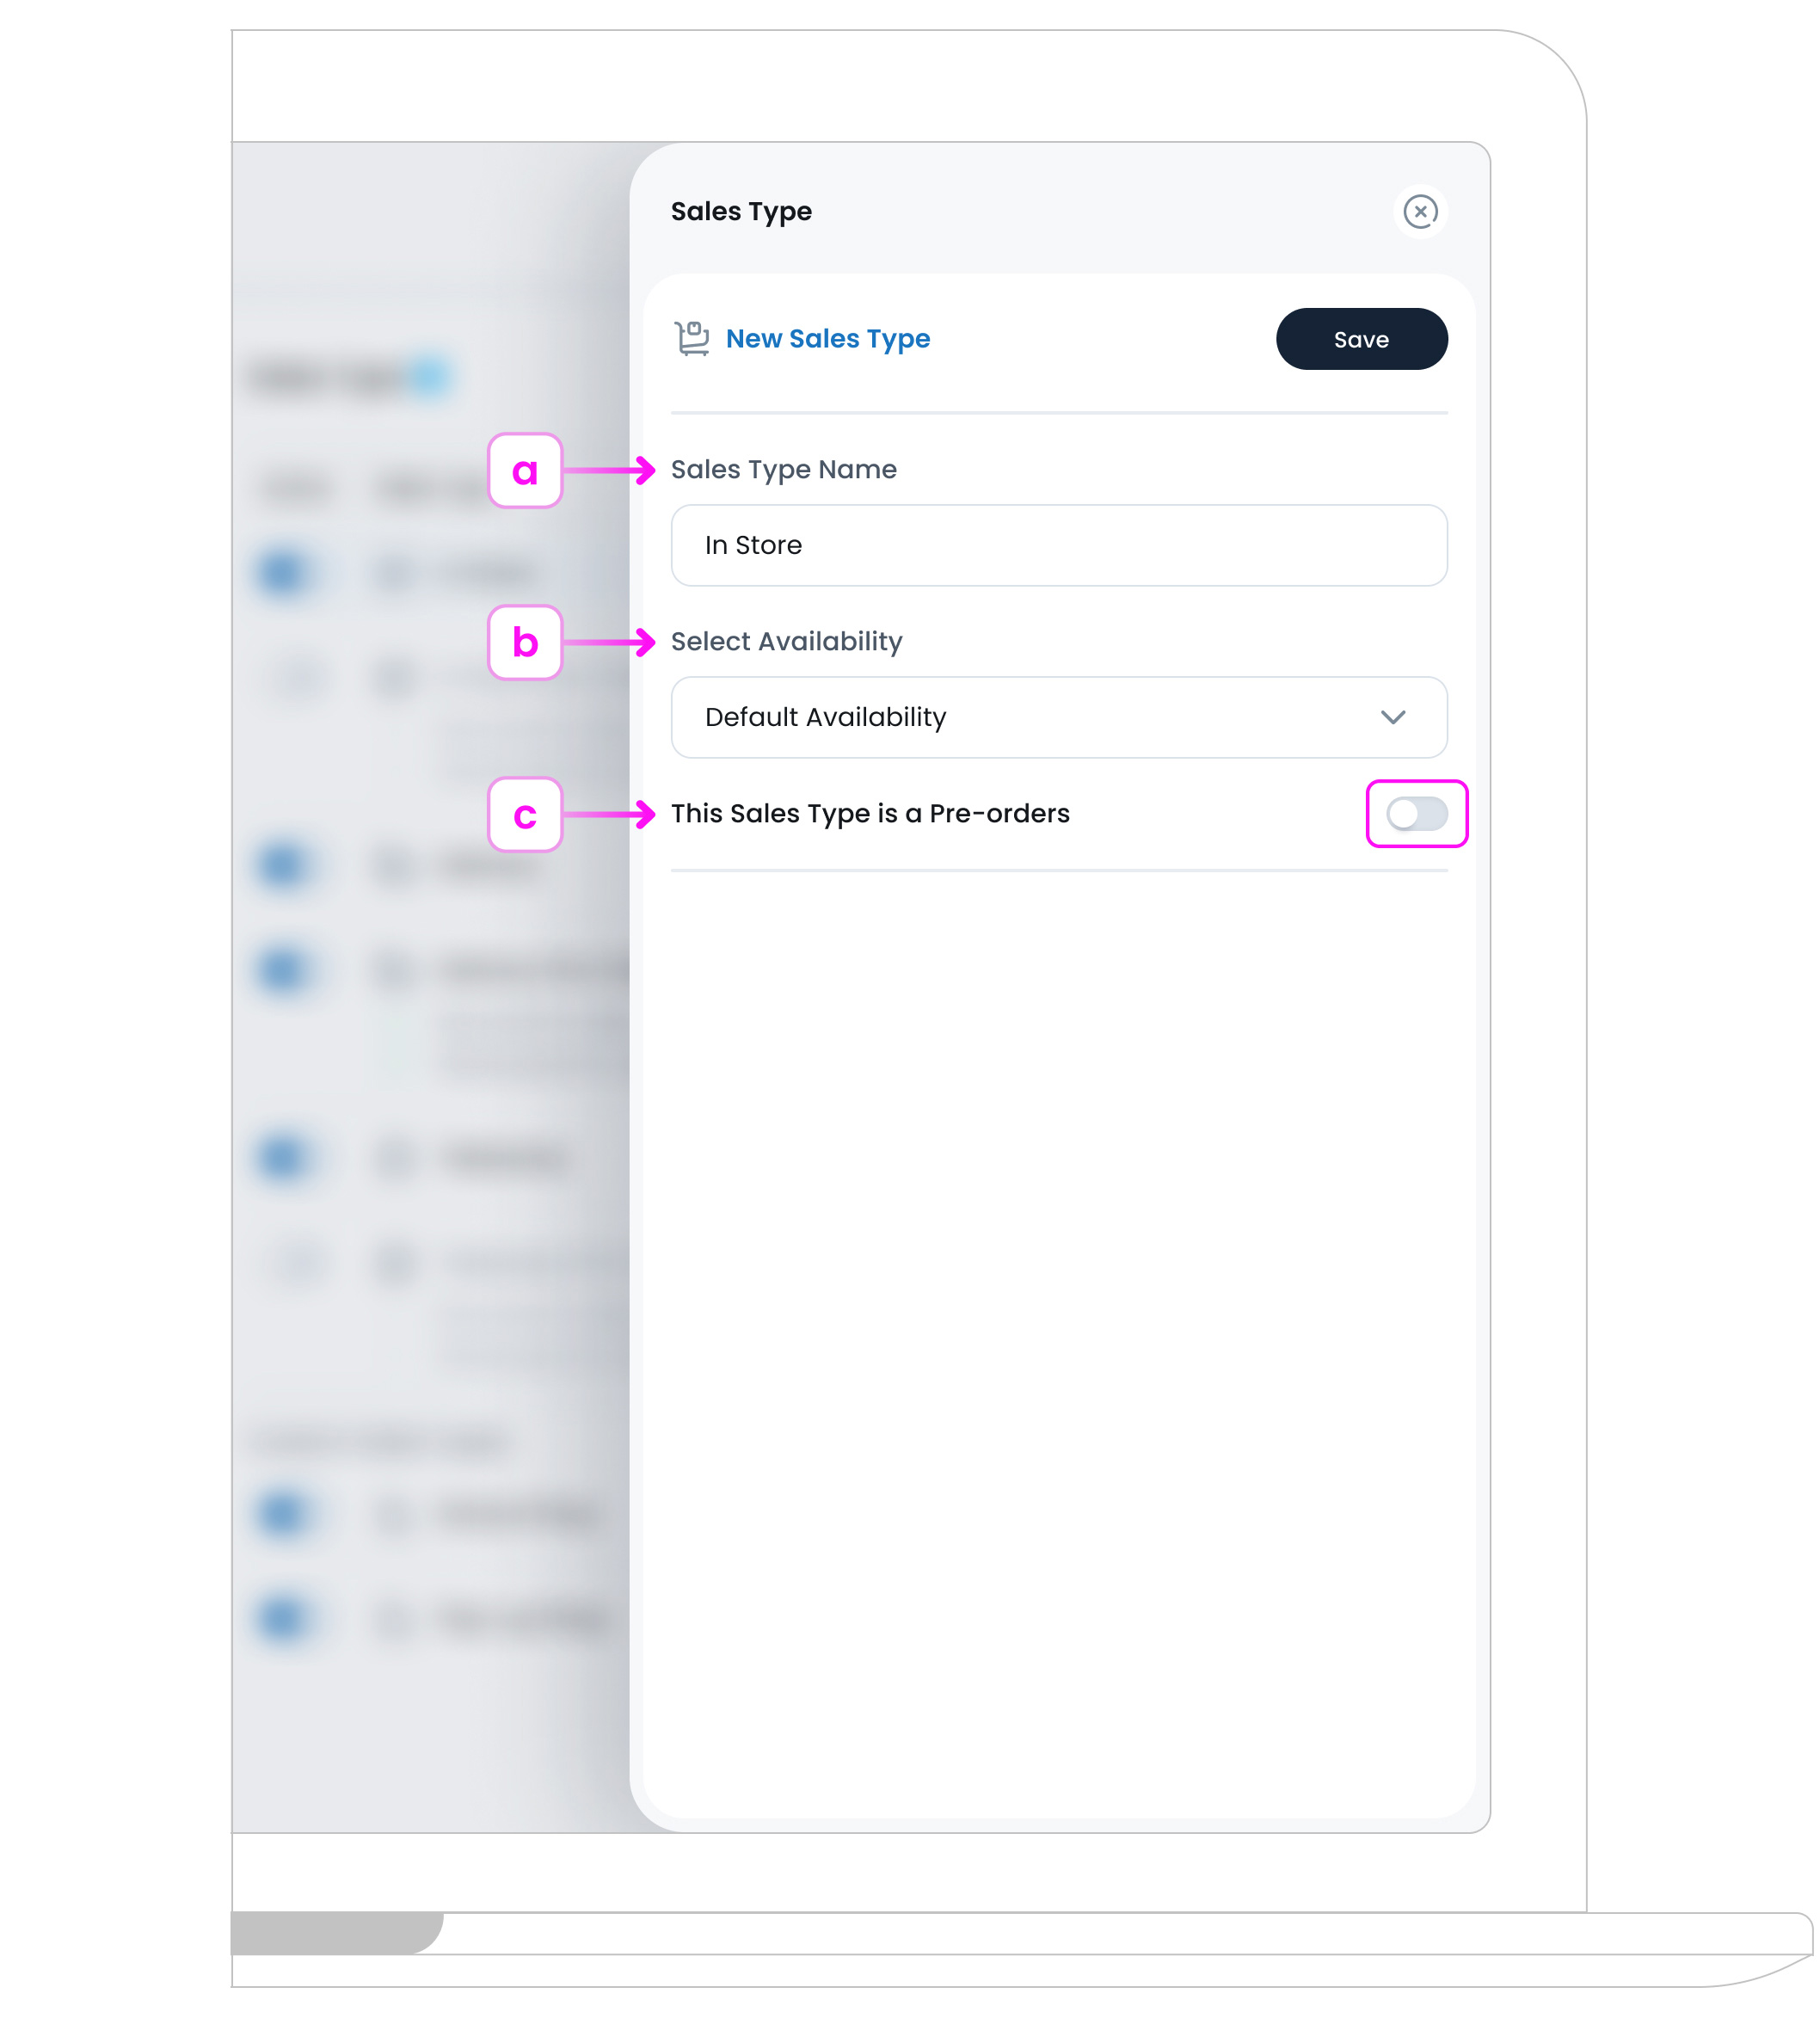
Here’s how to add and configure a new sales type:
a. Sales Type Name
Give the new sales type a clear and recognisable name (like VIP Orders, Curb-side Pickup, Staff Meals). This name will appear in menus, item settings, and reporting filters.
b. Assign an Availability Set
Control when items under this sales type are visible. You can link a predefined Availability Set (e.g. Lunch Hours, Weekend Specials) to limit when the sales type is active.
c. This Sales Type is Pre-order (Optional)
Allow customers to place orders ahead of time by enabling this toggle. Once enabled, you’ll unlock scheduling rules that let you define acceptable timeframes for advance orders:
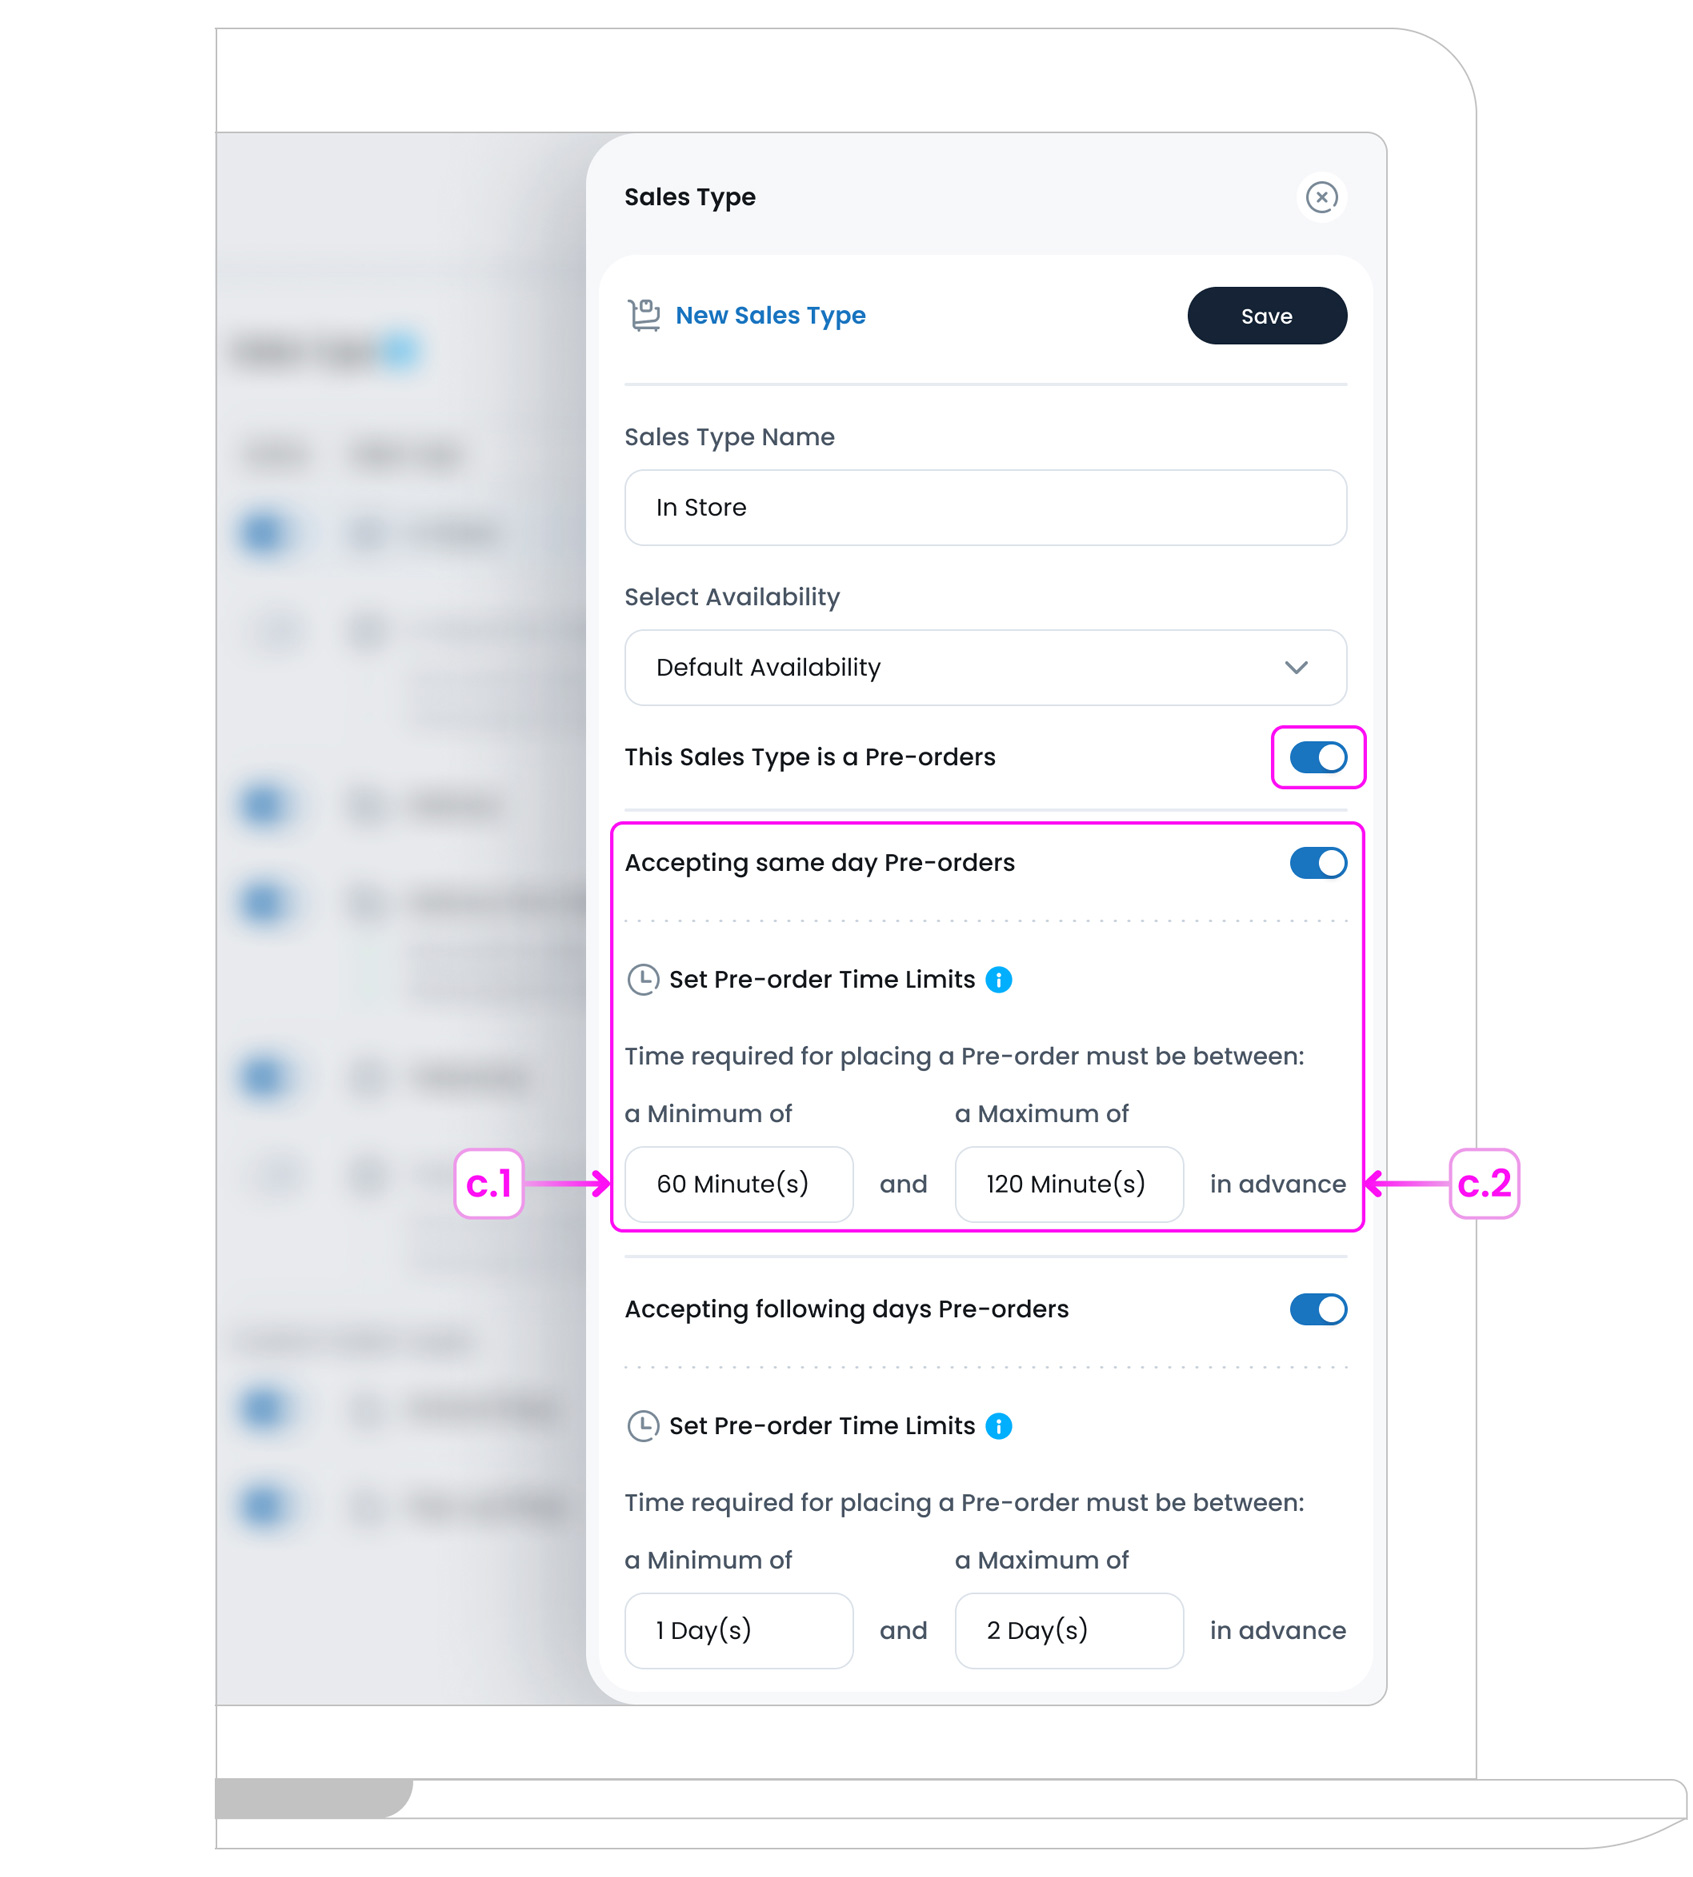
Accepting Same Day Pre-orders
- c.1. Set a Minimum Time (e.g. 30 mins in advance)
- c.2. Set a Maximum Time (e.g. up to 6 hours in advance)

Accepting Following Days Pre-orders
- c.3. Set Minimum Days value (e.g. at least 1 day ahead)
- c.4. Set Maximum Day limit (e.g. up to 7 days ahead)
These controls help your team stay prepared and manage customer expectations around advance orders.
Pro Tip
Sales Types do not store pricing directly, but you can assign different prices for each Sales Type in the Item setup page. For more info, see Create a New Inventory Item.
e. Save Sales Type
Once all details are filled in, click the Save button  .
.
Sales Types Page Overview
This page shows all Sales Types used across your ordering channels, each one defines where items are sold and how they’re handled. Sales Types help you manage pricing, availability, and pre-order options across POS, kiosk, and online platforms.
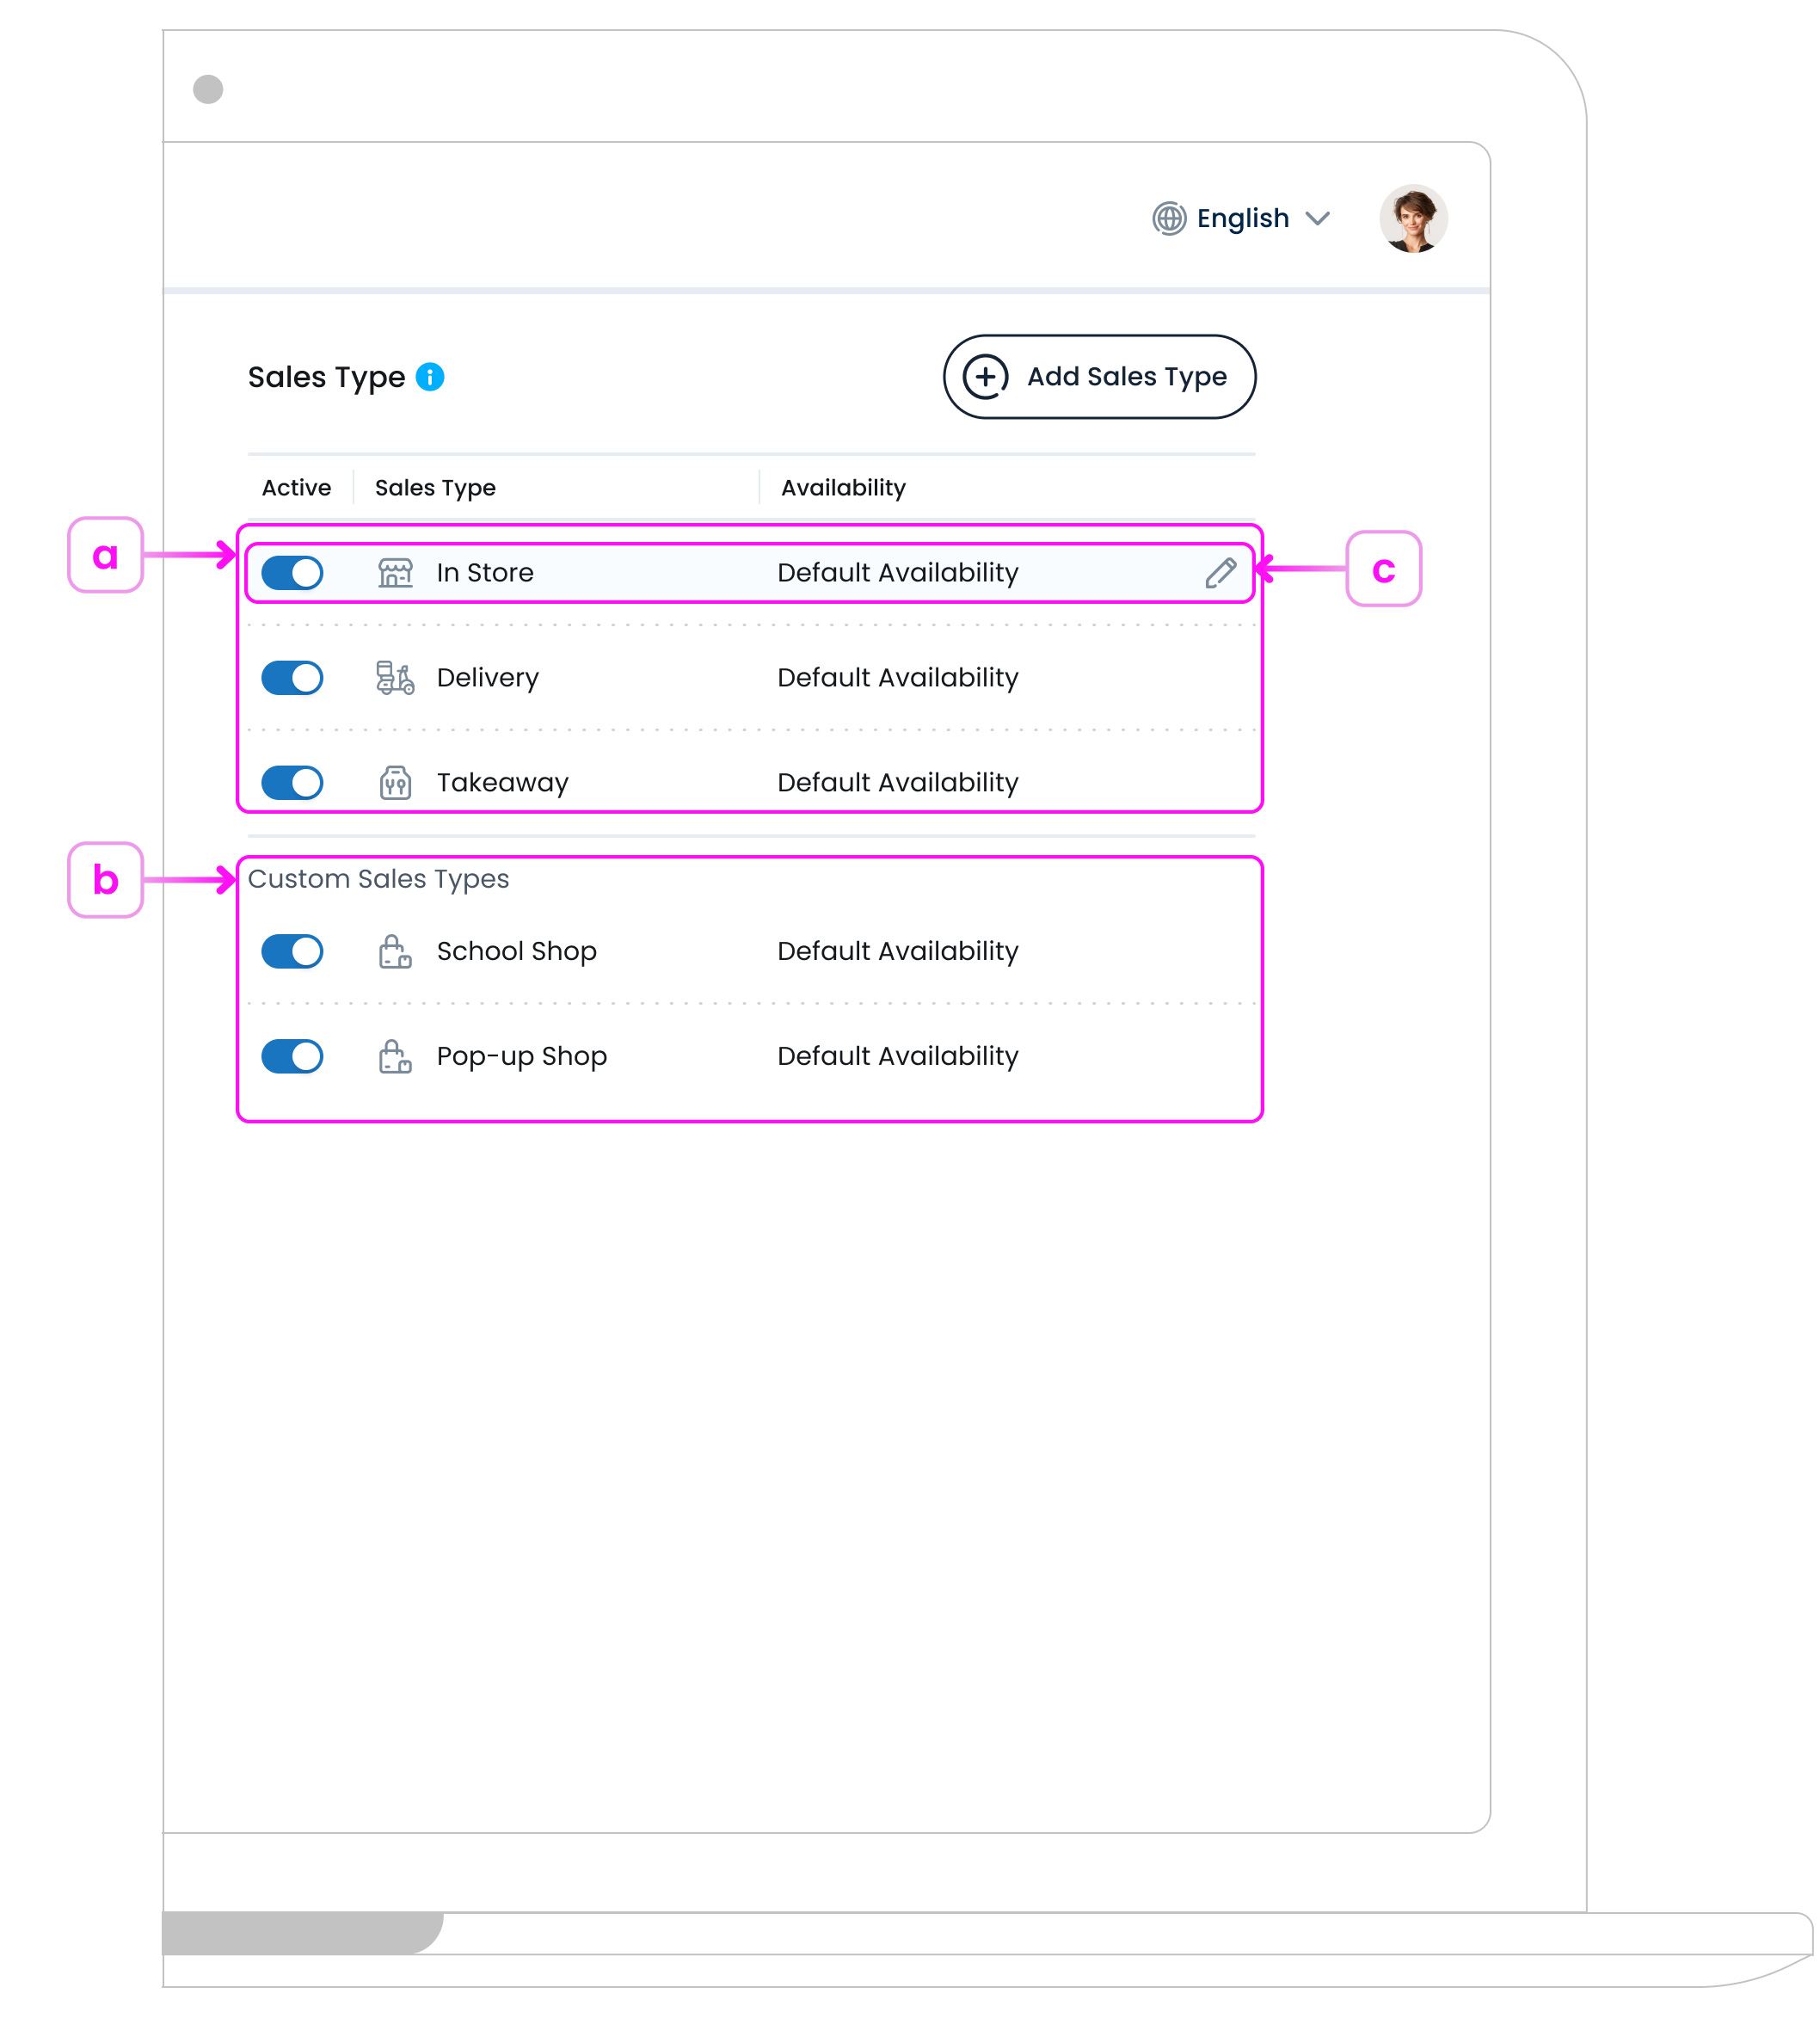
a. List of Default Sales Types
The page includes built-in Sales Types (such as In-Store, Delivery, and Takeaway). These are added automatically and can be edited to adjust time slots or date ranges, but they cannot be archived.
b. Custom Sales Types
Any new Sales Type you create appears in the Custom Sales Types section. These are useful for unique workflows (like Drive-thru). You can archive custom Sales Types at any time to remove them from use while keeping a record in your system.
c. Understanding Sales Type Rows
Each row shows how that Sales Type behaves and includes these controls:
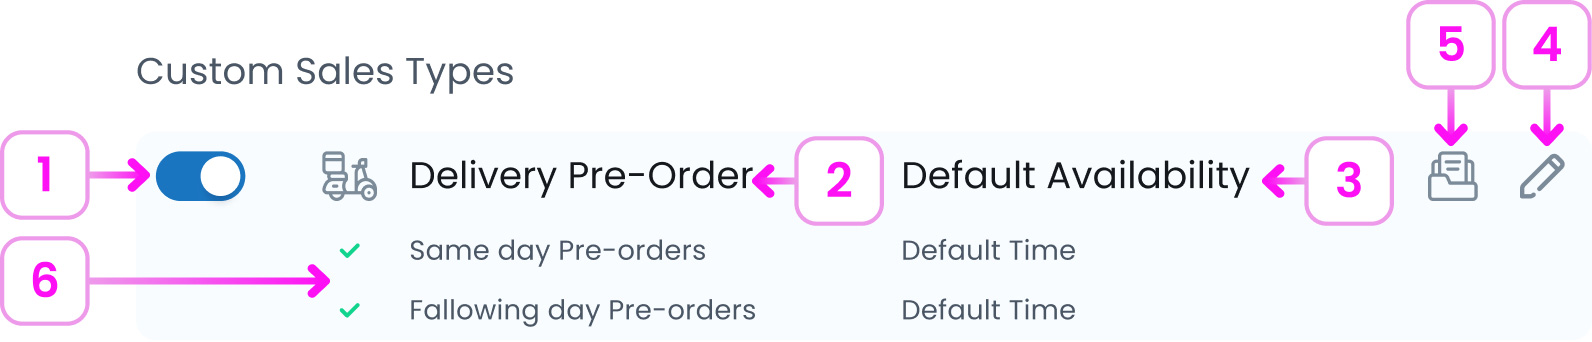
- Active Toggle: Turns the sales type on or off. When toggled off, items linked to this type will not appear on menus or ordering channels.
- Sales Type Name: Shows the label (e.g. In-Store, Delivery, VIP Orders), you can click this name when editing custom types.
- Availability: Displays the assigned Availability Set. This helps you quickly see when the sales type is active.
- Edit Sales Type Button: An edit icon appears when you hover over default sales types (like In-Store or Takeaway). Click it to open and update the availability or pre-order settings.
- Archive Sales Type Button: For custom sales types, an archive icon appears when you hover over a row. Use this to delete the custom sales type from the list while keeping a record of it in your system.
- Pre-Order Status: Indicates whether Same Day and/or Following Day pre-orders are enabled. If they are, the system will show either Default Time or custom lead time rules depending on your configuration.
What’s Next?
Now that your Sales Types are set up, head over to the Item Library to assign availability and pricing per type. This ensures each item appears in the right place, at the right time, and for the right customer.