Create a New Inventory Item
Items are the foundation of your inventory, whether they’re products, materials, or services. This article walks you through the process of adding a new item to your Item Library in the TechSuite inventory management system. You’ll learn how to set up a new item by giving it a name, setting pricing, assigning categories, defining item types, uploading images, assigning availability, and connecting modifiers, ensuring the item is ready to be added to menus and used across POS, kiosk, and online ordering channels.
To Get Started
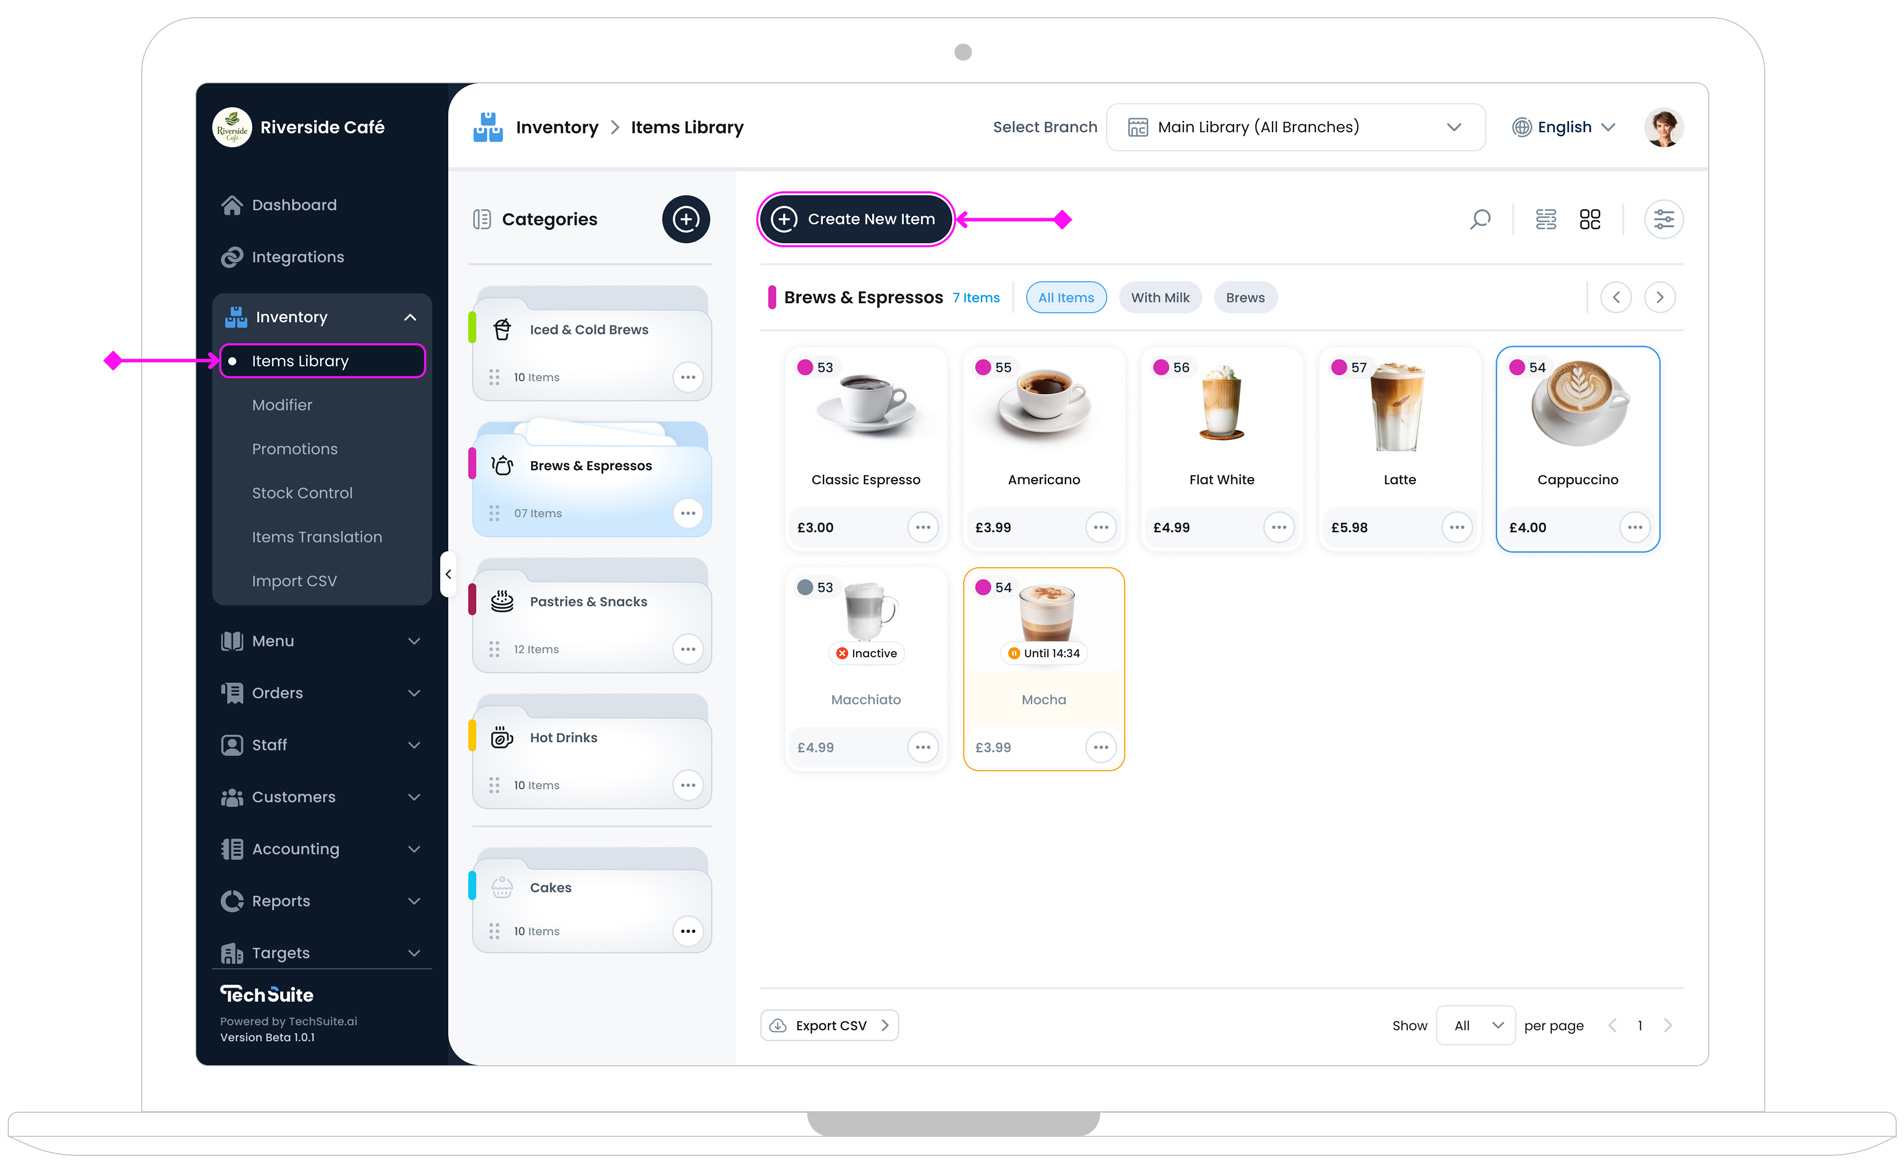
To create a new item, log in to the TechSuite portal and navigate to Inventory > Item Library from the sidebar. Then, click the “Create New Item” button
Step 1: Set Item Info
This section lets you define the core identity of your item.
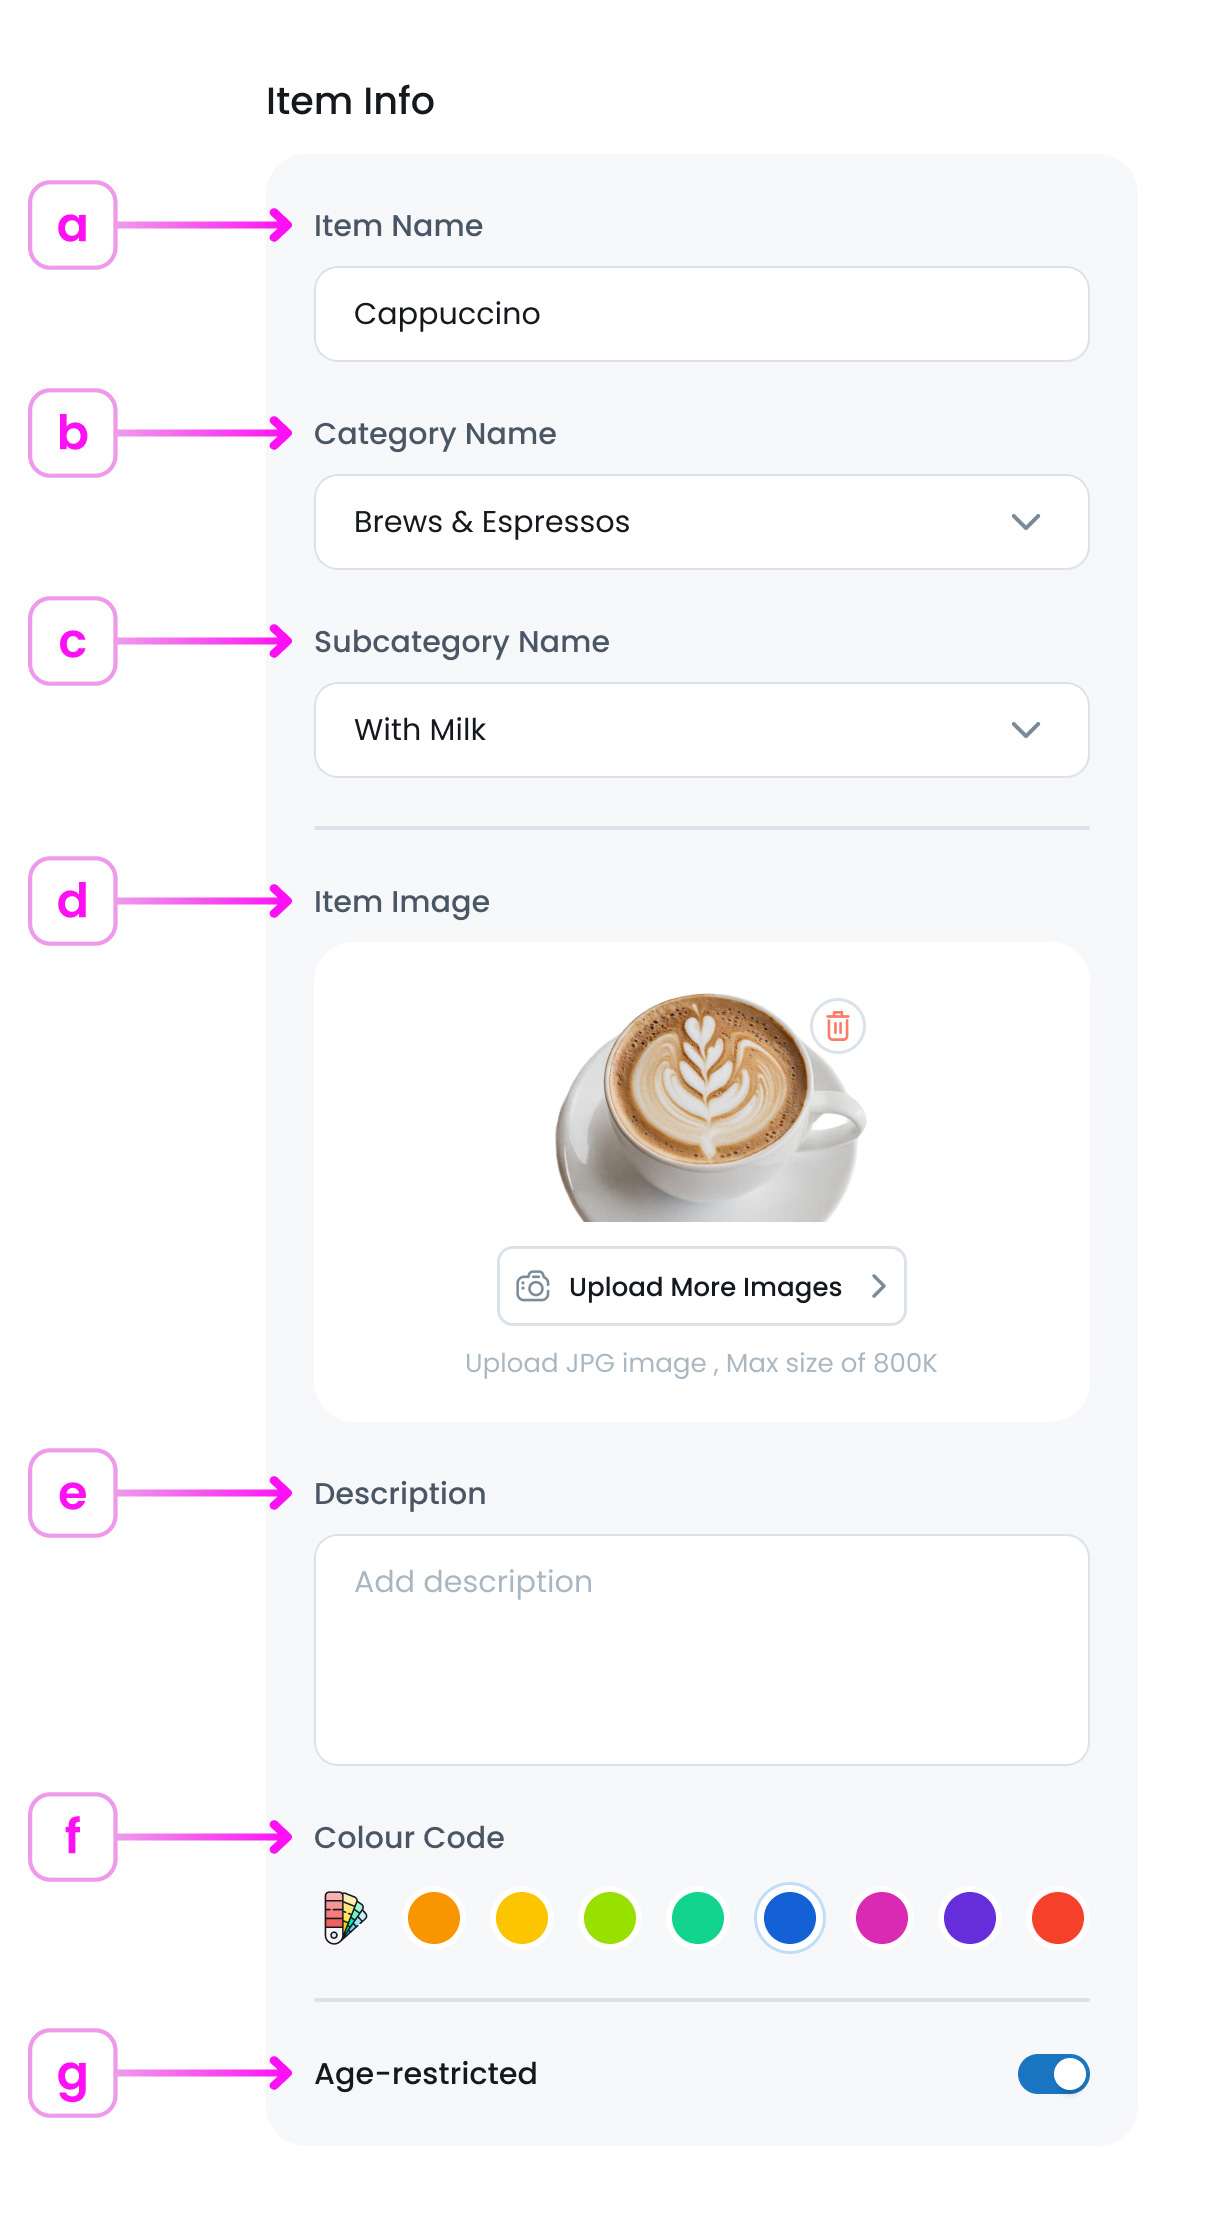
a. Item Name
Enter a short, clear name, (e.g. Green Tea or Blueberry Muffin). This name will appear on menus, POS, kiosks, and other item lists throughout your system.
b. Category Name
Select the category this item belongs to (e.g. Snacks, Drinks). Categories help organise your library and enable filtering. If you haven’t created a category yet or aren’t sure how to add one, see Create a New Category to learn how to set up categories for organising your inventory.
c. Sub-category
In the Item Info section, if the selected category includes any sub-categories, an extra dropdown field labeled "Subcategory Name" will appear. You’ll need to choose the correct subcategory to properly classify your item. This helps further organise your inventory and ensures items are grouped and filtered accurately throughout the system.
d. Item Image
Upload one or multiple high-quality images in JPG format, and size up to 800 KB, to visually represent the item. This image will appear on Menus across POS, kiosks, and Online ordering platforms, so it plays a key role in how your item is presented to customers.
Image Guidelines and Pro Tips
-
Make it visually appealing
Choose an image that clearly shows the item, looks fresh, and sparks interest at a glance.
-
Avoid poor lighting or blur
Low-resolution or unclear photos can negatively affect how your menu is perceived.
-
Keep it consistent:
For a more professional and polished menu, aim to use images with similar lighting, angles, and backgrounds across your items.
-
Upload the Right Image Size
Use rectangle images sized 1200×800 or 1600×1000 pixels (landscape), in JPEG format for best compatibility. Keep file size under 800KB to ensure fast loading. Large images can slow performance, while small ones may appear blurry. Always preview your image to confirm it displays well across POS, kiosk, mobile, and online ordering. For resizing tips, see our Image Resizing Guide.
e. Item Description
Use this field to add a brief explanation about the item. This description will be visible to customers on self-ordering kiosks, the mobile app, and online ordering channels. Include details such as what the item includes, its size, flavour profile, or any key highlights. (e.g., “Rich espresso with steamed oat milk – served hot.)
f. Colour Code
Colour Code: Choose a colour to visually label this item. You can select from our preset palettes for a quick choice or use the integrated colour picker to find a custom shade that matches your brand’s look and feel.
g. Age Restriction
For any products requiring a minimum age to purchase (like alcoholic beverages or restricted items), enable this toggle.
Step 2: Select Item Type
Choose the type of item you’re creating. This affects where it shows up in the system and how it behaves:

a. Menu Item
Use this for items that appear on customer-facing menus (such as on a kiosk, online ordering platform, or in the TechSuite POS). This applies whether the item is ready to sell as-is or requires preparation.
- a.1. Ready to Sell: Choose this if the item is pre-prepared or doesn’t need any extra steps before serving.
- a.2. Needs Preparation Time: Select this if the item is made to order. You’ll be able to set a prep time so staff can manage cooking or assembly.
- a.3. Item Condition: Describe how the item is stored or served (e.g., wet or dry, food or drink).
- a.4. Available for Sale: This toggle is ON by default. Turn it OFF if the item shouldn’t appear in POS, kiosk, or online channels yet.
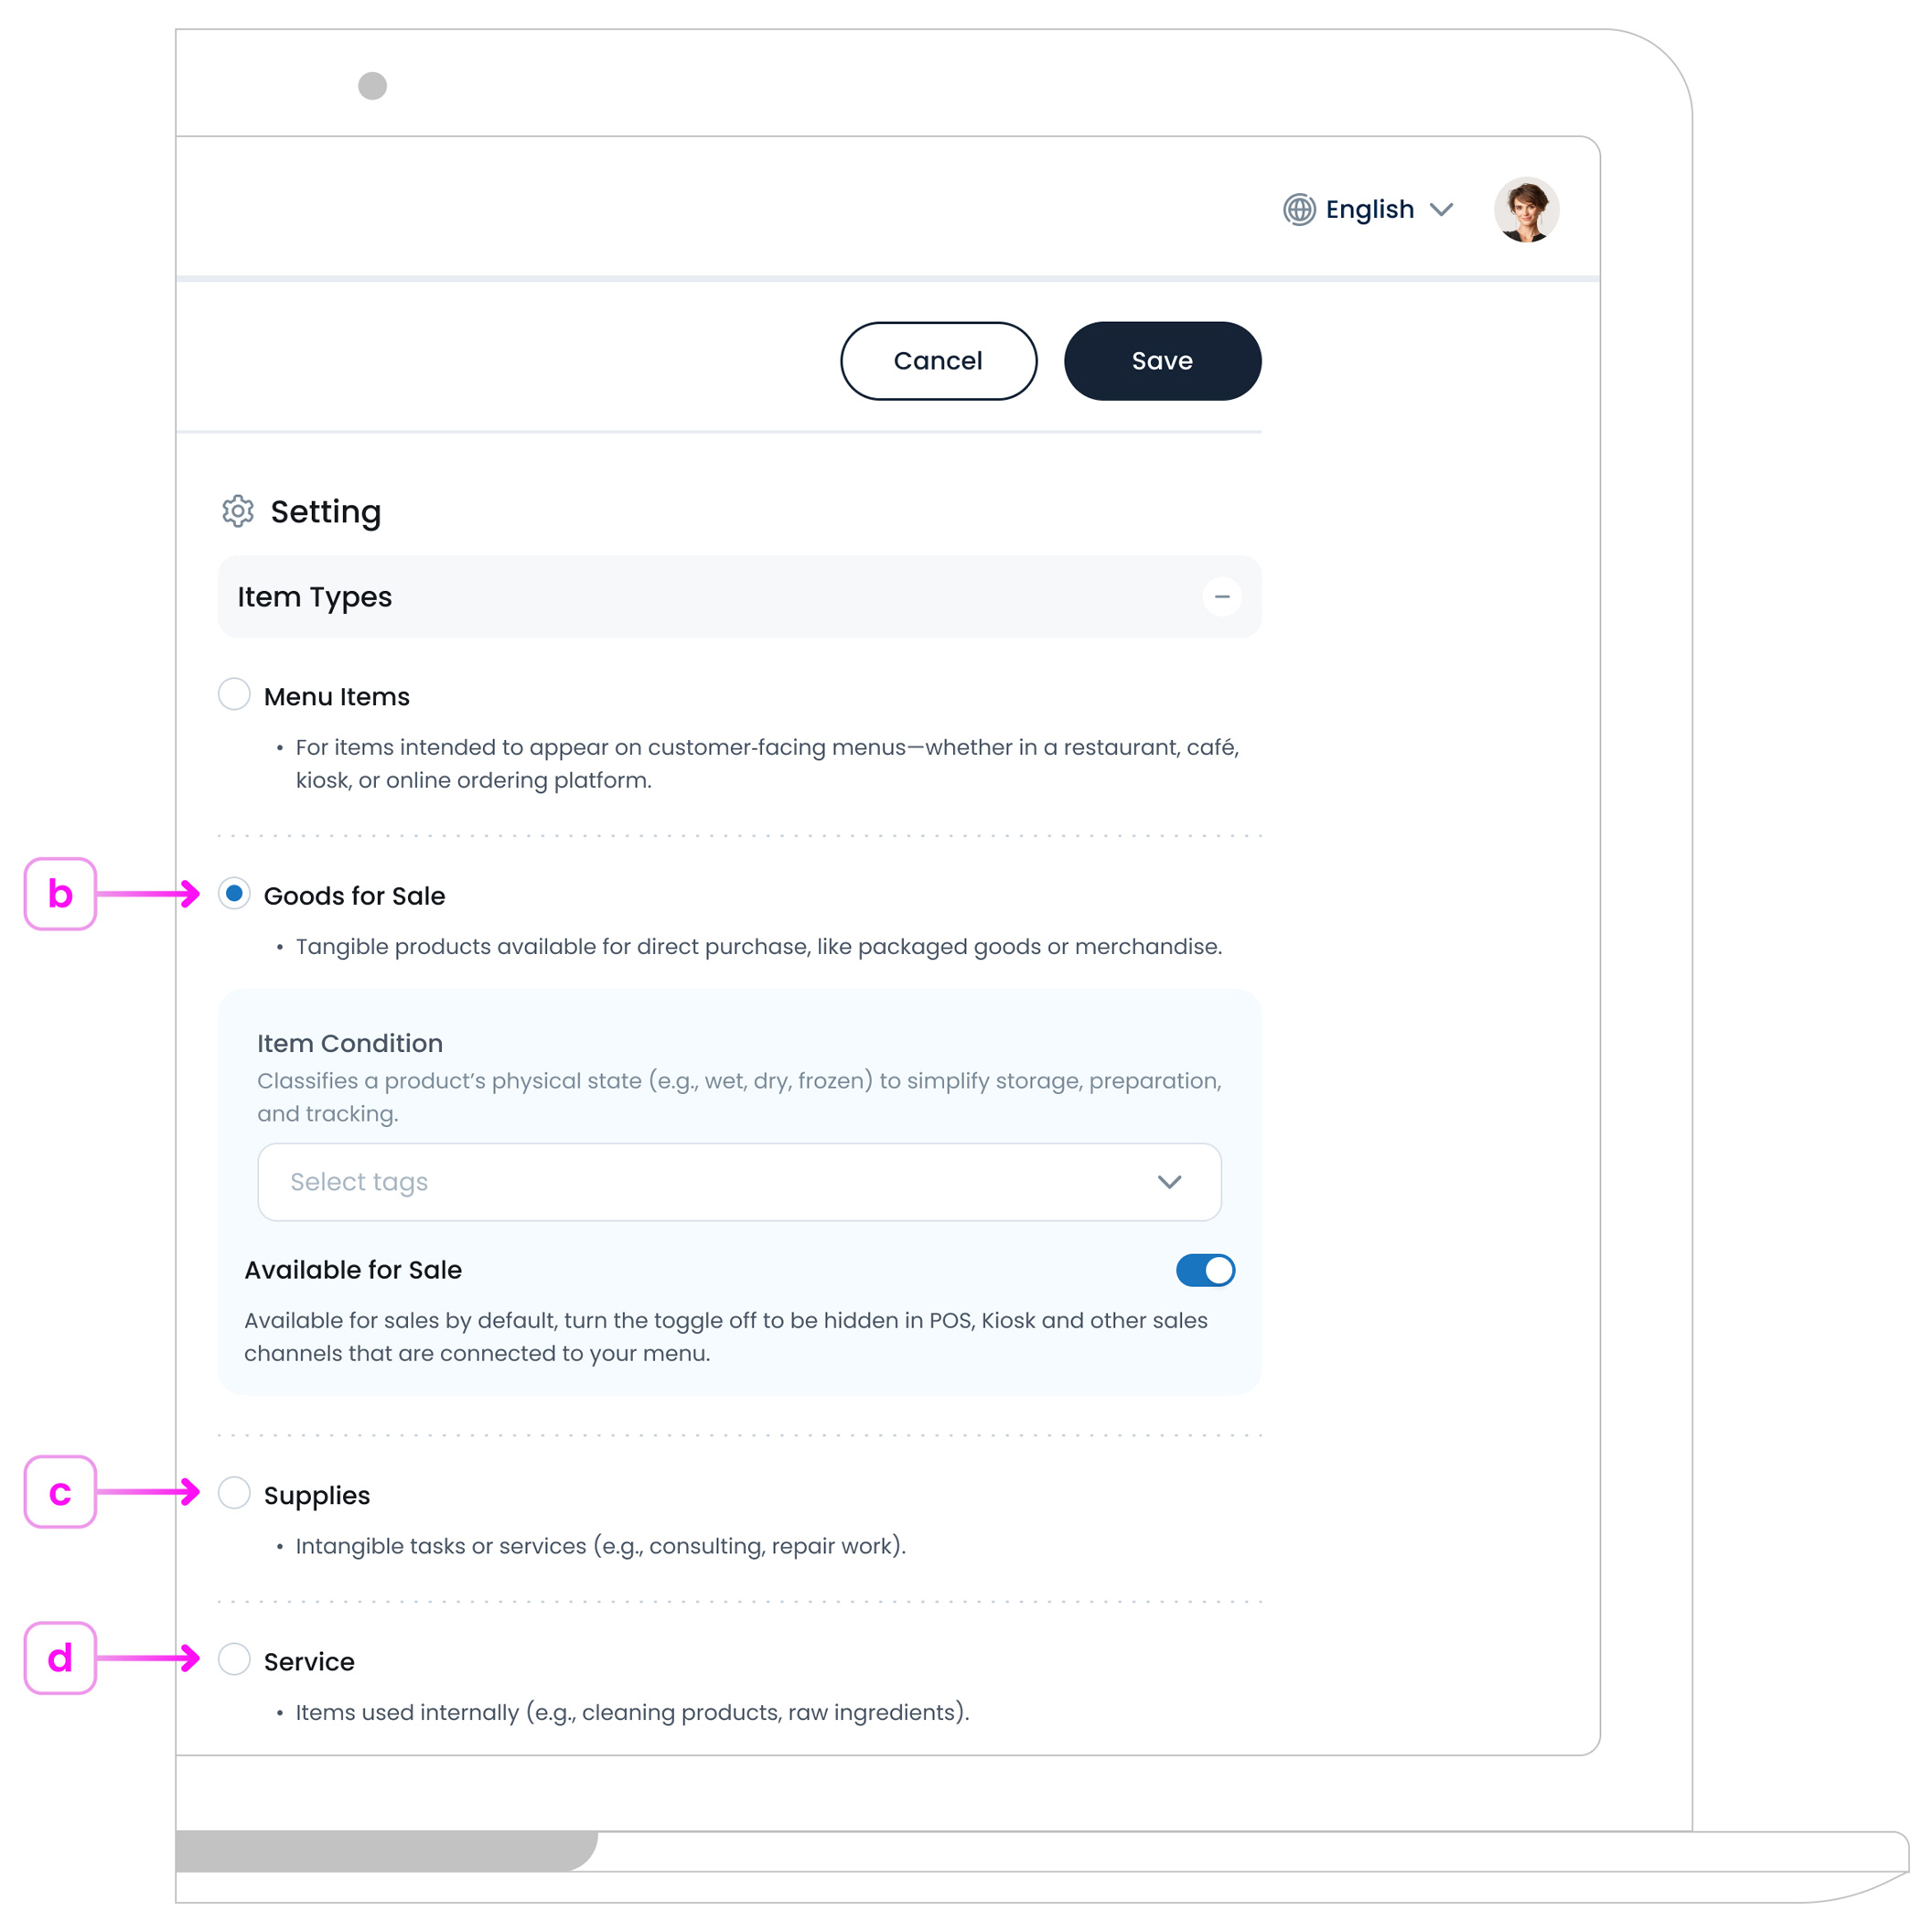
b. Goods for Sale
Use this for retail-style products like bottled drinks, merchandise, or packaged snacks that customers can buy directly.
c. Supplies
This is for internal-use items like cleaning products, raw ingredients, or packaging. Supplies don’t appear in menus or customer views.
d. Services
Choose this for non-physical offerings like consulting, repair work, or setup fees.
Step 3: Select Ingredients
This section allows you to link specific inventory items as ingredients used to prepare the product. It helps with stock tracking and recipe-level cost management.
Click on ‘Select Ingredient Items’ button  to open your inventory list and choose which ingredients are used to make this item (e.g., cheese, bread, lettuce).
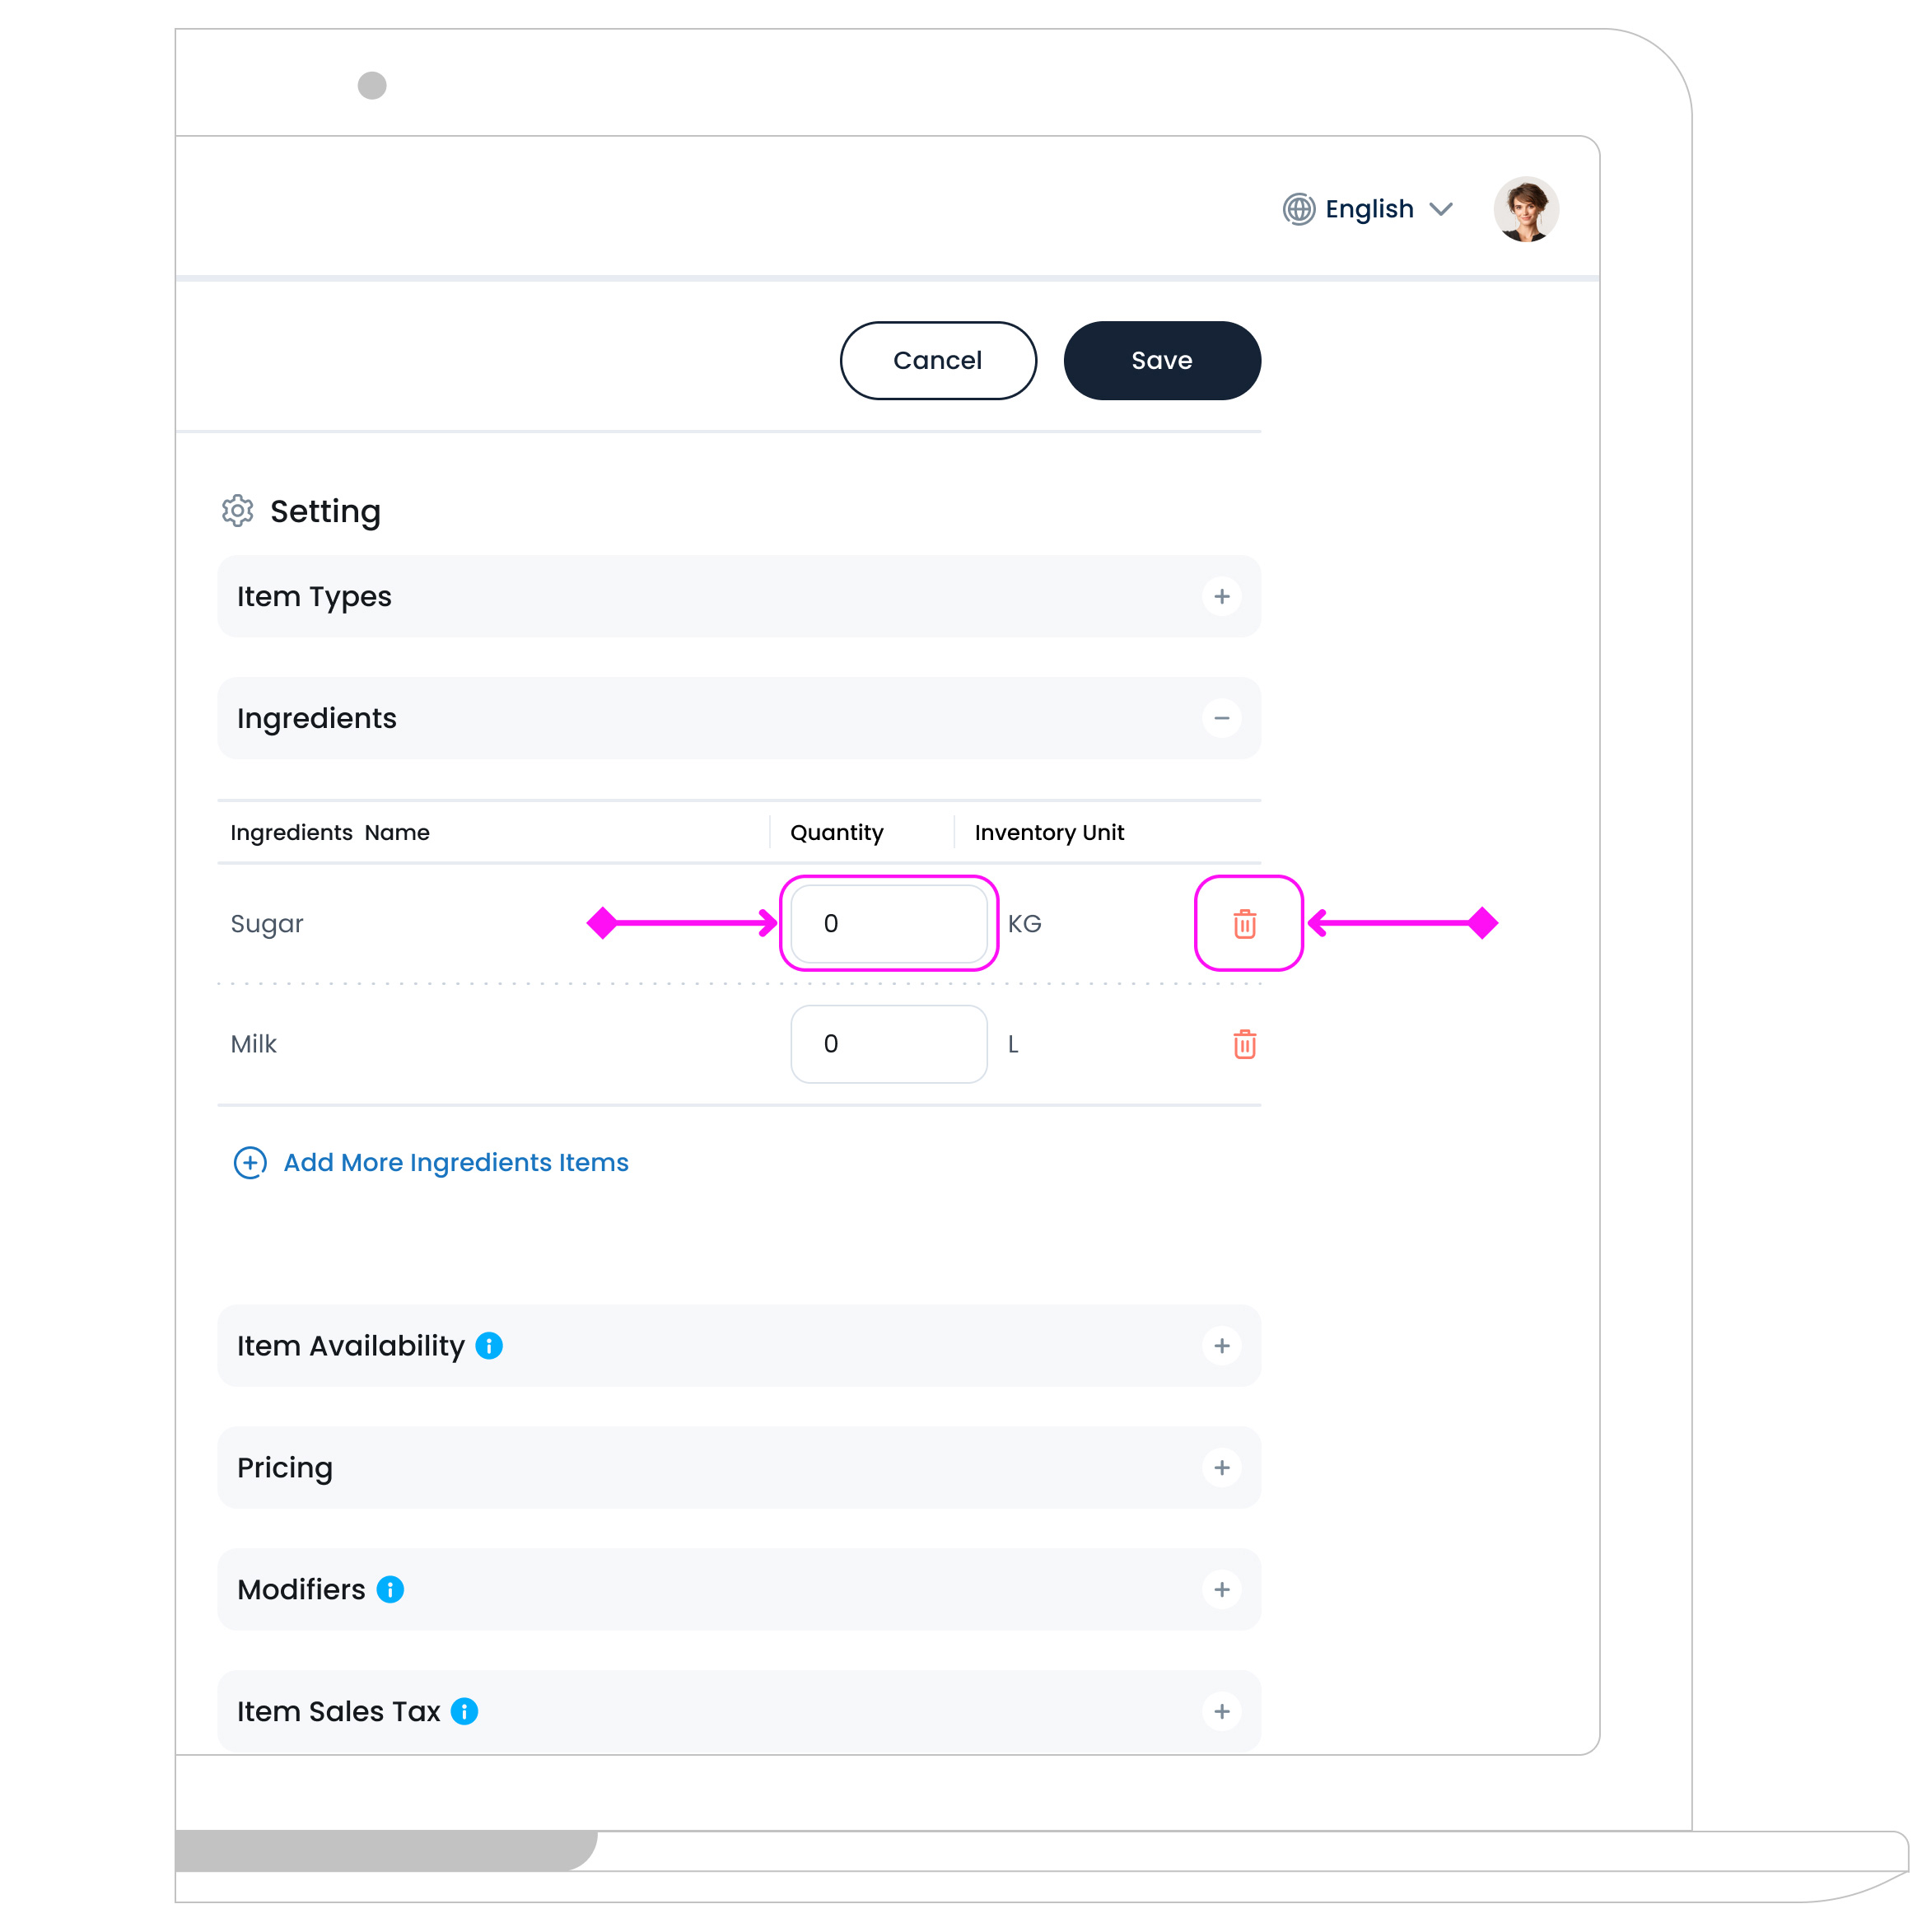
Once selected, you’ll see:
- Ingredients Name: Pulled from your inventory list.
- Quantity: Enter the quantity of each ingredient used per item (e.g., 0.2 for 200g).
- Inventory Unit: The unit type of the ingredient (e.g., kg, bottle, item).
-
Delete an Ingredient: To delete an ingredient, click the Delete icon
 at the end of its row.
Step 4: Item Availability
Item Availability controls when a product is available for sale (like specific days, seasons, or time periods). It helps you manage your stock visibility across POS, kiosk, or online. You can create and apply availability sets to match your business needs. This applies to:
- In-store
- Delivery
- Takeaway
- Or any other sales types you’ve added in the system settings .
You can choose the same availability across all sales types, or assign a unique schedule to each.
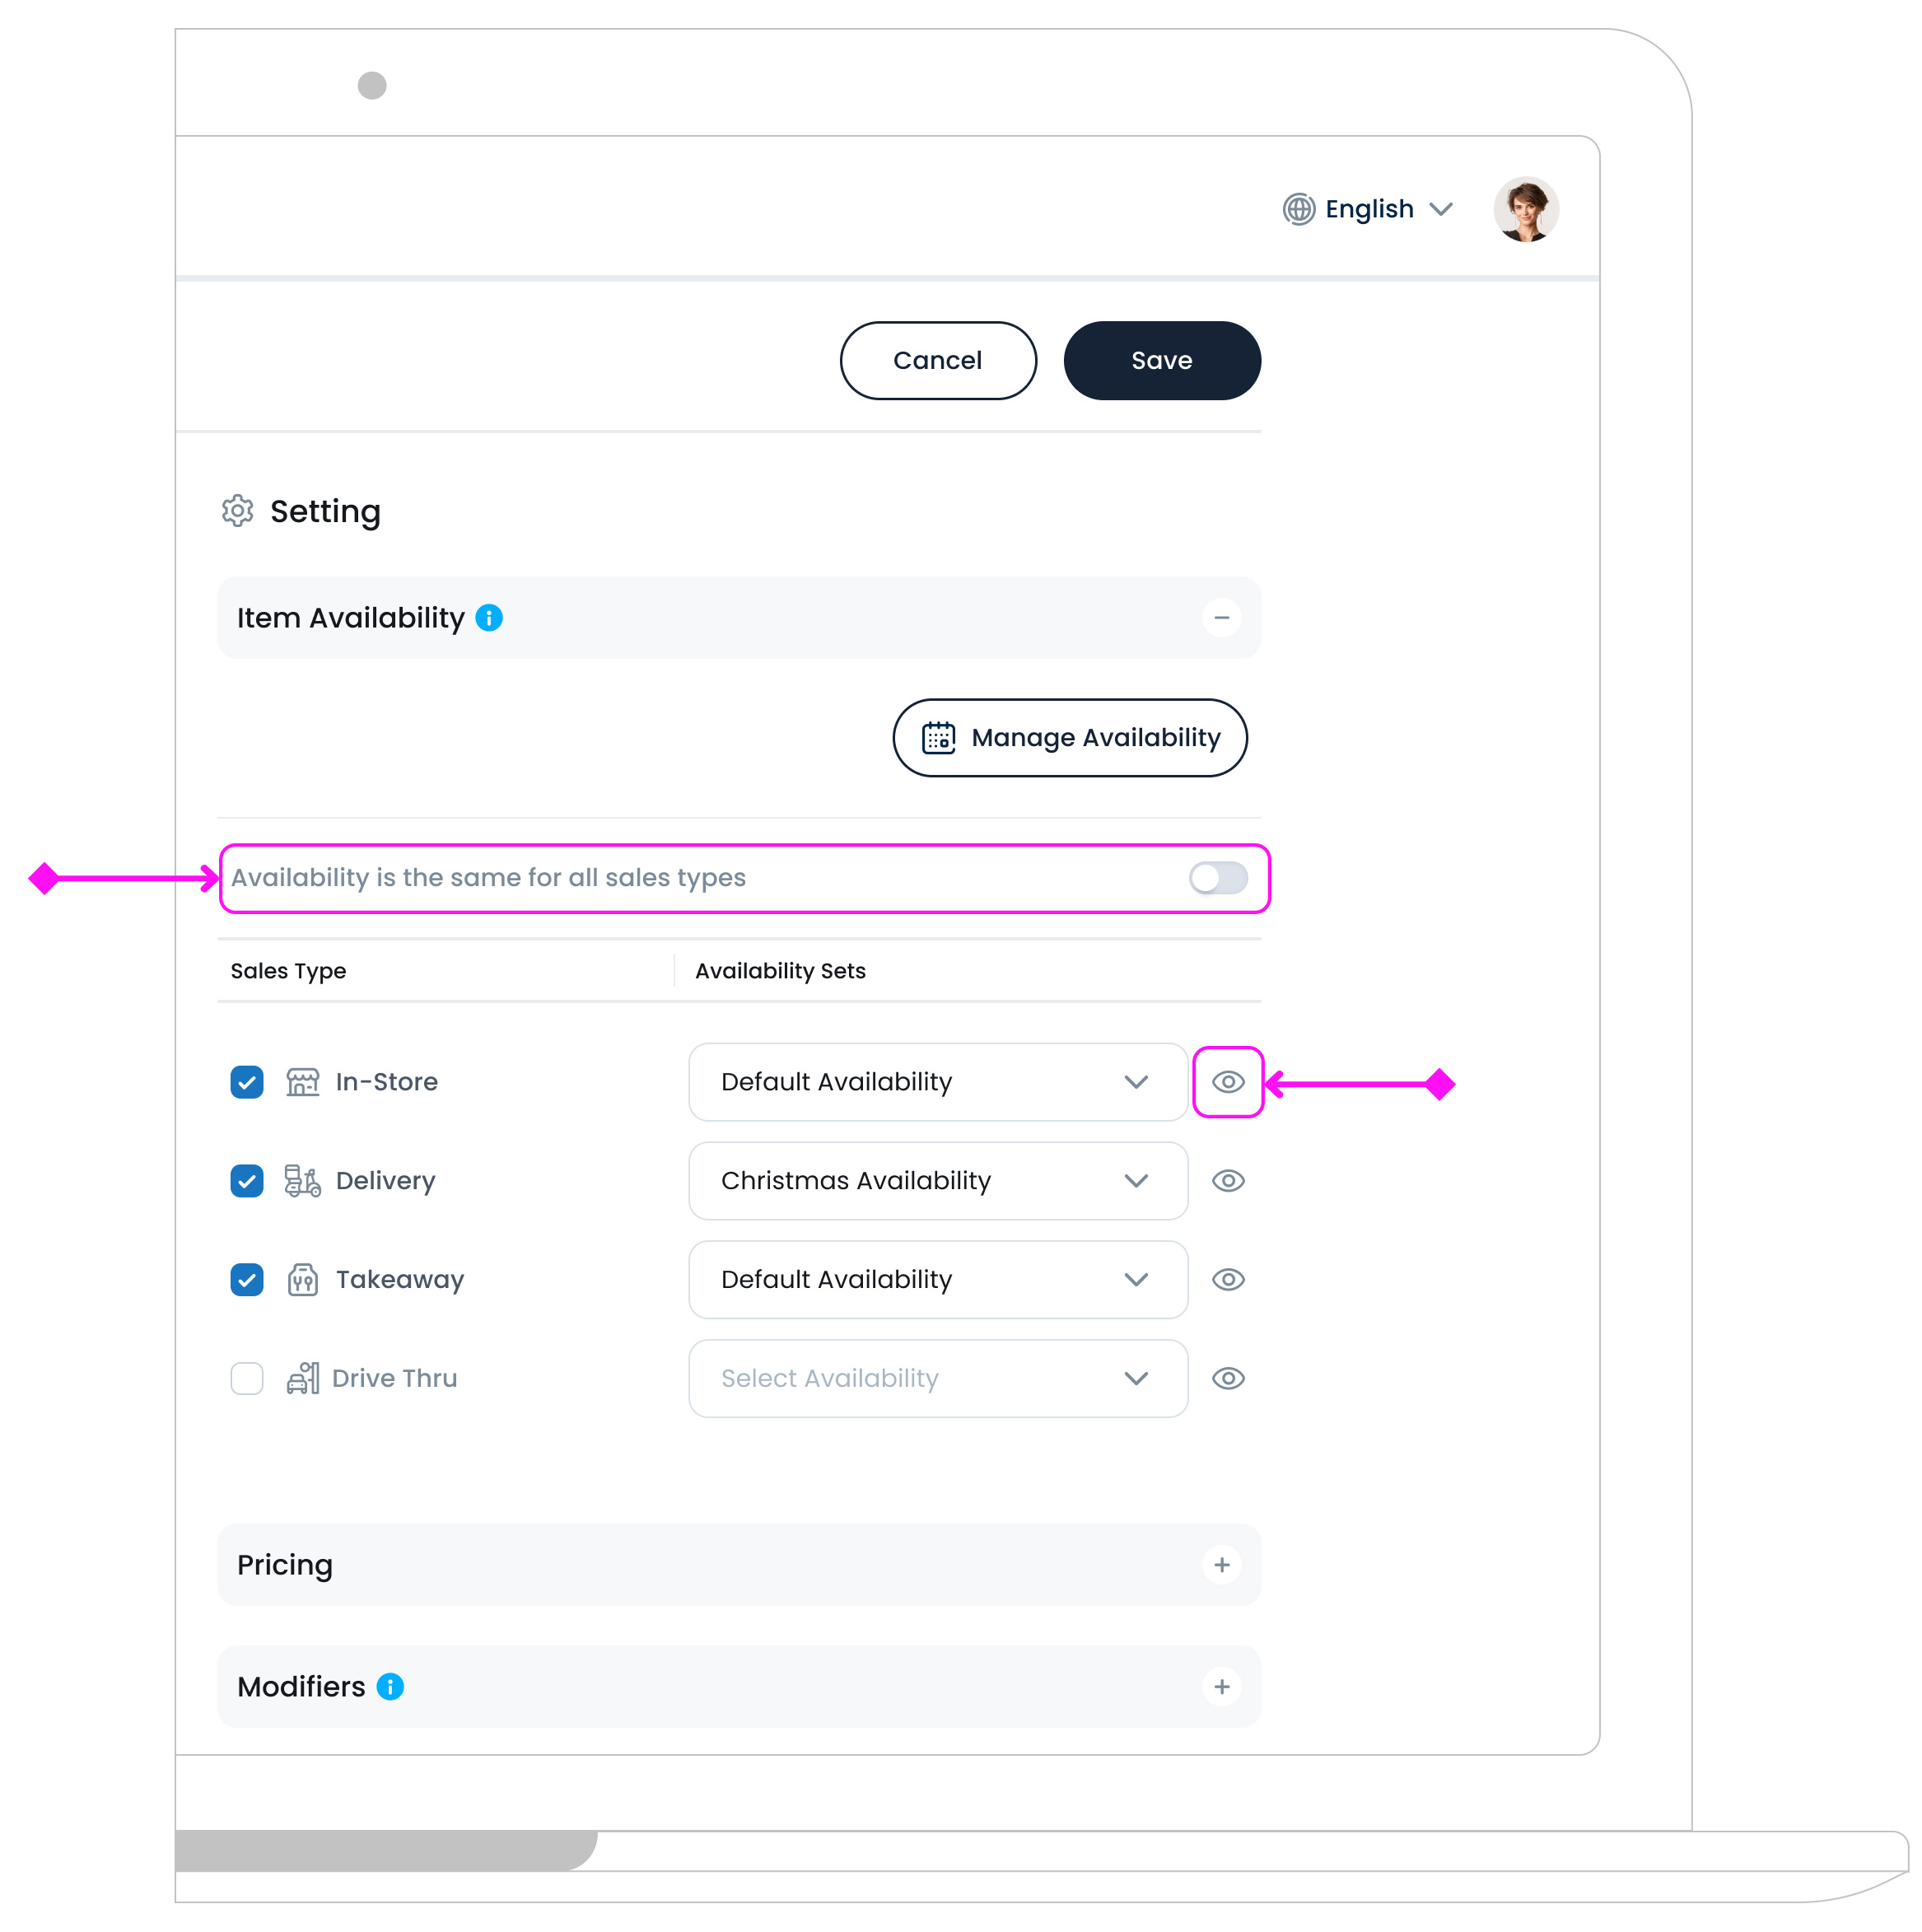
Option 1: Same for All
Toggle ON the “Availability is the same for all the sales types” option to apply a single availability setting across all channels.
Option 2: Custom Per Sales Type
Leave the toggle OFF to set different availability per channel (e.g., breakfast items available in-store but not for delivery).
You’ll see a dropdown for each sales type where you can choose a predefined availability set, like General Availability or other pre-set availability.
Click the eye icon ![]() next to a set to preview the detailed hours (e.g., Monday to Sunday, 07:00–23:00).
next to a set to preview the detailed hours (e.g., Monday to Sunday, 07:00–23:00).
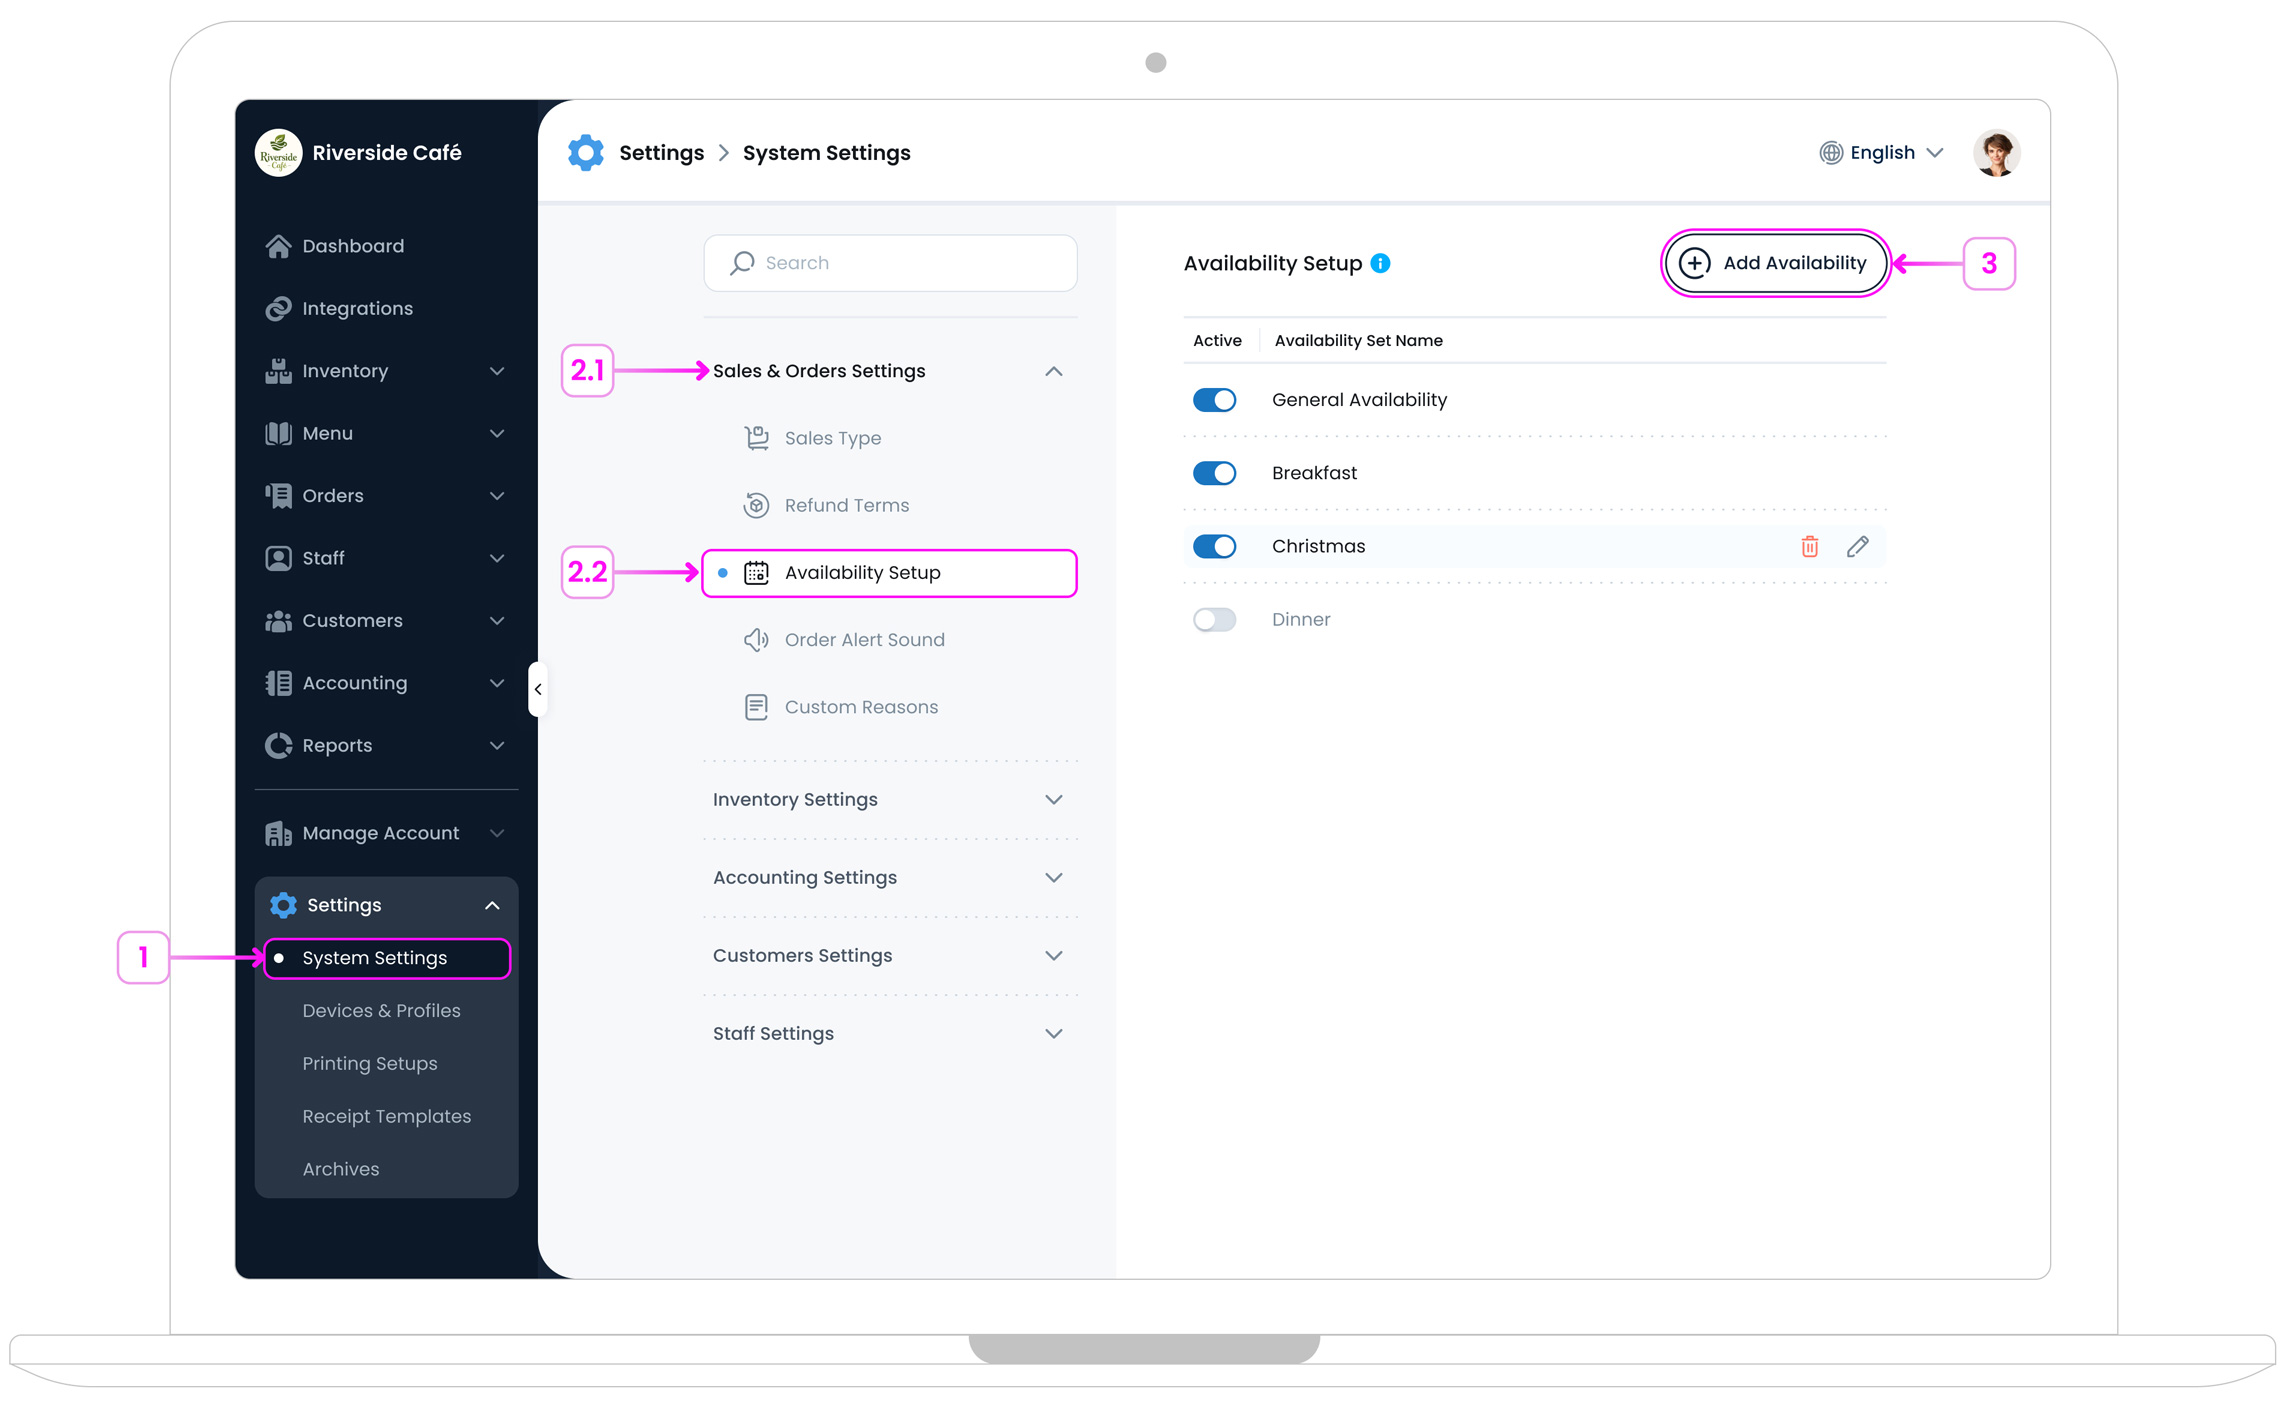
To customise or create new availability options:
- Step 1: Go to Settings > System Settings
- Step 2: Under Sales & Orders Settings, choose Availability Setup
- Step 3: Click Add Availability

- Step 4: Name your new availability set (e.g., “Breakfast Hours”)
- Step 5: Set the weekly time slots or date range
- Step 6: Click on the Save Button
 to save your availability
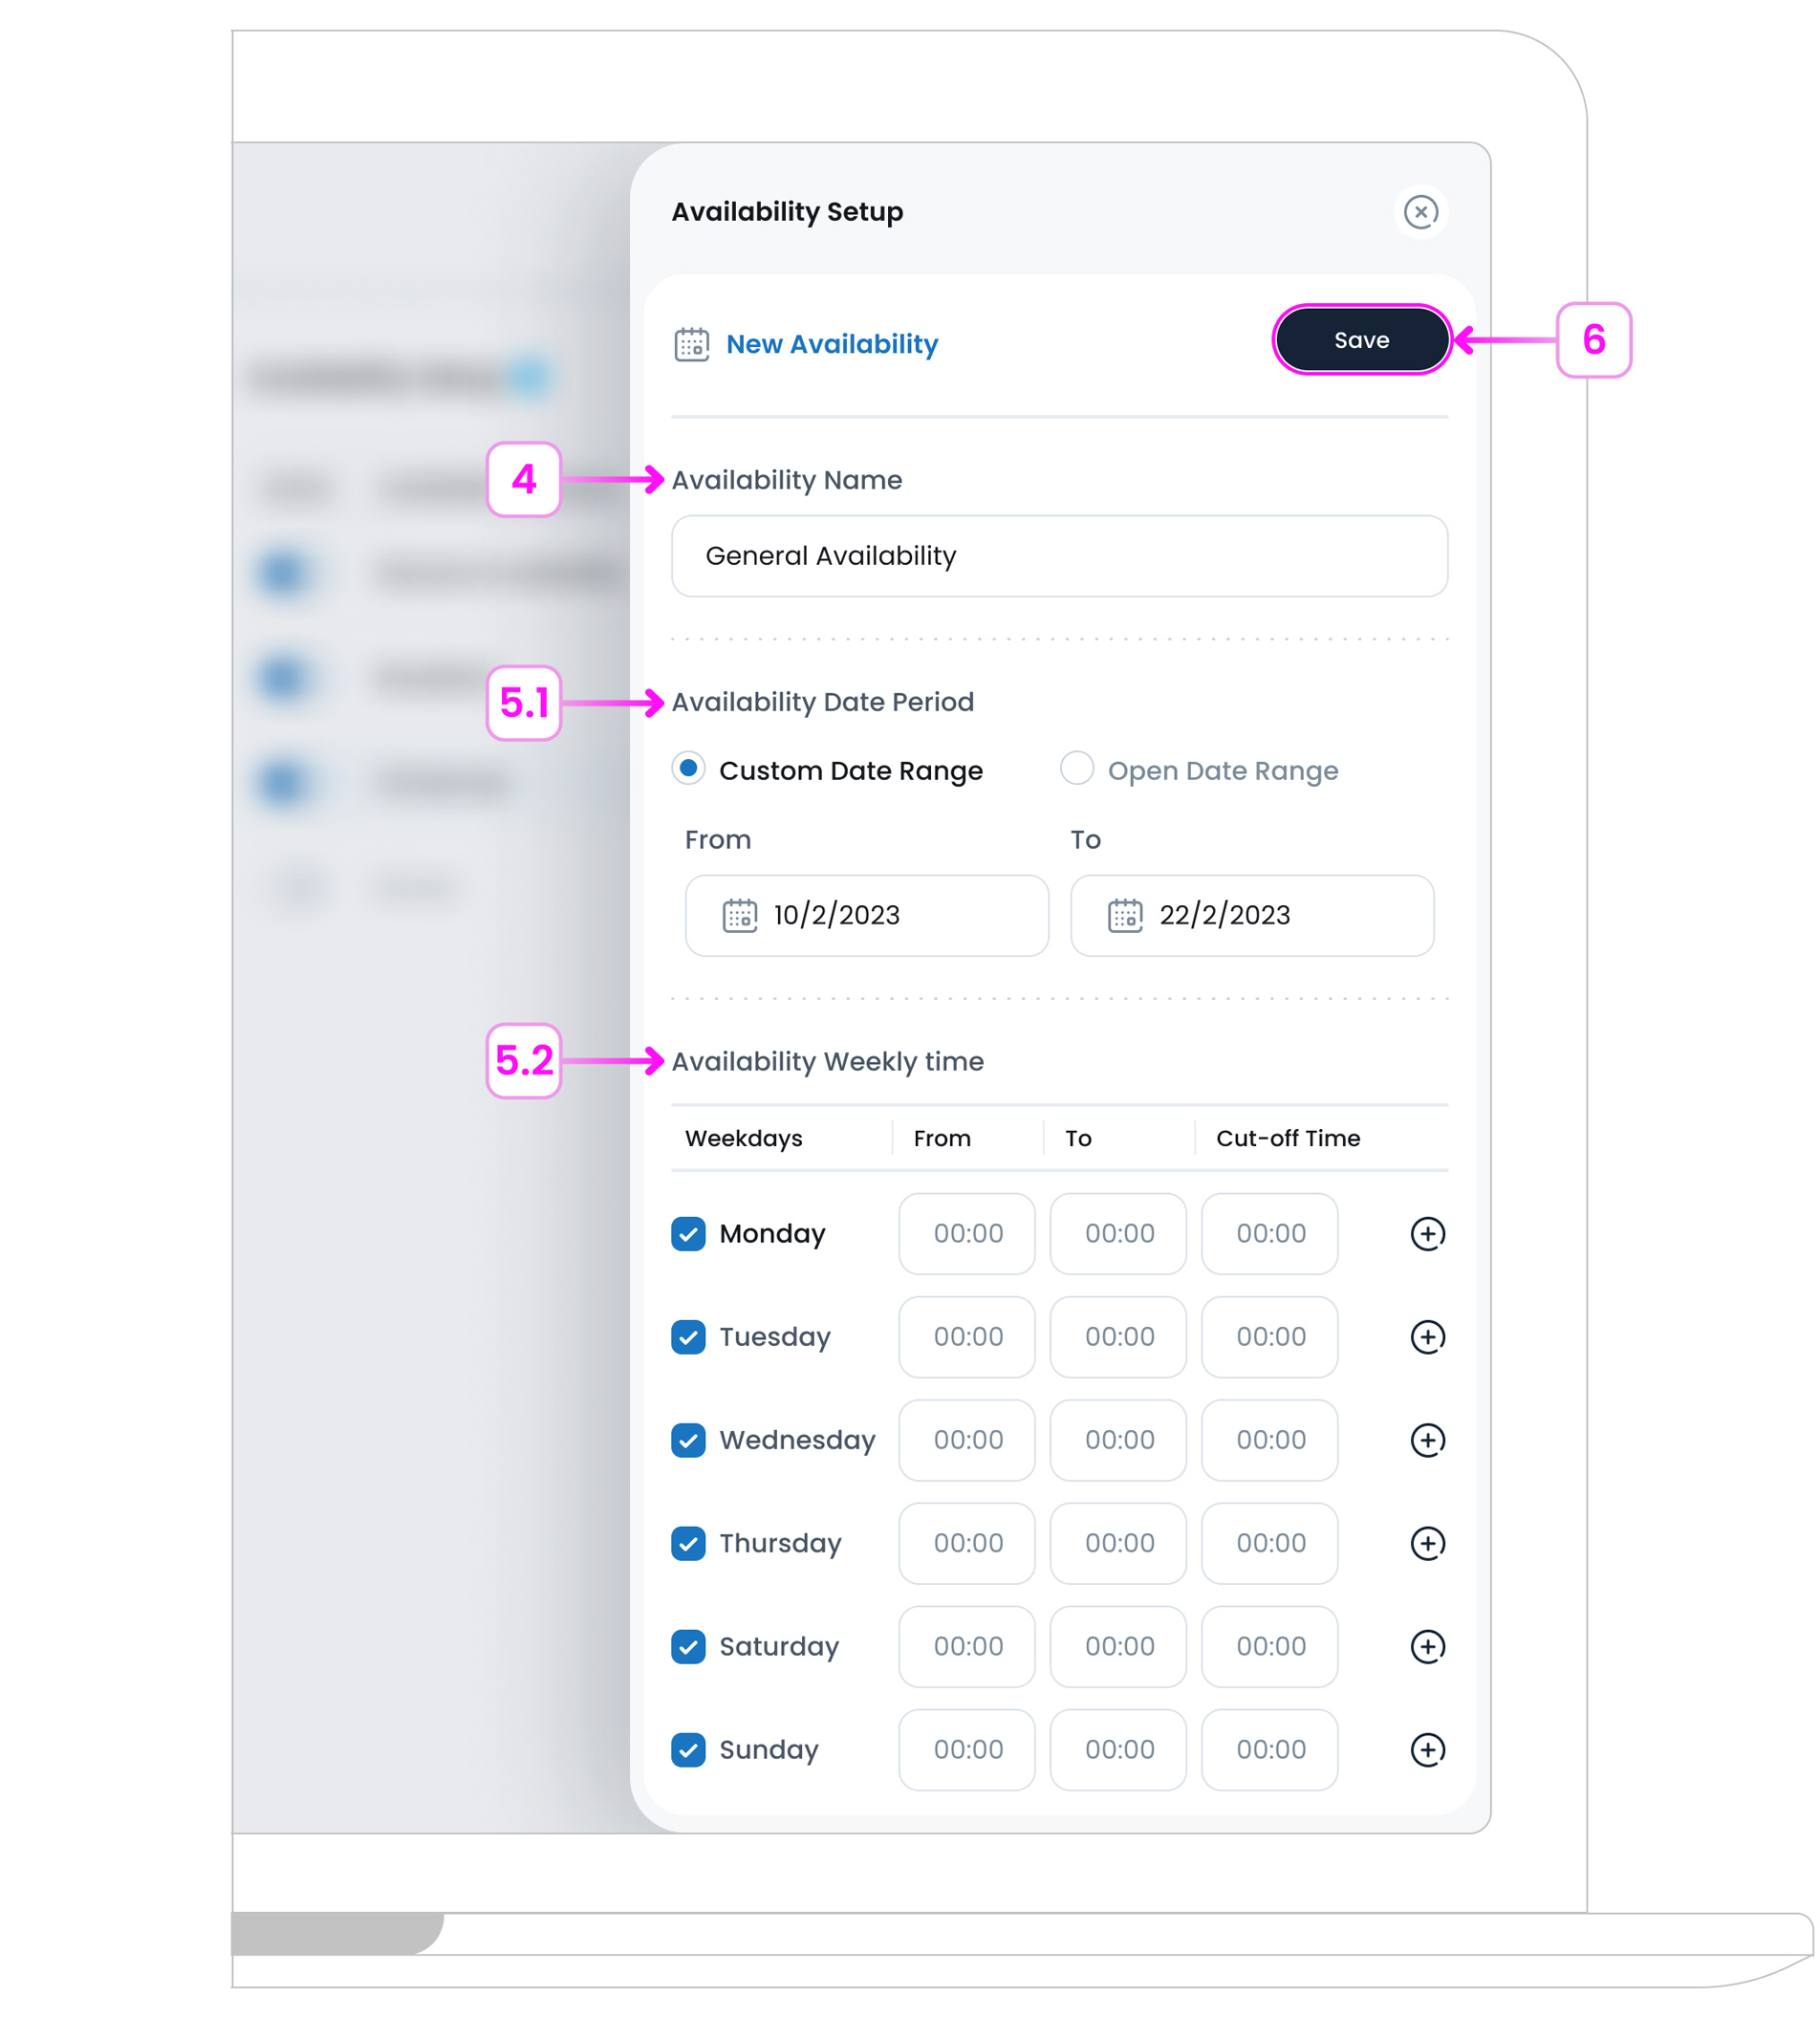
This new set will now appear in your dropdown list when assigning availability to items.
Using these tools, you can ensure each item appears only when it should, keeping your menu clean and relevant across different sales channels.
Sales Types
Sales Types define where and how your item will be available for purchase.
- In-Store: For orders placed directly at your physical location, like a counter or dine-in POS.
- Delivery: For items that can be ordered online or through an app and delivered to the customer.
- Takeaway: For items ordered in-store or online but picked up by the customer instead of being eaten on-site or delivered.
How to Add a Sales Type?
In TechSuite, Sales Types let you manage how and where your items are sold (such as in-store, takeaway, or delivery). To add a new Sales Type:
- Step 1: Go to: Settings > System Settings > Sales Type
- Step 2: Click the Add Sales Type button in the top right.
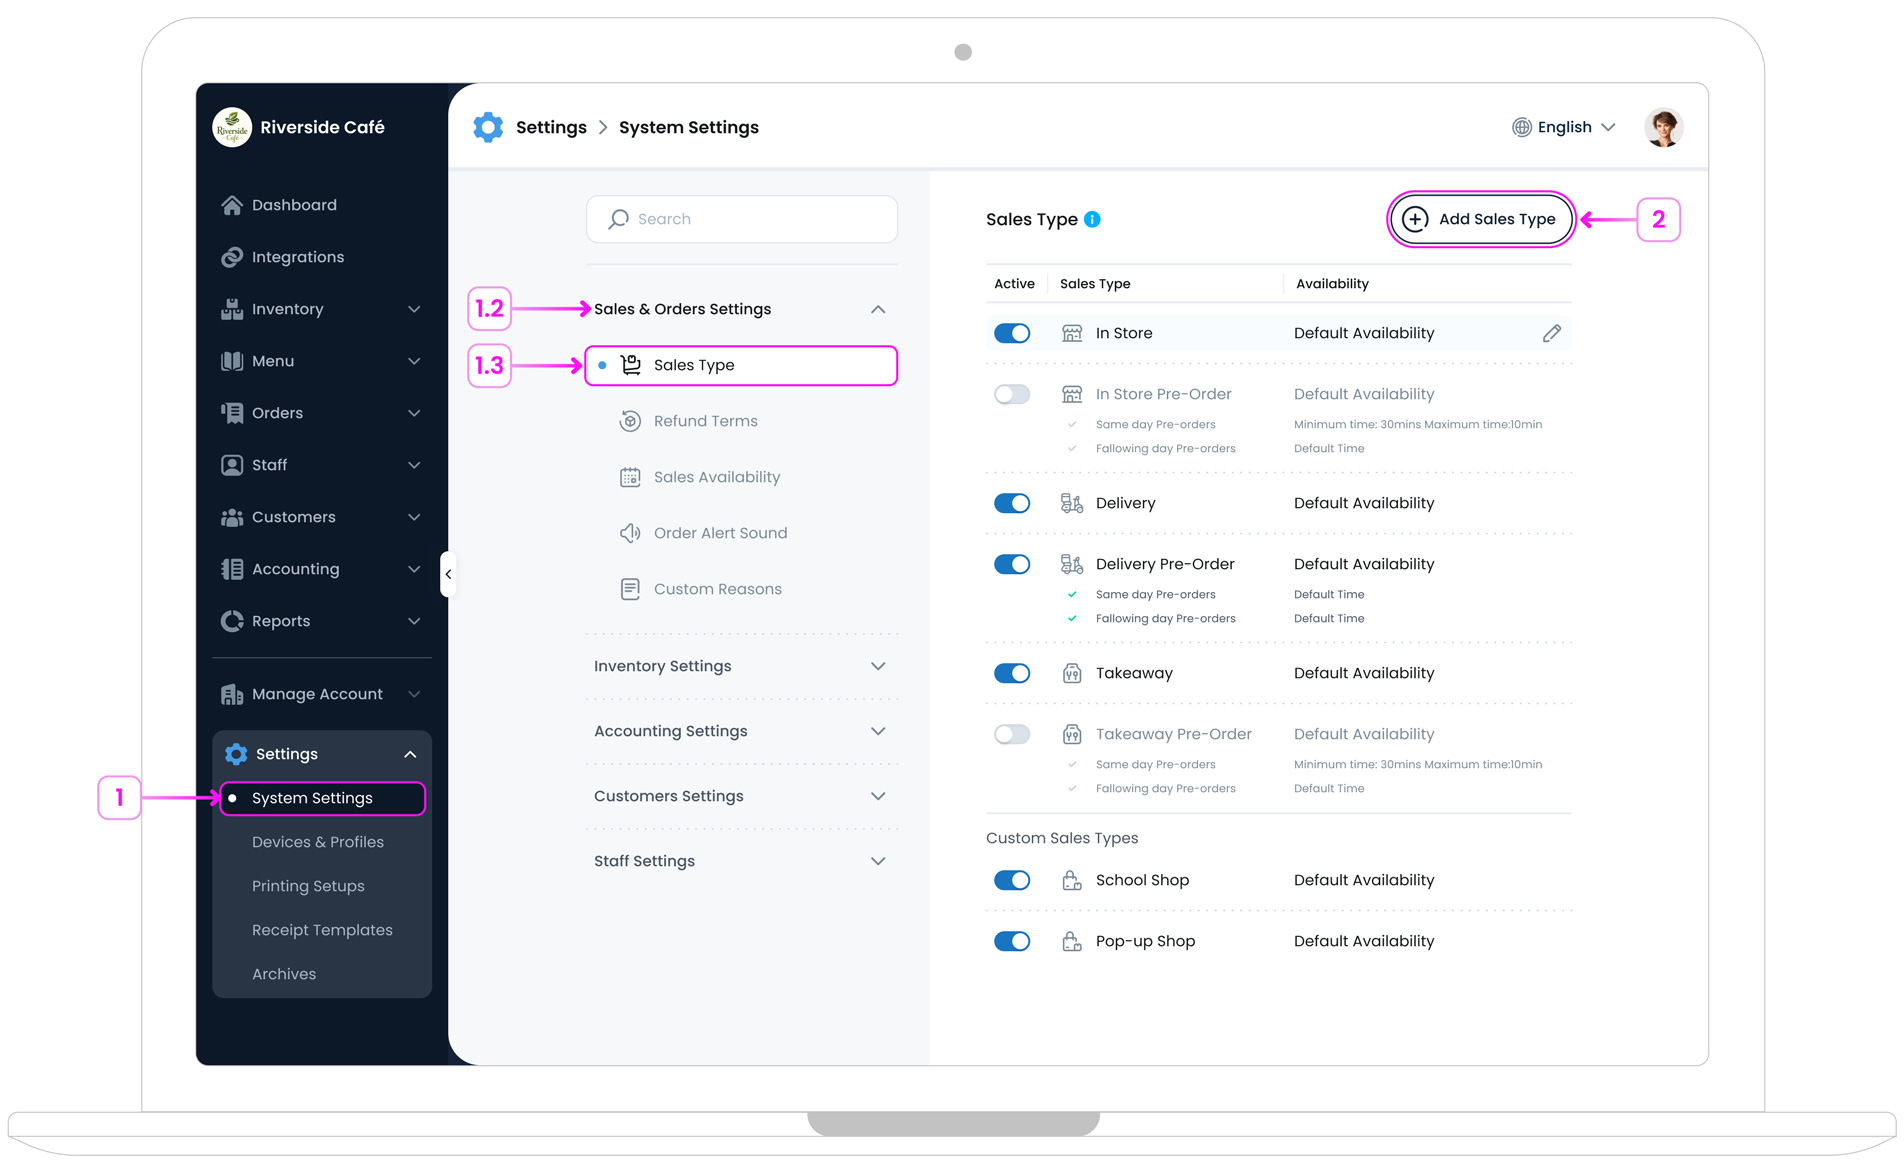
- Step 3: Fill out the form:
- Sales Type Name: Give it a clear and recognisable name (e.g. “Curbside Pickup” or “VIP Orders”).
- Availability: Choose when this sales type will be active by selecting from your pre-set availability schedules (set up under Availability Setup).
- Pre-Orders Toggle: Turn this ON if this sales type will handle advance orders that are not fulfilled immediately (e.g. bakery items made the next day).
- Step 4: Click on the Save Button
 to save add it.
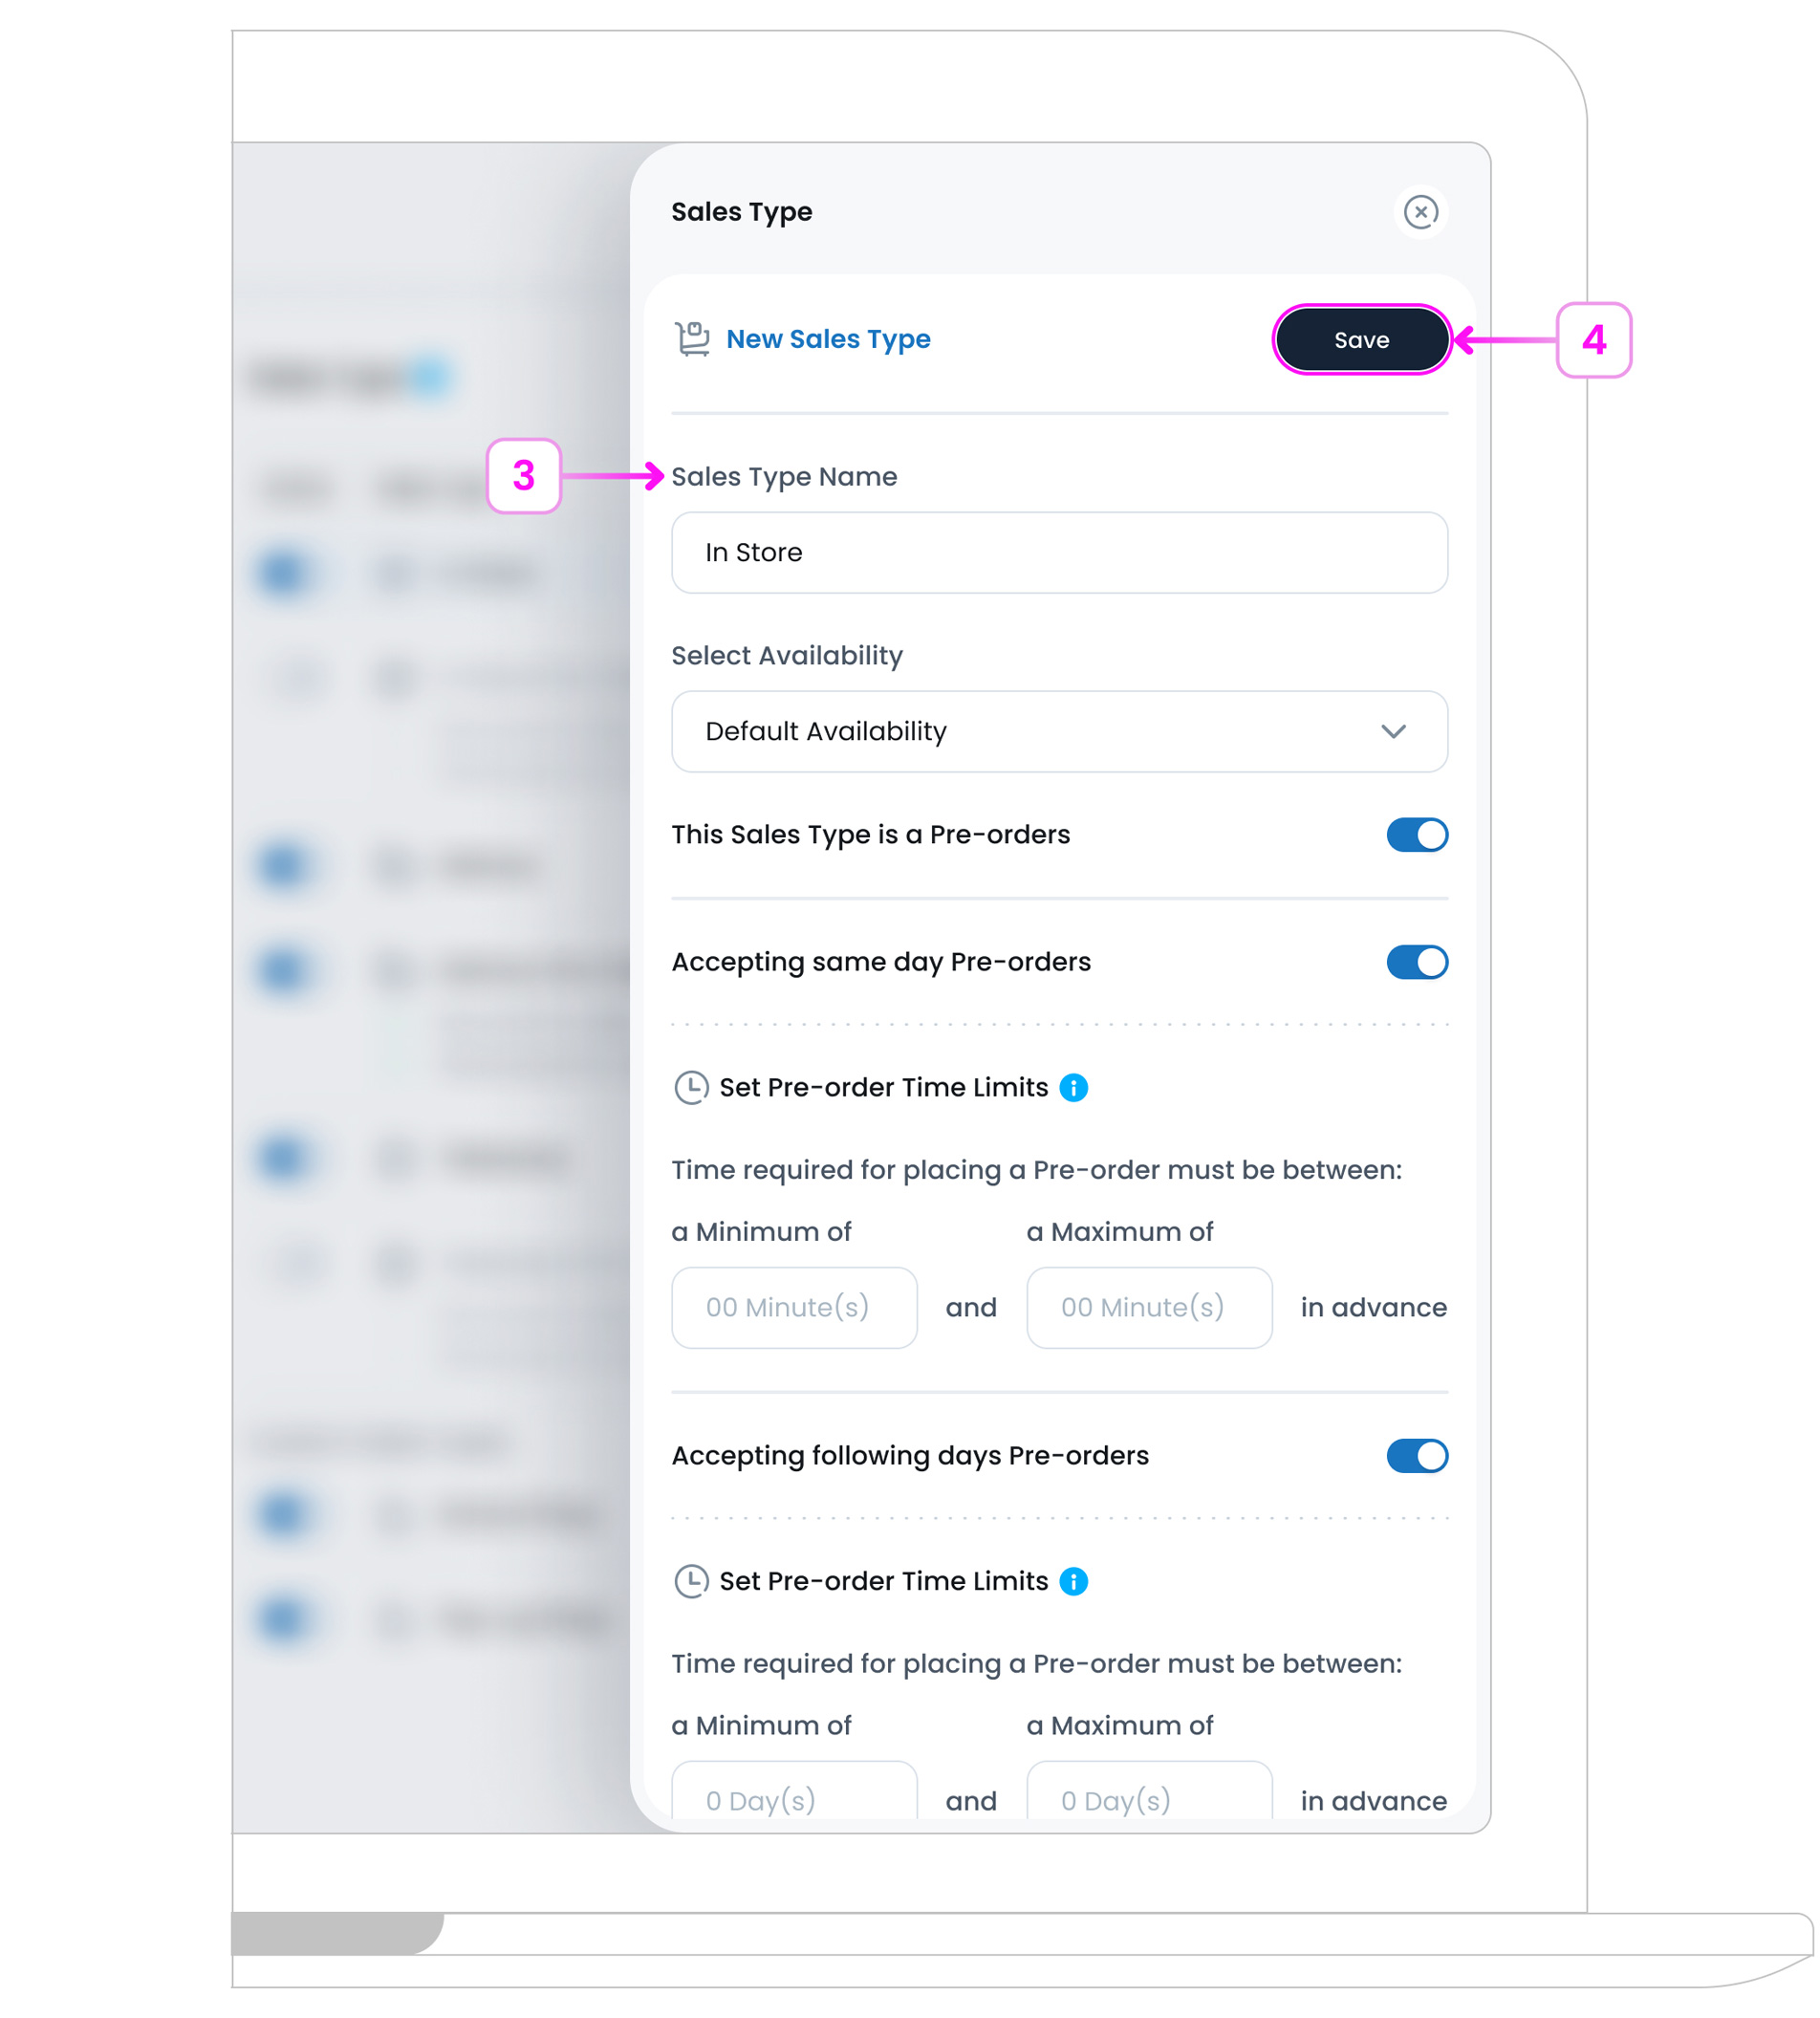
Once saved, the new Sales Type will appear in the list and can be used when setting item prices, availability, and reporting filters.
Step 5: Pricing
Define how much the item costs and whether it can be discounted or refunded.
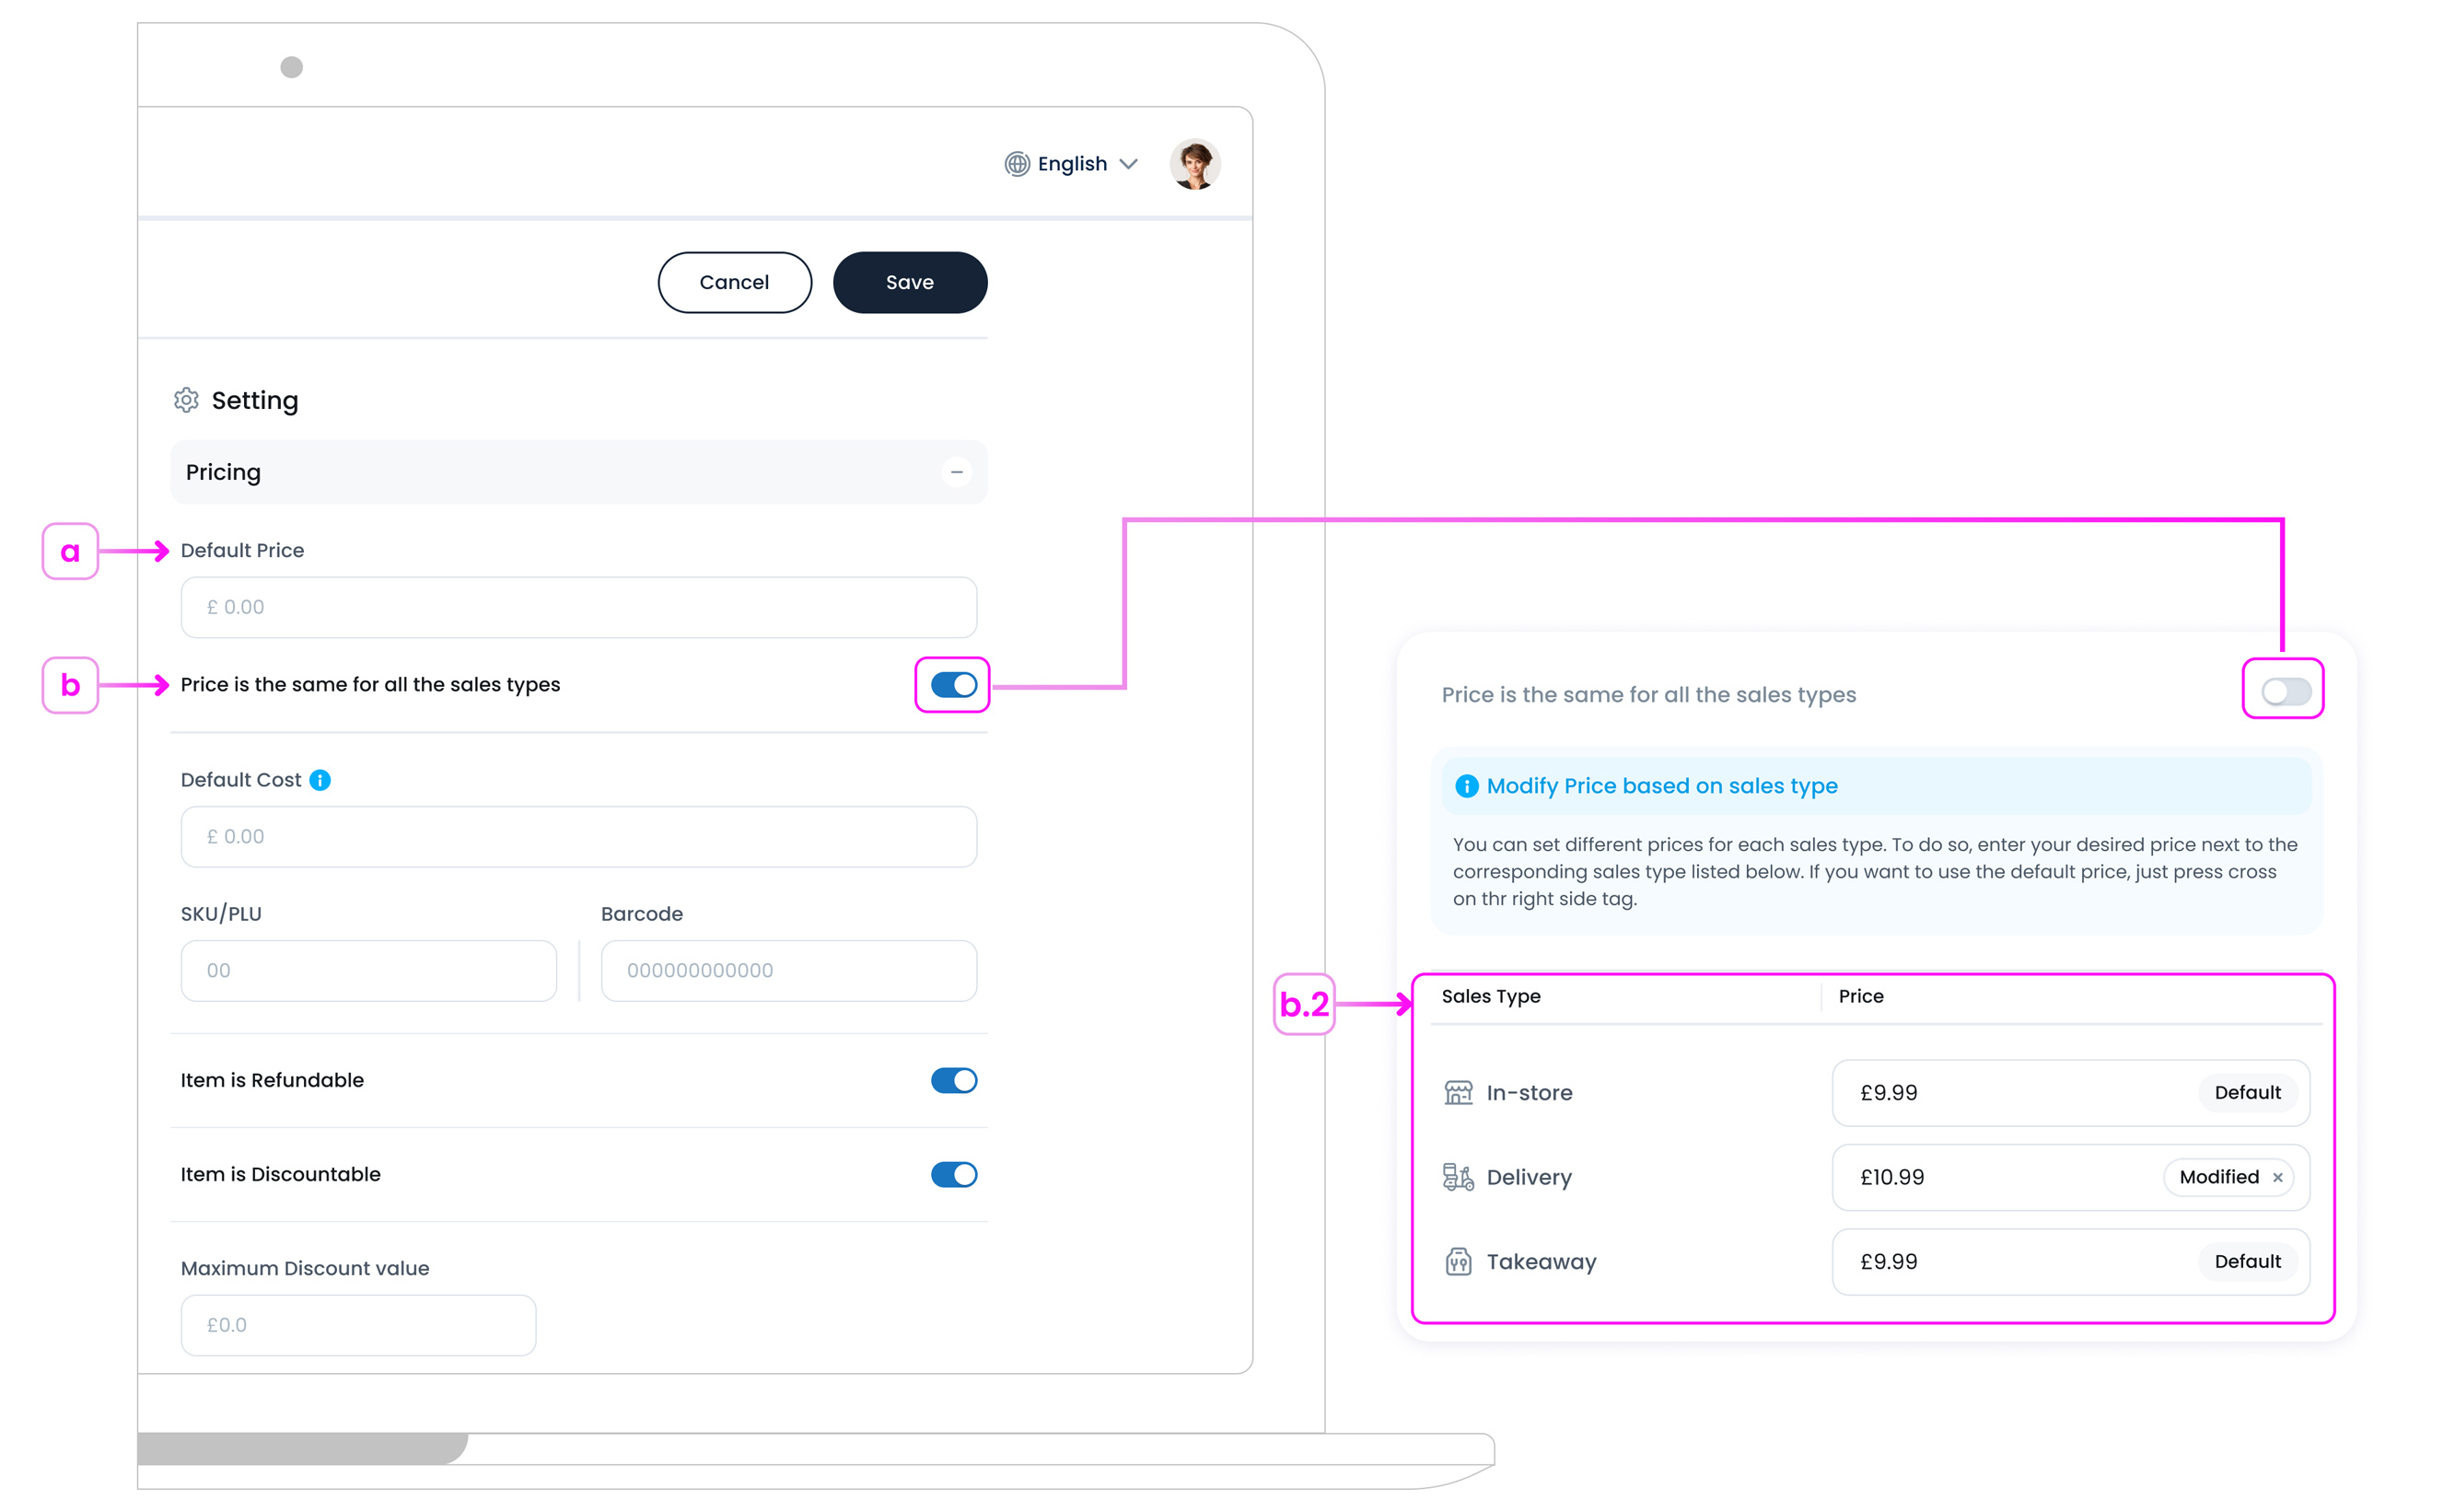
a. Default Price:
This is the base selling price of the item, used unless sales type-specific prices are applied.
b. Price is the same for all the sales types:
Toggle ON to use one price across all channels (e.g., In-Store, Delivery, Takeaway).
Toggle OFF to assign different prices for each sales type using the table below.
b.2 Sales Type Pricing Table:
Set specific prices next to each sales type (e.g., £5.00 for In-Store, £6.00 for Delivery).
If no custom price is set, the Default price is applied.
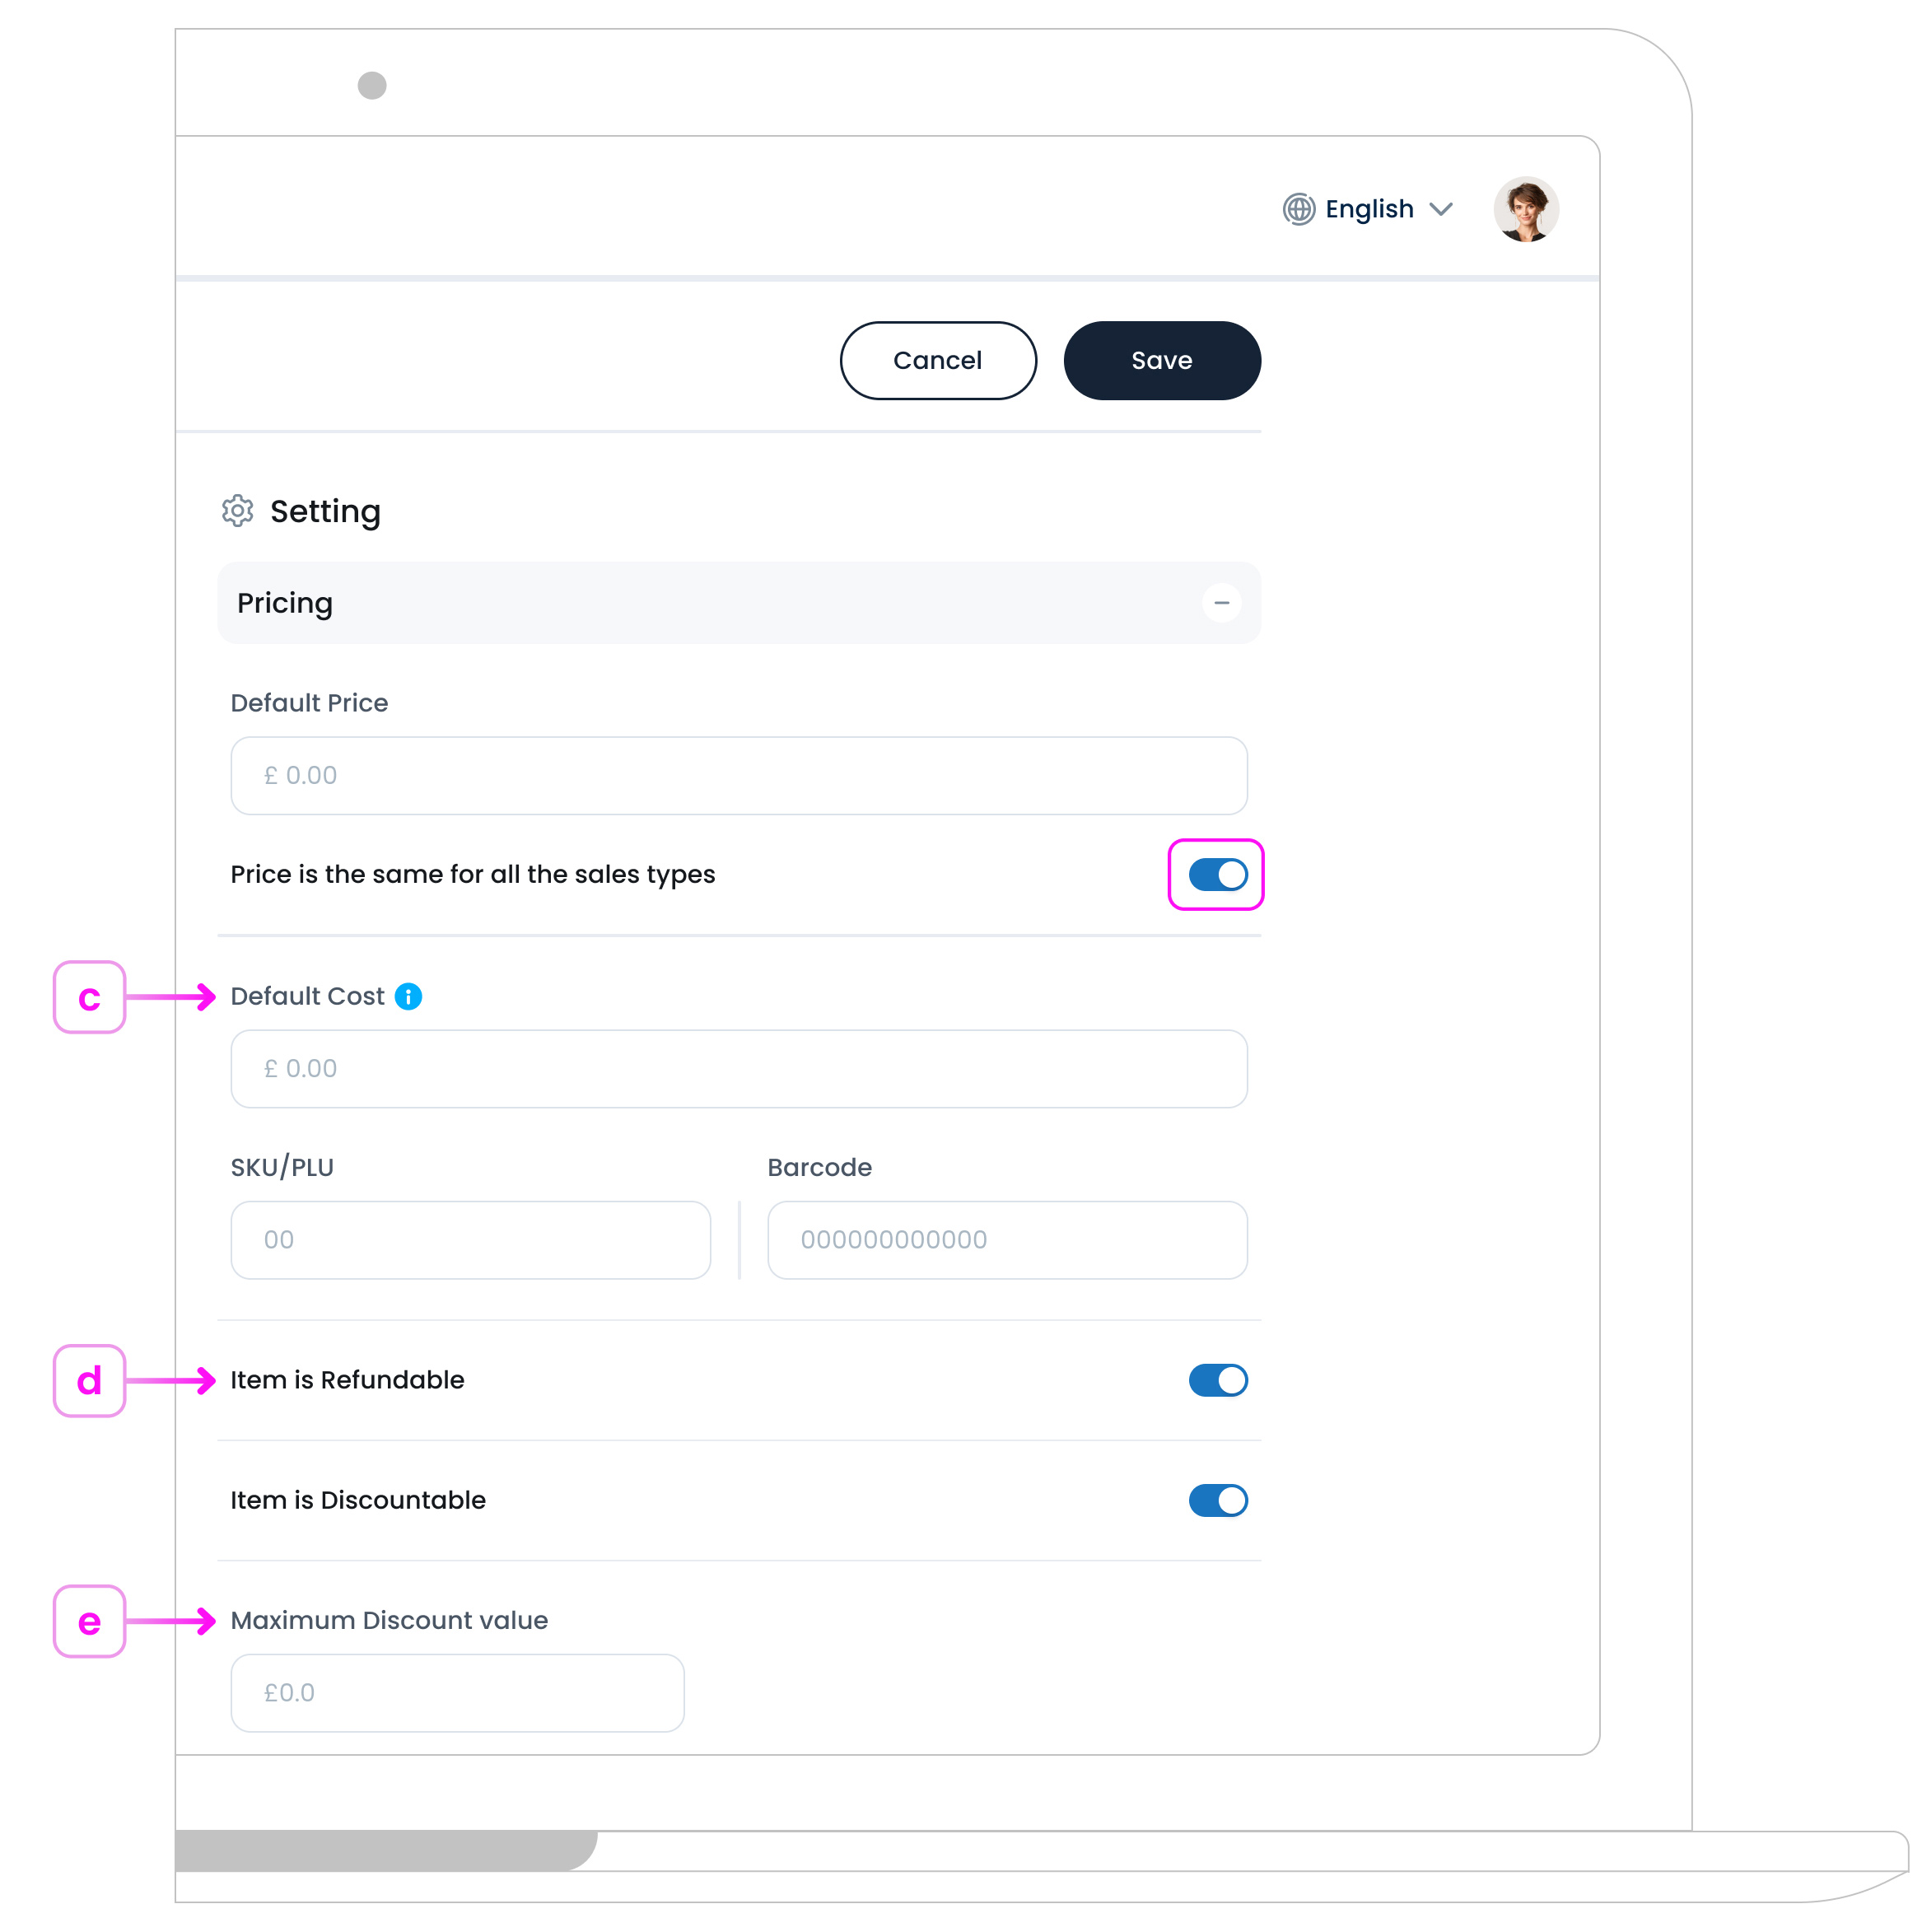
c. Default Cost:
Internal cost for tracking profit margins and reports. This won’t be visible to customers.
d. Item is Refundable / Discountable:
Toggle ON if this item can be refunded or included in a discount.
e. Maximum Discount Value:
Optionally enter the highest discount allowed for this item.
Step 6: Modifiers
This section lets you connect modifier groups to an item (for example, milk types, toppings, or sizes), so customers can customise their orders.
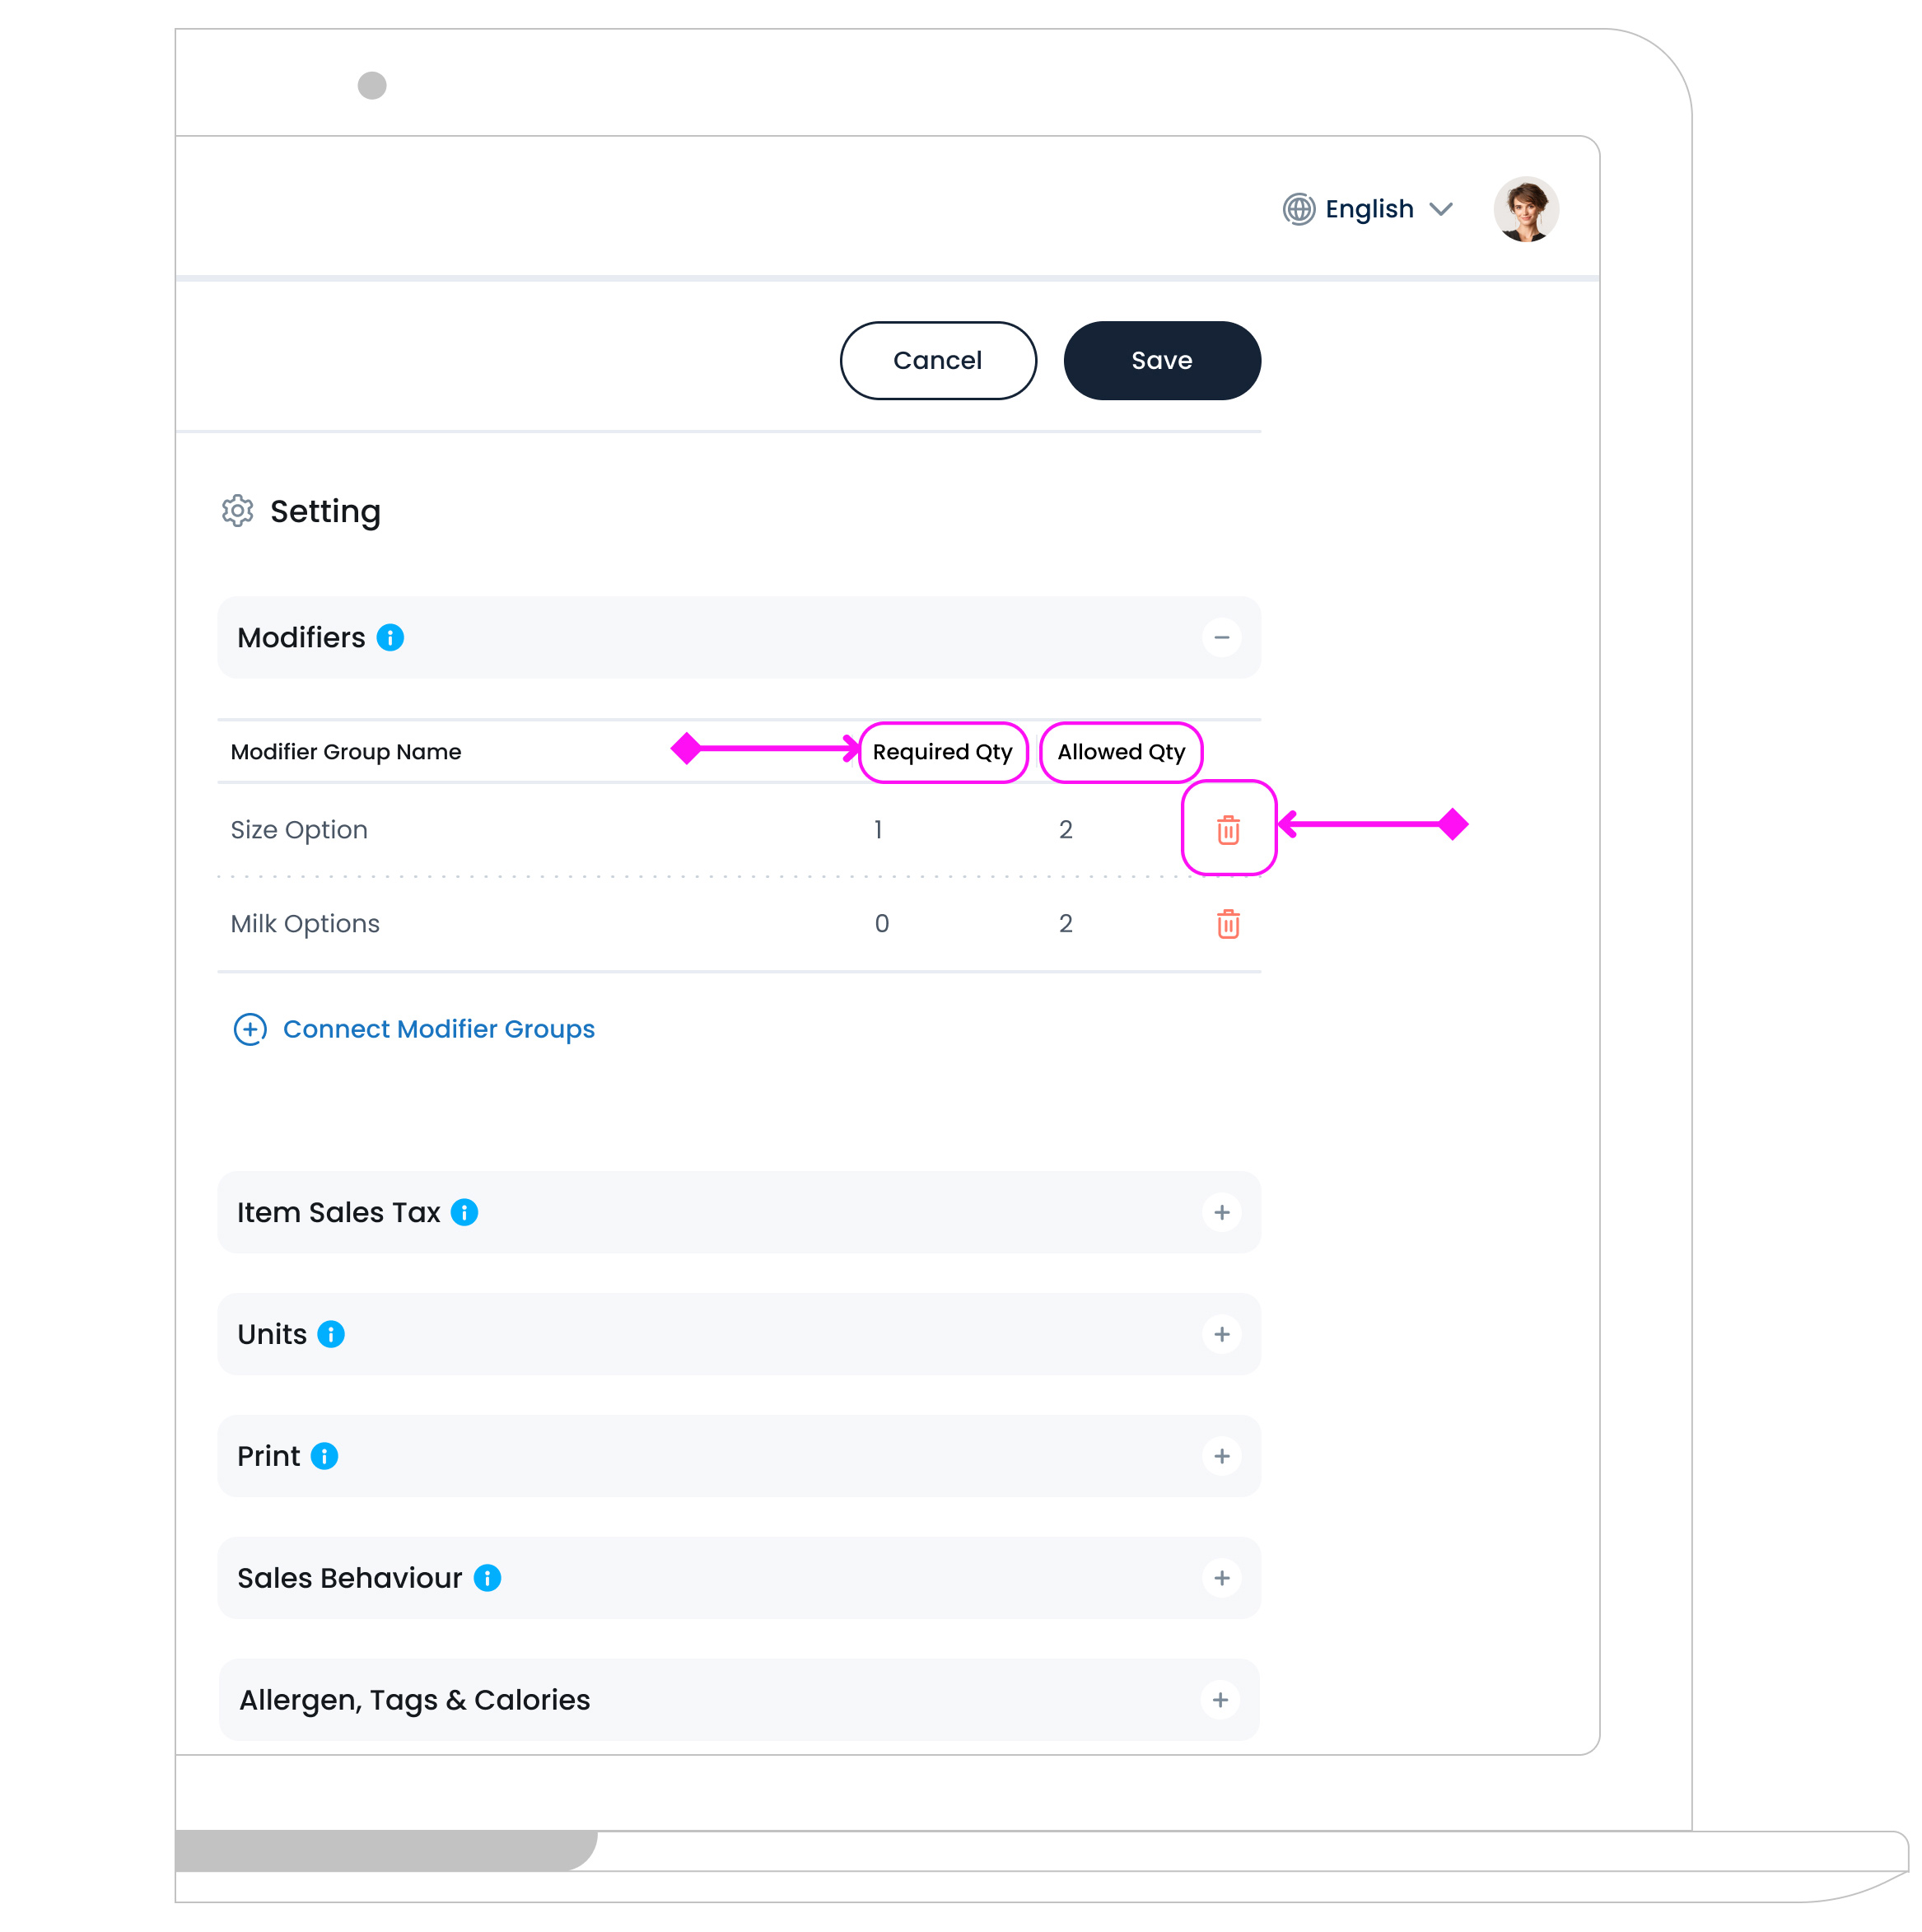
Once a group is connected, it shows up in a table with:
- Modifier Group Name: The name of the modifier group.
- Required Qty: Minimum number of selections the customer must make. Minimum 0 means the modifier is optional.
- Allowed Qty: Maximum number of selections allowed. Maximum 1 means only one option can be selected.
- Delete a Modifier Group: To delete a modifier group, click the Delete icon
 at the end of its row.
- Connect Modifier Groups: Click this button to browse and select existing modifier groups.
Pro tip:
You can reuse the same group across multiple items.
This setup ensures customers are presented with the right customisation options when ordering the item.
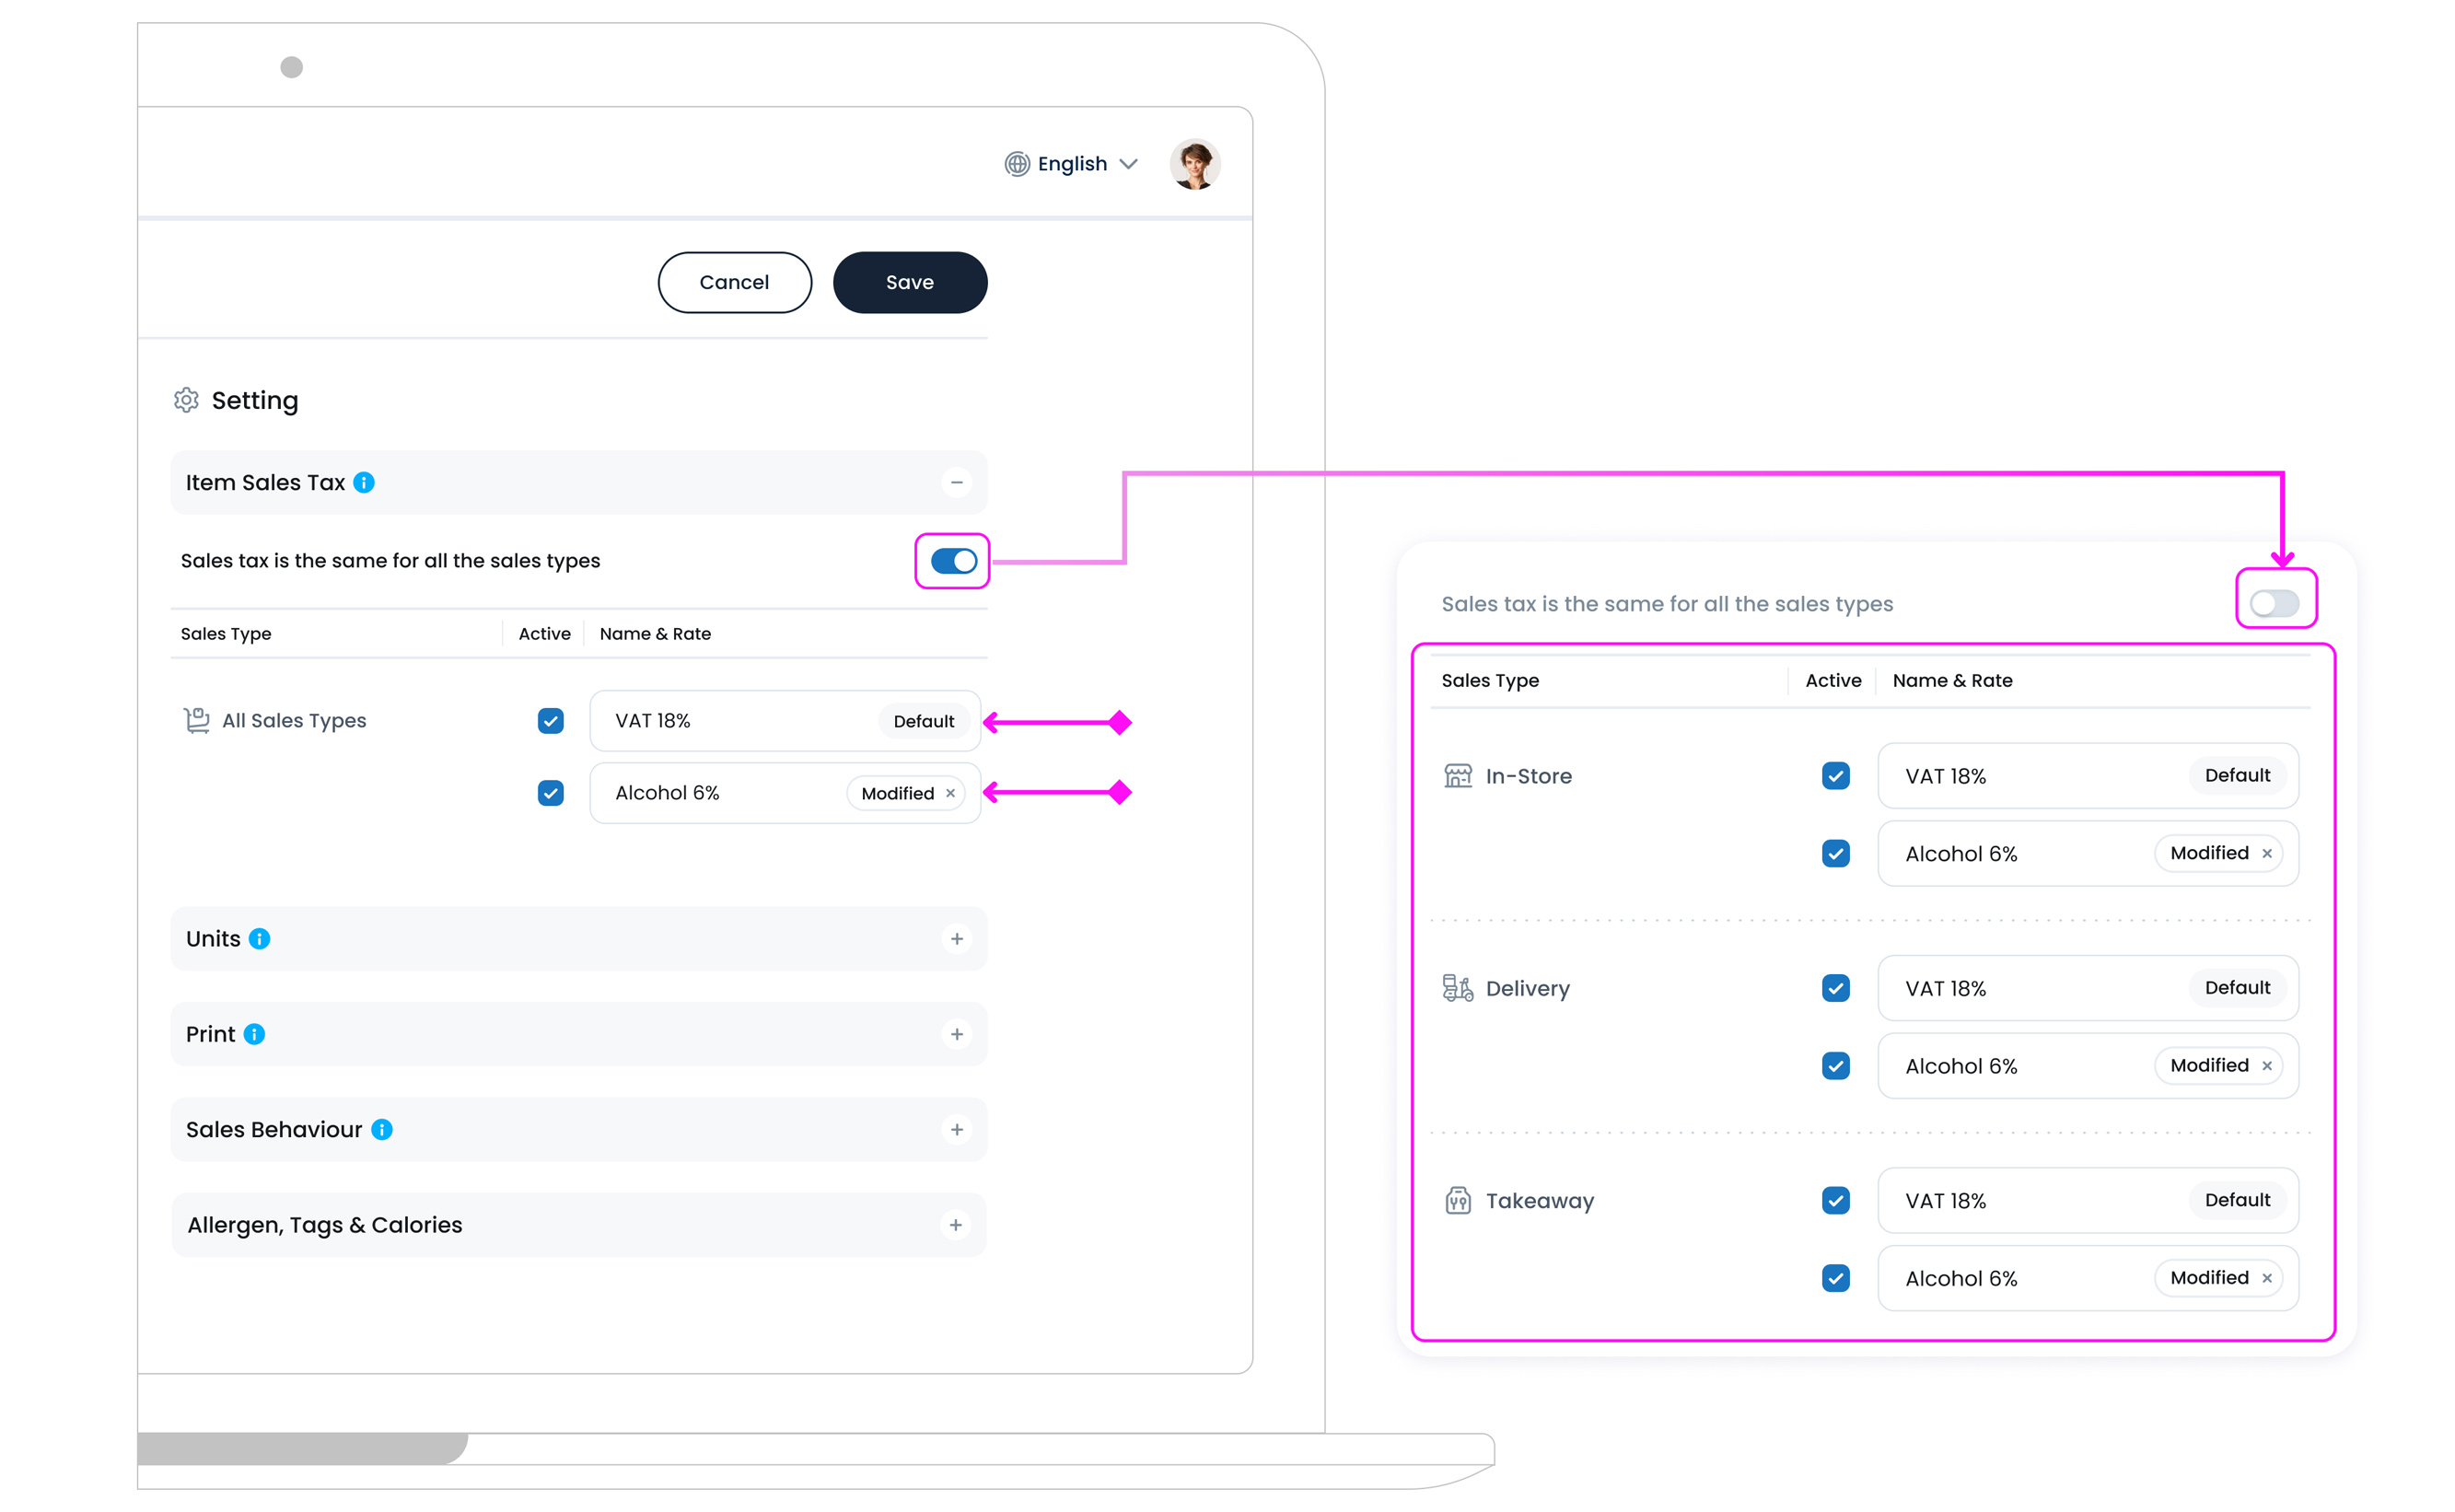
Step 7: Sales Tax
Choose the correct tax rate for this item.
Sales tax can be the same or different per sales type (e.g., In-Store, Delivery, Takeaway).
Step 8: Units
The Units section defines how your item is measured, tracked, and sold across different parts of your business (like inventory, purchasing, and sales).
Purchase & Inventory Units Formula
This lets you set up unit conversions so you can:
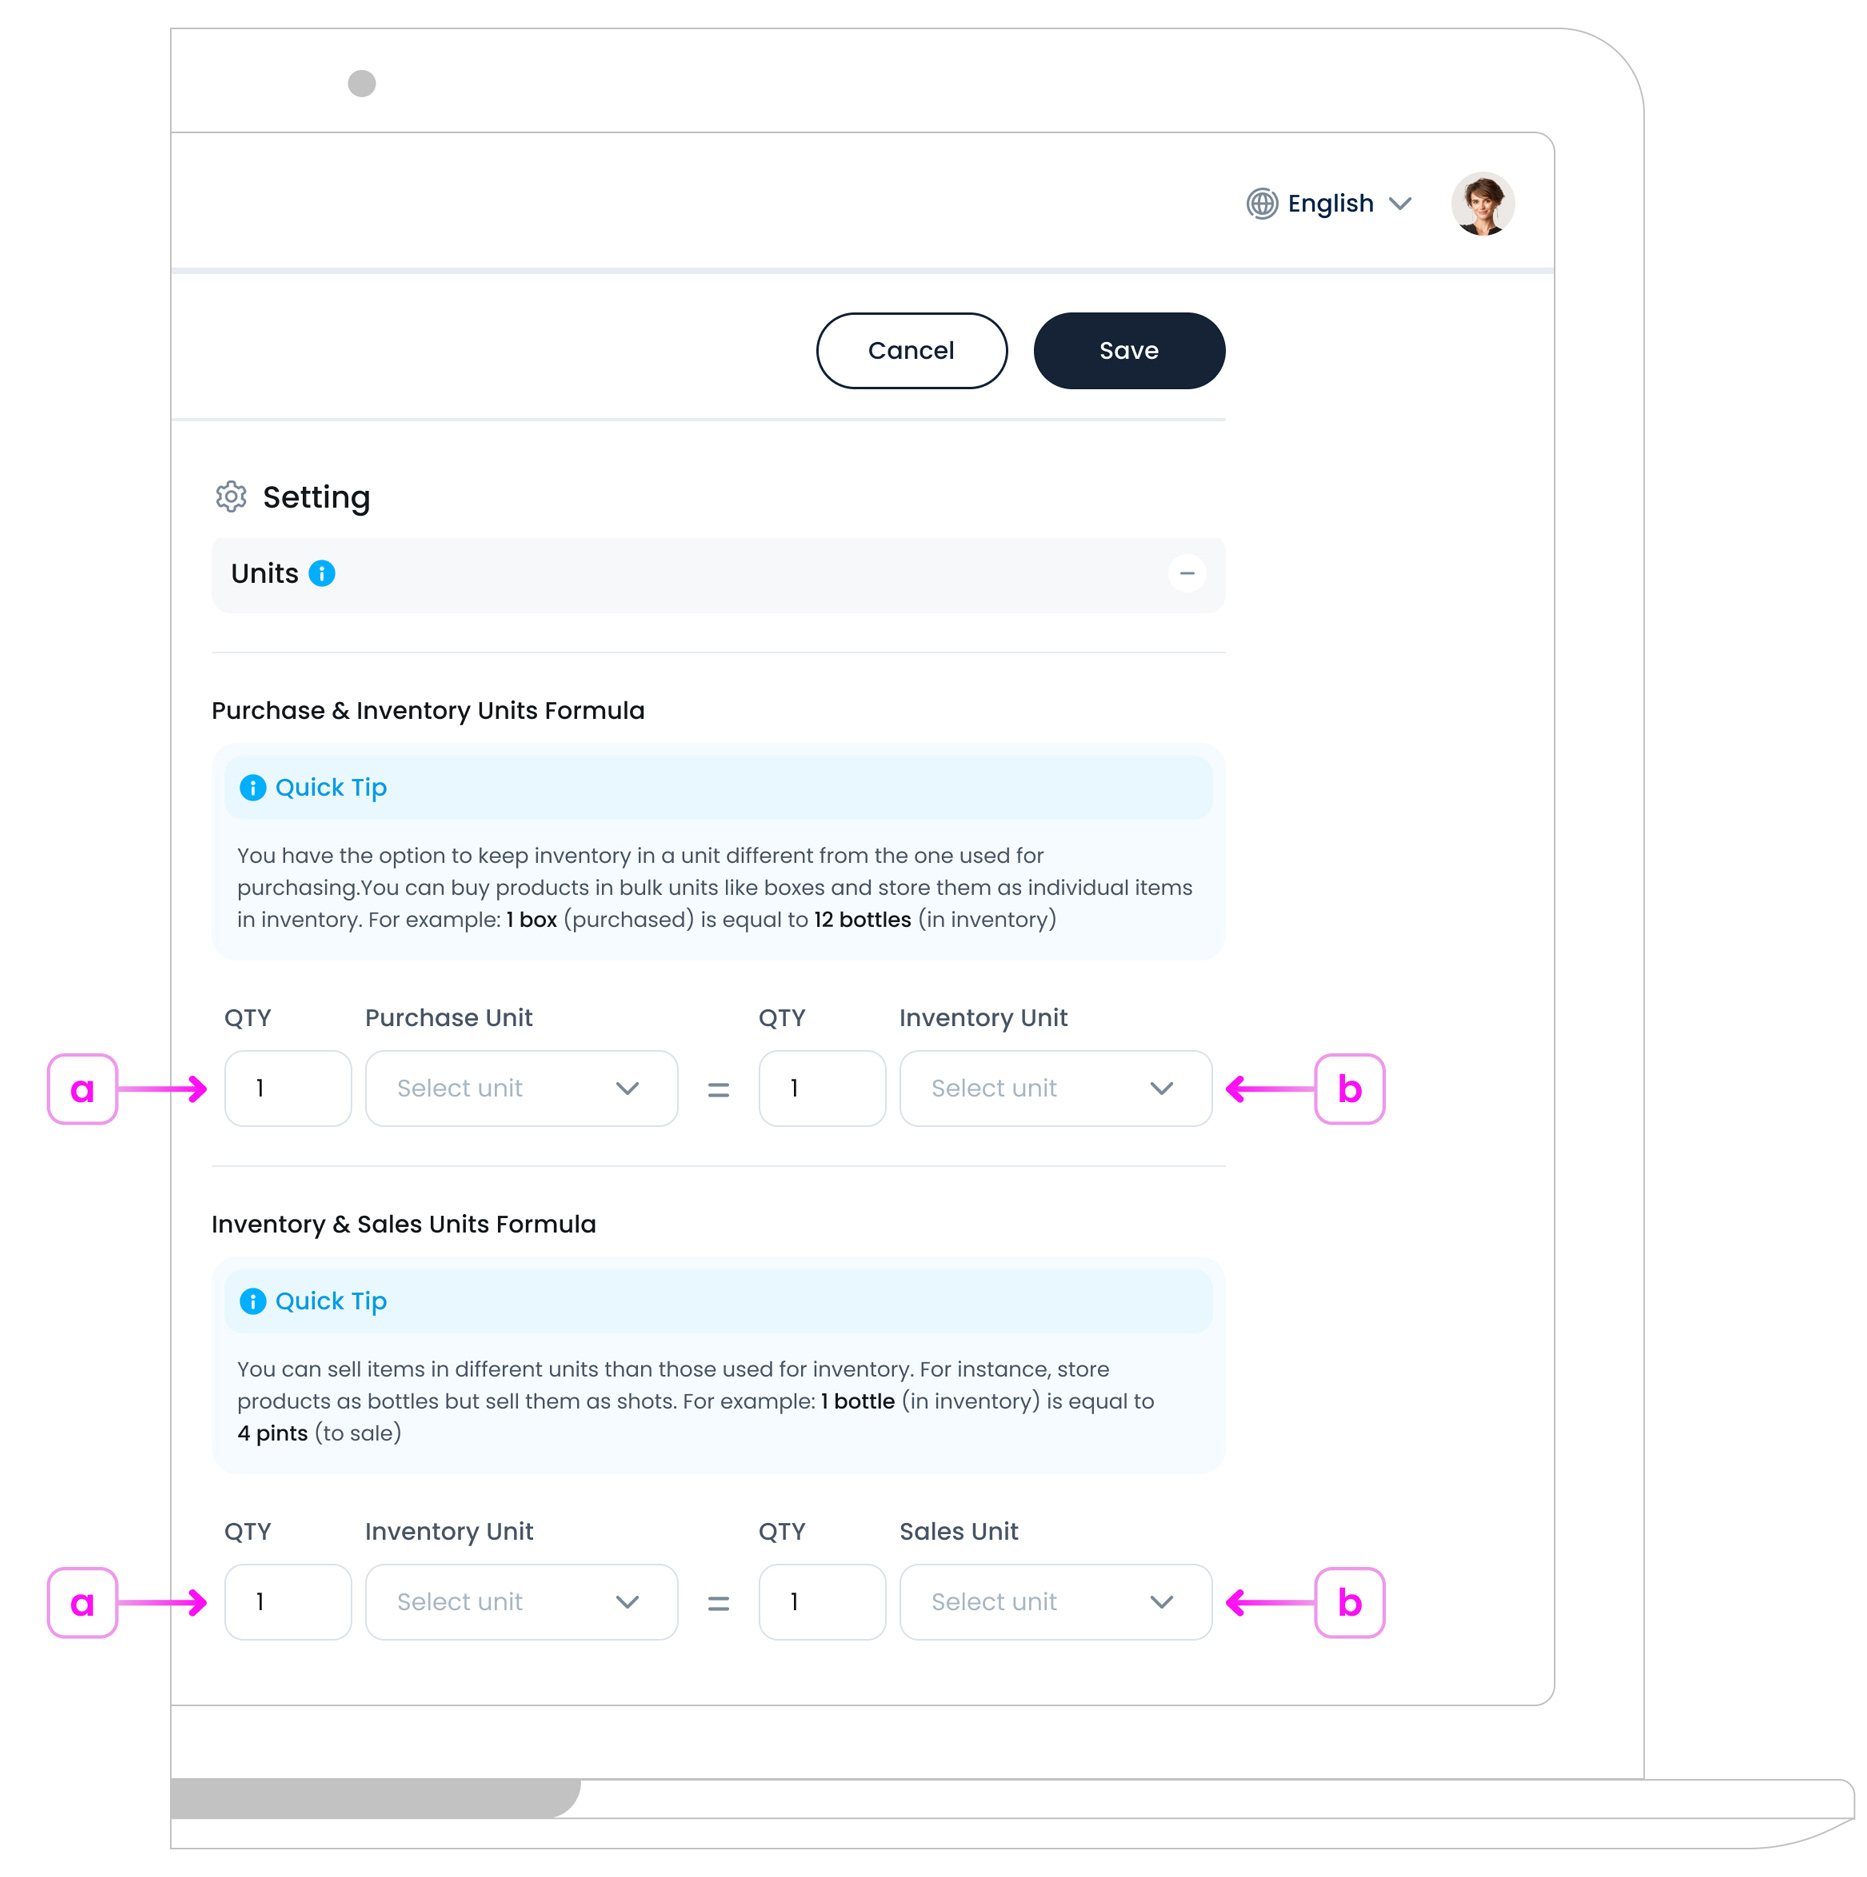
a. Purchase in one unit (e.g., box)
b. Track in another (e.g., bottle)
Examples:
1 Box (purchased) = 12 Bottles (inventory)
This is useful for bulk items where what you order isn’t the same as what you stock.
Unit Options
You can choose from a range of predefined units, including:
- Item (default single unit)
- Kilogram / Gram / Milligram
- Pound / Ounce
- Litre/ Millilitre
This setup is optional. If you skip it, the item will default to a standard “Item” unit across all areas.
Step 9: Print
Name on Receipt: Override item name shown on printed receipts (optional).
Step 10: Sales Behaviour
Fine-tune how this item behaves in transactions:
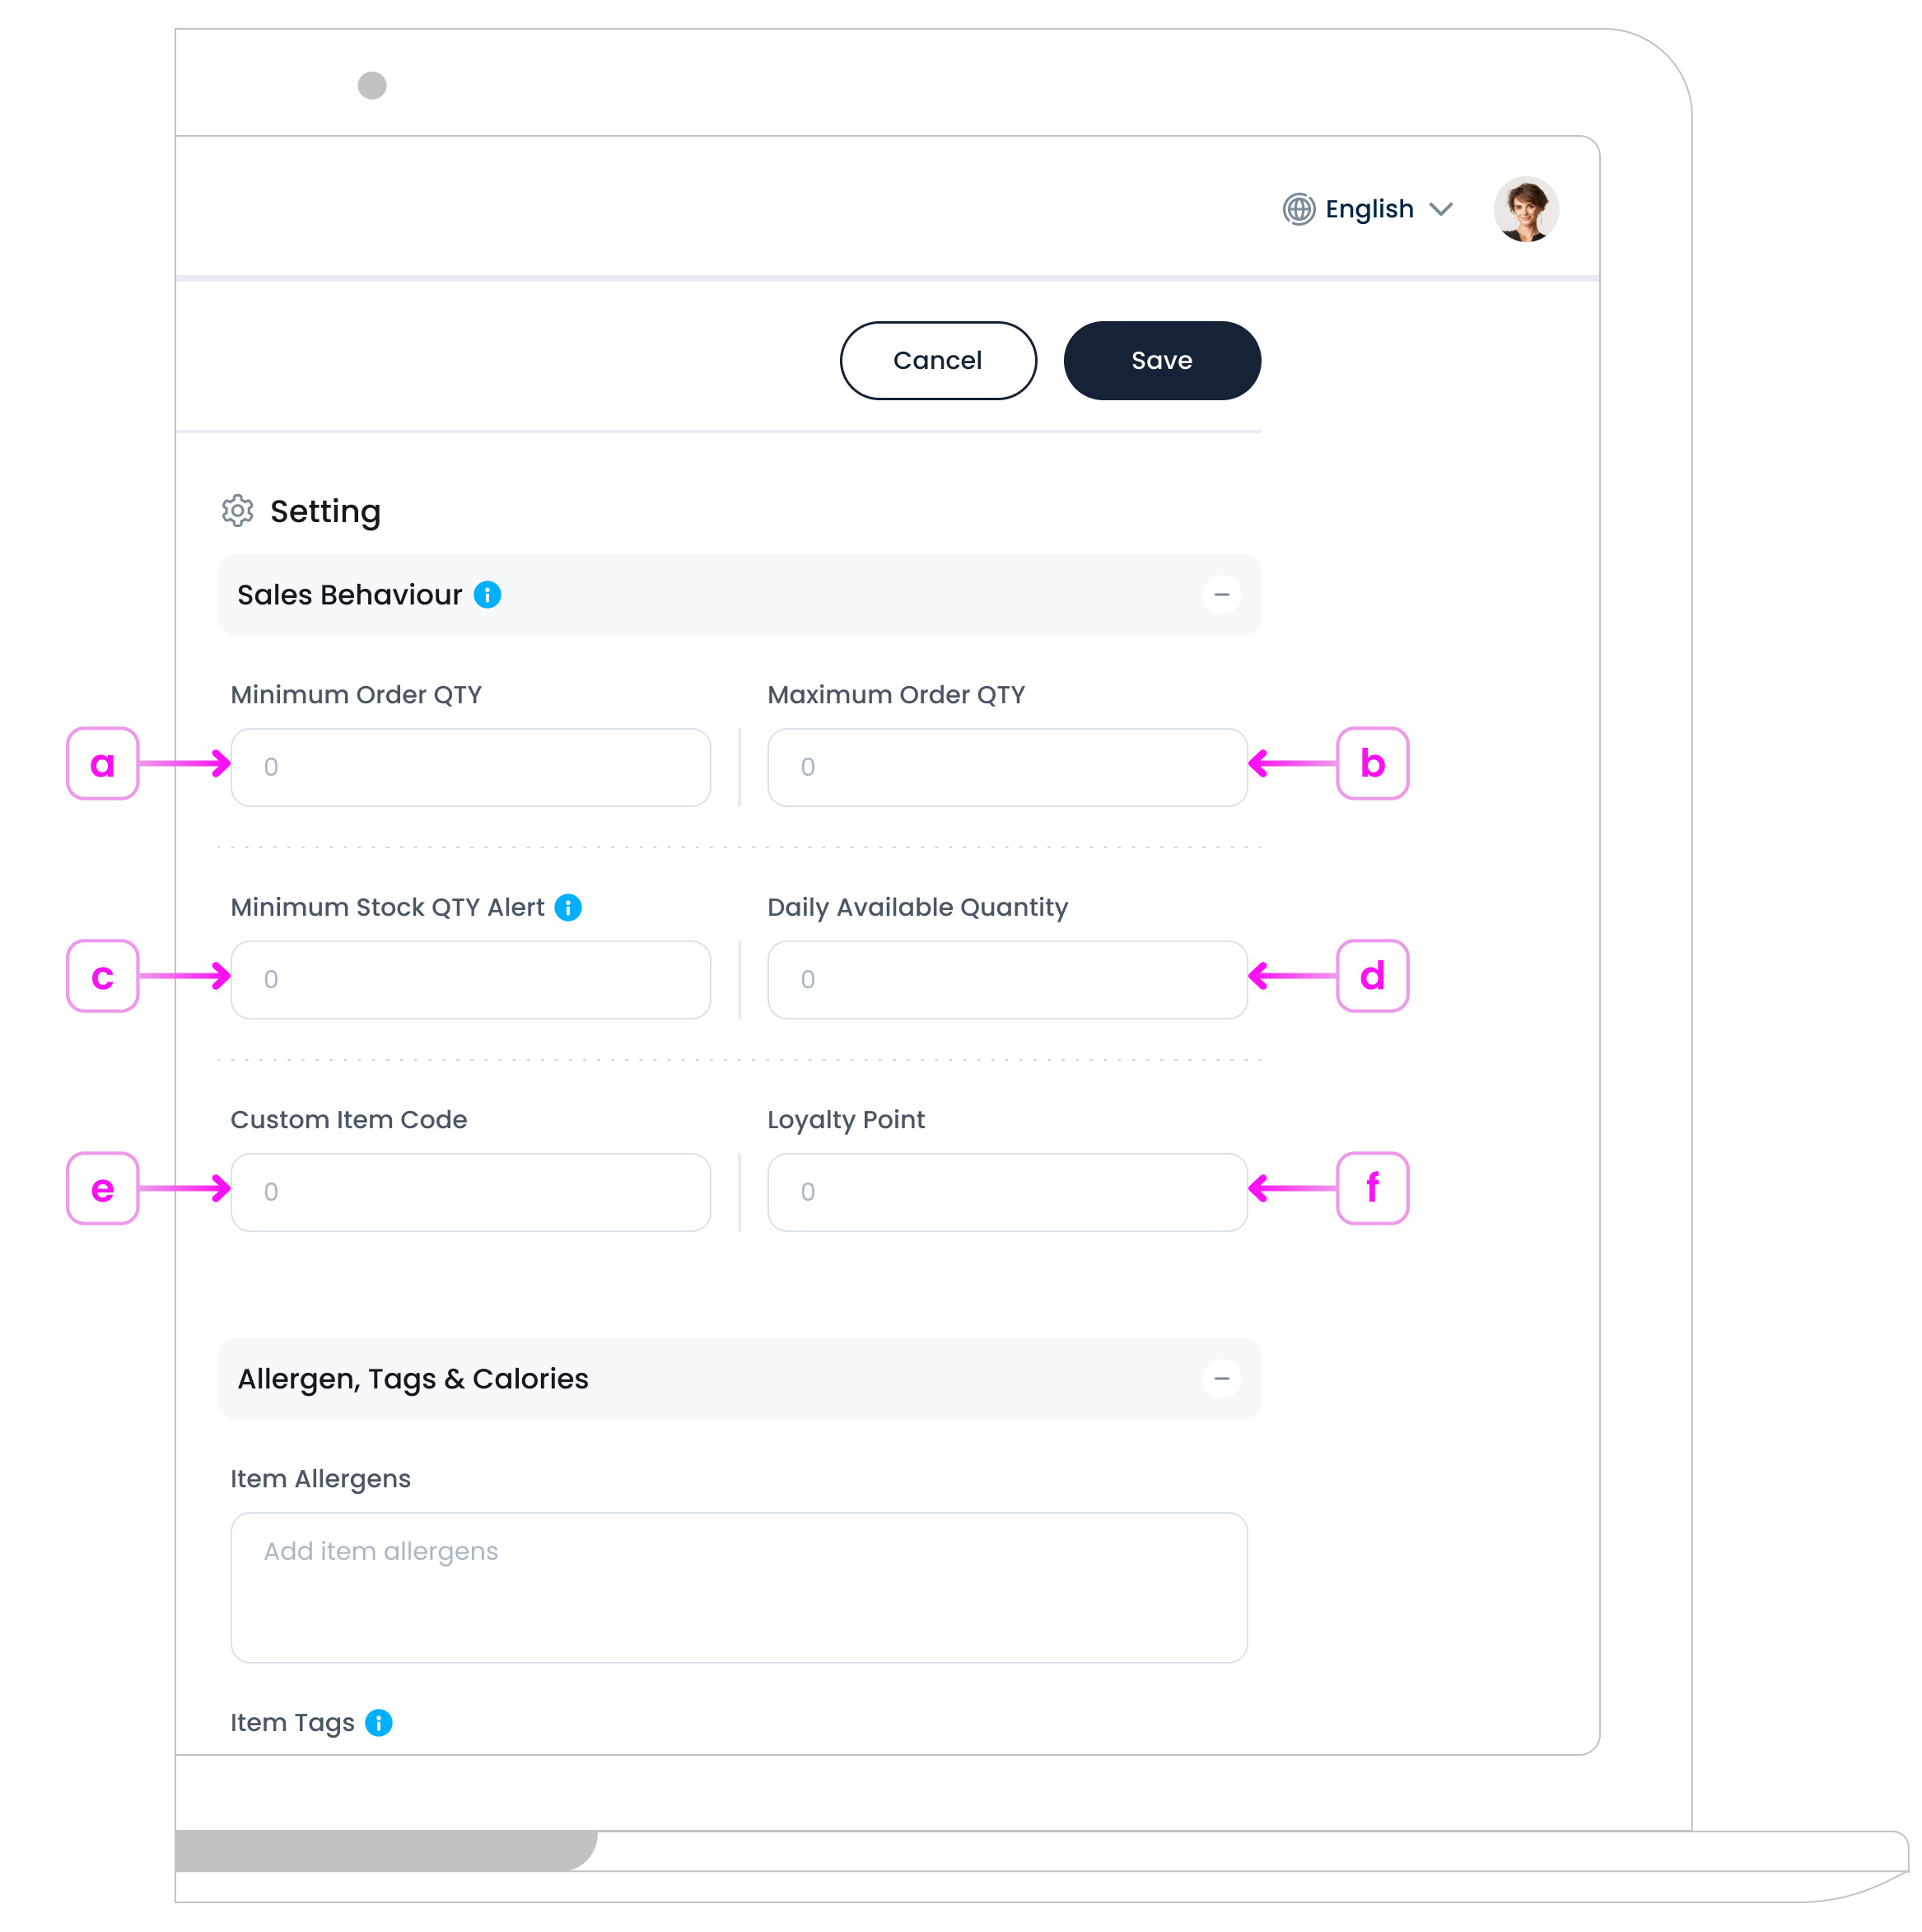
a. Minimum Order Quantity:
Leave at 0 for no restriction.
b. Maximum Order Quantity
Leave at 0 for no restriction.
c. Minimum Stock Alert
Enter the alert threshold for restocking.
d. Daily Available Quantity
Set a cap on how many can be sold daily
e. Custom Item Code
The Custom Item Code is a numeric-only identifier you can assign to each item. It helps staff quickly locate items during busy order-taking times.
How it works:
- You can enter any number (e.g. 101, 2003, 55).
- When using the POS, staff can type the number instead of scrolling or typing the full item name.
- It speeds up service and keeps things efficient, especially in high-traffic environments.
Note
Only numbers are allowed, no letters or special characters. Use a logical sequence that’s easy to remember.
Step 11: Allergen, Tags & Calories

a. Item Allergens
Add known allergens related to the item (e.g. Milk, Nuts, Gluten).
b. Item Tags
Tags improve search results and categorisation across your menus.
Example Tags:
Vegan, Popular, Spicy, New, Chef’s Special
c. Item Calories
Add calorie details per unit.
Example:
250 calories per item
This information will appear in customer-facing apps, helping users make safer food choices.
How to Edit an Item?
After creating an item, you can always go back and update its details.
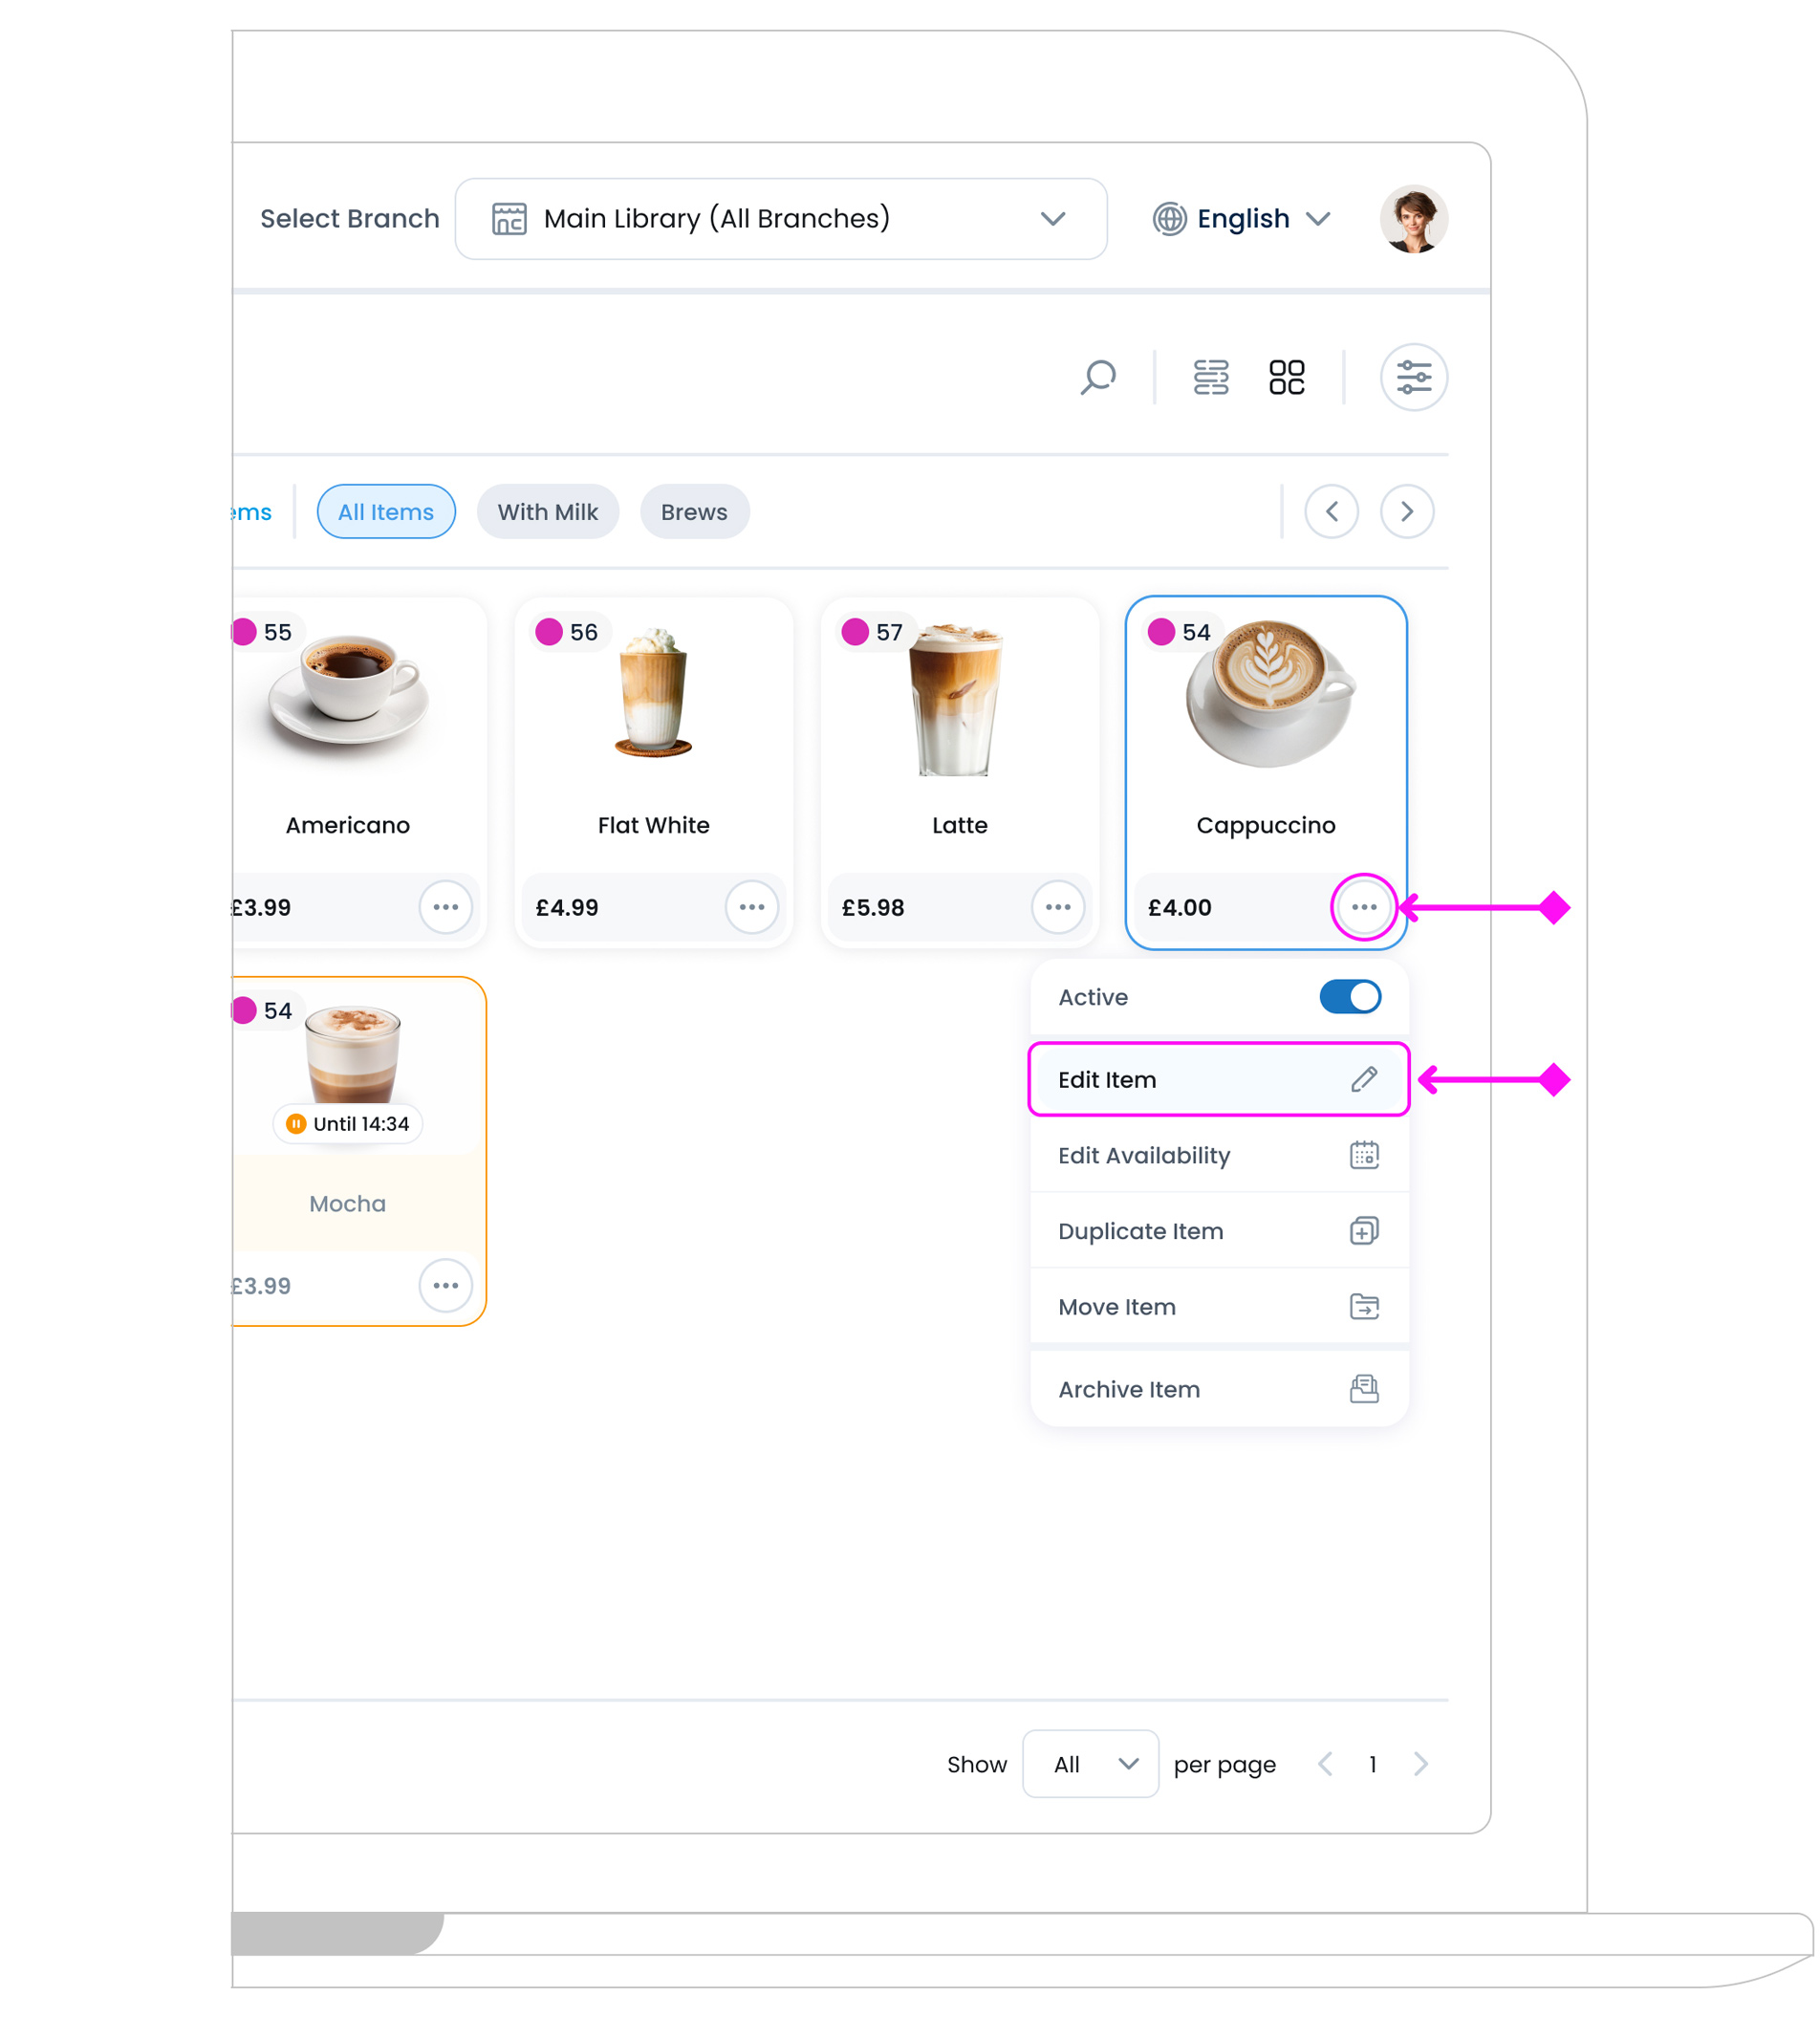
From the Item Library, hover over any item and click the three-dot menu ![]() on the card. Then select Edit Item. This will open the full item setup page, just like when you first created it.
on the card. Then select Edit Item. This will open the full item setup page, just like when you first created it.
Here, you can:
- Change the name, description, image, or category.
- Adjust pricing, tax, and availability.
- Modify settings like preparation time, unit types, or whether the item is refundable or discountable.
- Add or update connected modifier groups.
This lets you keep your inventory accurate as your menu or stock evolves.
What’s Next?
After creating an item, you can continue managing it from the Item Library. For the next step, explore how to Create a New Modifier Group to give your items customisation options.